Saltar al contenido principal

Esta versión puede contener ediciones incorrectas. Cambiar a la última instantánea verificada.

Qué necesitas

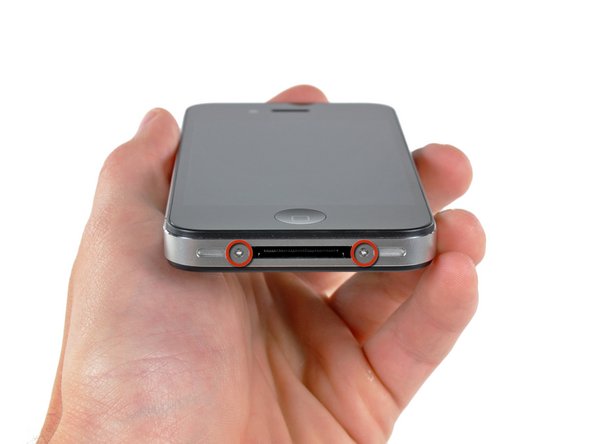
  1. , Cubierta trasera: paso 1, imagen 1 de 2 , Cubierta trasera: paso 1, imagen 2 de 2
    • Antes de desmontar tu iPhone, asegúrate de que este apagado.

    • La caja posterior de tu iPhone 4 puede fijarse bien con dos tornillos Phillips #000 o bien con tornillos Apple de 5-Puntos (segunda imagen). Comprueba cuáles tienes y asegúrate de que tienes el destornillador adecuado para retirarlos.

    • Retira los dos tornillos Pentalobe o Phillips #000 de 3.6 mm que están junto al conector para el cargador.

    • El Destornillador de 5-Puntos solo de ser utilizado una vez, ya que tiene la posibilidad de barrer los tornillos.

  2. : paso 2, imagen 1 de 2 : paso 2, imagen 2 de 2
    • Empuja el panel trasero hacia el borde superior del iPhone.

    • El panel se moverá cerca de 2mm.

  3. : paso 3, imagen 1 de 1
    • Pincha el panel trasero con tus dedos y levántalo del iPhone. Alternativamente, usa una Pequeña Ventosa de Succión.

    • Ten cuidado de no dañar los clips de plástico unidos al panel trasero.

    • Si estas instalando un nuevo panel trasero, asegúrate de remover el plástico protectivo del interior de los lentes de la cámara y el sticker de la gran área negra cerca de los lentes.

  4. , Batería: paso 4, imagen 1 de 1
    • Remueve el único tornillo de 2.5 mm Phillips que asegura el conector de la batería a la tarjeta lógica.

    • Algunos dispositivos tienen dos tornillos, uno que sostiene la almohadilla de contacto que esta localizado sobre el tornillo indicado en rojo en la foto.

  5. : paso 5, imagen 1 de 1
    • Usa una herramienta de plástico de apertura para gentilmente hacer palanca en el conector de la batería de su socket en la tarjeta lógica.

    • Haz palanca desde el superior e inferior del bracket del conector--no hay algo como un lado sobresaliente, y puedes dañar el conector.

    • Ten mucho cuidado de solo hacer palanca en el conector de la batería y no en el socket de la tarjeta lógica. SI haces palanca en el socket de la tarjeta lógica puedes romperlo por completo.

    • Remueve el clip de metal que cubre el conector de la antena.

  6. : paso 6, imagen 1 de 3 : paso 6, imagen 2 de 3 : paso 6, imagen 3 de 3
    • Usa la pestaña de plástico clara para levantar gentilmente la batería fuera del iPhone.

    • Si la pestaña se rompe antes que la batería este liberada, aplica unas gotas de alcohol isopropílico de alta concentración (90%) debajo del borde de la batería. Espera cerca de un minuto para que la solución de alcohol afloje el pegamento. Cuidadosamente desliza una esp´átula debjo de la pestaña de la batería para soltar el adhesivo.

    • Hacer palanca en otros lugares puede causar daño. No trates de levantar la batería haciendo fuerza. Si es necesario, aplica más gotas de alcohol para aflojar más el adhesivo. Nunca deformes o pinches la batería con tu herramienta de palanqueo.

    • Si hay solución de alcohol restante en el teléfono, límpialo cuidadosamente o permite que se seque antes de instalar la batería nueva.

    • Si tu batería de reemplazo viene en una funda de plástico, remuévela antes de instalarla jalándola desde el cable plano.

    • Antes de reconectar el conector de la batería, asegúrate que el clip de contacto (mostrado en rojo) este propiamente posicionado a lado del conector de la batería.

    • Antes de reensamblar, limpia los puntos de contacto metal-con-metal con un des-engrasante como windex. El aceite de tus dedos tiene el potencial de causar problemas de interferencia inalámbrica.

    • Realiza un hard reset después del reensamble. Esto previene varios problemas y simplifica la resolución de problemas.

  7. Este paso está sin traducir. Ayuda a traducirlo

    : paso 7, imagen 1 de 2 : paso 7, imagen 2 de 2
    • Remove the following two screws:

    • One 1.2 mm Phillips

    • One 1.6 mm Phillips

    • Remove the thin steel dock connector cable cover from the iPhone.

    • Before reassembly, be sure to clean all metal-to-metal contact points on the dock connector cable cover with a de-greaser such as windex. The oils on your fingers have the potential to cause wireless interference issues.

  8. Este paso está sin traducir. Ayuda a traducirlo

    : paso 8, imagen 1 de 2 : paso 8, imagen 2 de 2
    • Use a plastic opening tool to gently pry the dock cable connector up off the logic board from both short ends of the connector.

  9. Este paso está sin traducir. Ayuda a traducirlo

    : paso 9, imagen 1 de 2 : paso 9, imagen 2 de 2
    • Carefully peel the dock ribbon cable off the logic board and the lower speaker enclosure.

    • Do not use excessive force to peel the dock ribbon cable off the logic board. Doing so may tear the cable.

  10. Este paso está sin traducir. Ayuda a traducirlo

    : paso 10, imagen 1 de 1
    • Use a plastic opening tool to pry the lower antenna connector up off its socket on the logic board.

  11. Este paso está sin traducir. Ayuda a traducirlo

    : paso 11, imagen 1 de 1
    • Remove the following screws securing the speaker enclosure assembly to the outer case:

    • One 1.9 mm Phillips screw

    • One 2.4 mm Phillips screw

  12. Este paso está sin traducir. Ayuda a traducirlo

    : paso 12, imagen 1 de 3 : paso 12, imagen 2 de 3 : paso 12, imagen 3 de 3
    • Use a plastic opening tool to lift the speaker enclosure assembly out of the case, being sure not to damage the EMI fingers on the attached Wi-Fi antenna.

    • Remove the speaker enclosure assembly.

    • Before reinstalling the speaker enclosure assembly's screws, be sure the Wi-Fi grounding fingers are installed below the lip in the iPhone's metal case as seen in the third picture.

    • Before reassembly, be sure to clean all metal-to-metal contact points between the grounding fingers of the Wi-Fi antenna and the case of the iPhone with a de-greaser such as windex or isopropyl alcohol. The oils on your fingers have the potential to cause wireless interference issues.

  13. Este paso está sin traducir. Ayuda a traducirlo

    : paso 13, imagen 1 de 1
    • Use the edge of a plastic opening tool to carefully peel the bottom edge of the dock connector assembly off the adhesive securing it to the rear case.

  14. Este paso está sin traducir. Ayuda a traducirlo

    : paso 14, imagen 1 de 1
    • Remove the two 1.3 mm Phillips screws securing the dock connector to the rear case.

  15. Este paso está sin traducir. Ayuda a traducirlo

    : paso 15, imagen 1 de 2 : paso 15, imagen 2 de 2
    • Use the tip of a spudger or your fingernail to flip up the home button ribbon cable retaining flap.

    • Be sure you are prying up on the retaining flap, not the socket itself. The retaining flap is the small flap on the charging port side of the cable retainer. It should flip up 90º.

    • Use a pair of tweezers to gently pull the home button ribbon cable out of its socket. Note its position for reinsertion.

    • Do not excessively strain the home button ribbon cable as you remove it, as it is very thin and fragile.

  16. Este paso está sin traducir. Ayuda a traducirlo

    : paso 16, imagen 1 de 2 : paso 16, imagen 2 de 2
    • Use the flat edge of a spudger to carefully peel the left edge of the dock connector assembly and its ribbon cable off the adhesive securing it to the rear case.

    • Pry the right edge of the dock connector off the rear case.

  17. Este paso está sin traducir. Ayuda a traducirlo

    : paso 17, imagen 1 de 1
    • Use the flat edge of a spudger to push the lower microphone away from the bottom edge of the iPhone.

    • Note the folding of the cable and the positioning of the rubber microphone cover for reassembly.

  18. Este paso está sin traducir. Ayuda a traducirlo

    : paso 18, imagen 1 de 1
    • Remove the dock connector assembly from the iPhone, minding any cables that may get caught.

  19. Este paso está sin traducir. Ayuda a traducirlo

    : paso 19, imagen 1 de 1
    • Slide the rubber cover off the microphone attached to the old dock connector and transfer it to your new dock connector.

    • The ribbon is very fragile and can easily be torn when placing the rubber cover onto your new part.

    • If your microphone does not work after replacing your dock connector, the issue may be that the rubber cover is not positioned properly on the mic cable.

Linea de Meta

503 personas más completaron esta guía.

Documentos Adjuntos

26 comentarios

I found a cool iPhone 4 universal dock adapter that may help protect the connector from being damaged in the first place. It is called the LCYO Adapter (http://www.synthecept.com) and lets you dock the phone without removing the case. Just a thought, like I said it might help avoid a damaged connector!

B King - Contestar

I successfully did this, however now my mic is not working unless I am on speaker or using my headphones... anyone else have this problem?

thanks,

D

Dimitri - Contestar

I had two different little pieces of plastic on my replacement on the mic that I needed to peel off. You may have left some on. Not the easiest to check, but a possibility.

pyroguysf -

I had the same problem - nonfunctioning lower mic upon reassembly after replacing dock connector. Took it apart again, removed and reinstalled the dock connector paying special attention to the mic. Still no luck upon reassembly the second time. Any ideas? Bad/damaged mic?

rrussellsmith -

Removing the logic board seems to be unnecessary. I was able to replace the dock connector by simply removing the speakers and battery.

Also, it'd be nice if the dock connector came with a new moisture sensor.
ryebread02 - Contestar

Agregar Comentario

Ver Estadísticas:

Ultimas 24 horas: 2

Ultimos 7 días: 23

Ultimos 30 días: 90

Todo El Tiempo: 647,876