Esta versión puede contener ediciones incorrectas. Cambiar a la última instantánea verificada.
Qué necesitas
-
-
Inserta una herramienta de expulsión de la tarjeta SIM o un clip en el orificio junto a la toma de auriculares.
-
Presiona el clip para papel hasta que salte la bandeja de la tarjeta SIM.
-
-
-
Inserta una herramienta de apertura de iPod en el espacio entre la cubierta de la antena y el marco frontal. La cuña de la herramienta debe apuntar hacia la cubierta de la antena. Deslice la herramienta alrededor de la esquina y hacia arriba hasta que llegue al soporte de metal.
-
Repita el mismo procedimiento en el otro lado del conector de la base.
-
-
Este paso está sin traducir. Ayuda a traducirlo
-
Remove the three Phillips #00 screws securing the rear panel to the iPhone.
-
-
Este paso está sin traducir. Ayuda a traducirlo
-
The small square hole is the location to insert the dental pick in the next step.
-
Insert the pointed end of a heavy-duty spudger into the space between the gray metal bar and the rear panel. Pry the panel up enough until you can get the tip of the iPod opening tool into the seam between the front bezel and rear panel.
-
-
-
Este paso está sin traducir. Ayuda a traducirlo
-
Start removing the rear panel on the side with the buttons.
-
Slide the dental pick completely into the square hole. You may need to wiggle the tool and apply a good amount of force to get it to go all the way.
-
-
Este paso está sin traducir. Ayuda a traducirlo
-
Pry up the rear panel by pulling the dental pick counterclockwise in a quick motion. Apply force perpendicular to the plane of the display assembly. You may be afraid to go fast, but going slowly is more likely to bend the case.
-
-
Este paso está sin traducir. Ayuda a traducirlo
-
Use a spudger to free the rear panel from the iPhone along the corner and top.
-
-
Este paso está sin traducir. Ayuda a traducirlo
-
Repeat the same procedure on the other side of the iPhone. Slide the dental pick completely into the square hole. You may need to wiggle the tool and apply a good amount of force to get it to go all the way.
-
-
Este paso está sin traducir. Ayuda a traducirlo
-
Pry up the rear panel by pulling the dental pick counterclockwise in a quick motion. Apply force perpendicular to the plane of the display assembly. You may be afraid to go fast, but going slowly is more likely to bend the case.
-
The rear panel is still attached to the iPhone by the headphone jack cable, so don't entirely remove the rear panel from the iPhone just yet.
-
-
Este paso está sin traducir. Ayuda a traducirlo
-
Use a spudger to disconnect the headphone jack cable from the logic board.
-
-
Este paso está sin traducir. Ayuda a traducirlo
-
Remove the two Phillips #00 screws securing the on/off switch to the rear panel.
-
-
Este paso está sin traducir. Ayuda a traducirlo
-
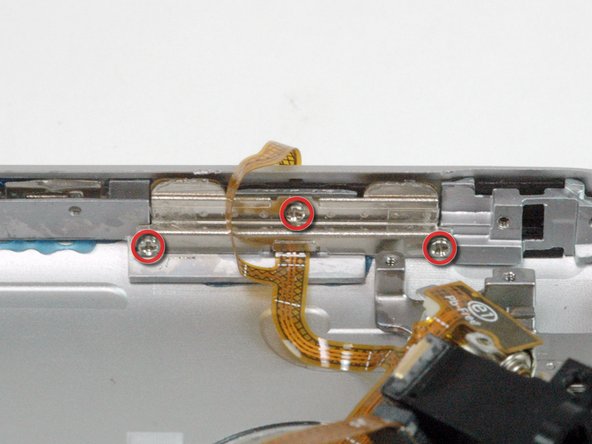
Remove the following 3 screws:
-
Two Phillips #00 screws securing the vibrator to the rear panel.
-
One larger head and longer Phillips #00 screw securing the headphone jack to the rear panel.
-
-
Este paso está sin traducir. Ayuda a traducirlo
-
Grasp the metal screw plate attached to the on/off switch and lift slightly up and away from the rear panel. The button should come with the cable.
-
Gently peel up the on/off switch ribbon cable. Be sure to pull near where the ribbon cable is glued to the rear panel.
-
-
Este paso está sin traducir. Ayuda a traducirlo
-
The headphone jack is slightly recessed into the rear panel. First slide the headphone jack away from its housing and then lift it up slightly (only 1/4 inch or 1/2 centimeter) so that it is no longer in the rear panel.
-
-
Este paso está sin traducir. Ayuda a traducirlo
-
Grasp the headphone jack at the tip and gently lift up, pulling the vibrator out of the rear panel.
-
-
Este paso está sin traducir. Ayuda a traducirlo
-
Remove the two Phillips #00 screws securing the silent/ring switch to the rear panel.
-
Pry off the metal backing with the screw holes and save for securing the replacement switch.
-
-
Este paso está sin traducir. Ayuda a traducirlo
-
Grasp the silent/ring switch and lift it up to reveal the screw beneath.
-
-
Este paso está sin traducir. Ayuda a traducirlo
-
Remove the three Phillips #00 screws securing the volume switch to the rear panel.
-
-
Este paso está sin traducir. Ayuda a traducirlo
-
Lift the headphone jack assembly out of the rear panel.
-


Cancelar: No complete esta guía.
52 personas más completaron esta guía.

2 comentarios
Keep in mind there is two different models - always check part number on actual flex - if you'll replace it with wrong one audio will work "other way around" - if you plug in headphones - speakers will start to work, if you unplug them speakers will not work.
I bought a iphone 2g off ebay and it has this problem.. :( Please is there anyway to fix it? There is 0 information on the internet about this problem.
Robert -