Saltar al contenido principal

iPad 4 CDMA Home Button Control Board Replacement

Sólo Prerrequisito
Esta guía solo debería usarse como prerrequisito para otras guías. Por tanto, estará incompleta.

Qué necesitas

  1. iPad 4 CDMA Home Button Control Board Replacement, Home Button Control Board: paso 1, imagen 1 de 2 iPad 4 CDMA Home Button Control Board Replacement, Home Button Control Board: paso 1, imagen 2 de 2
    • The two small notched trapezoidal strips will be used to attach the home button bracket to the front panel.

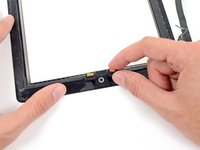
    • Carefully peel off the first trapezoidal adhesive strip with a pair of tweezers.

    • Using a pair of tweezers, place the first trapezoidal adhesive strip (minding its correct orientation) on the matching side of the home button mounting bracket.

    • Make sure to line up the profile of the strip with the edge of the mounting bracket.

    • Repeat the procedure for the second trapezoidal adhesive strip.

  2. iPad 4 CDMA Home Button Control Board Replacement: paso 2, imagen 1 de 1
    • Use a pair of tweezers to grasp the corner of one of the adhesive strips placed on the mounting bracket.

    • Lift and peel the clear backing up off the adhesive strip, revealing the black adhesive strip.

    • Repeat the procedure for the secondary adhesive strip.

  3. iPad 4 CDMA Home Button Control Board Replacement: paso 3, imagen 1 de 2 iPad 4 CDMA Home Button Control Board Replacement: paso 3, imagen 2 de 2
    • Gently place the home button mounting bracket on top of the home button.

    • Make sure the home button mounting bracket is lined up with the bottom of the digitizer.

Conclusión

To reassemble your device, follow these instructions in reverse order.

0 comentarios

Agregar Comentario

Ver Estadísticas:

Ultimas 24 horas: 0

Ultimos 7 días: 0

Ultimos 30 días: 0

Todo El Tiempo: 175