Saltar al contenido principal

WowWee MiP Robot LED Light Replacement

Qué necesitas

  1. WowWee MiP Robot LED Light Replacement, Battery: paso 1, imagen 1 de 2 WowWee MiP Robot LED Light Replacement, Battery: paso 1, imagen 2 de 2
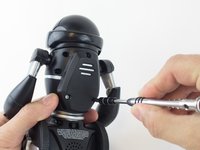
    • Remove the three 12.0 mm Phillips # 2 screws from the battery cover.

  2. WowWee MiP Robot LED Light Replacement: paso 2, imagen 1 de 2 WowWee MiP Robot LED Light Replacement: paso 2, imagen 2 de 2
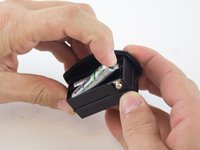
    • Carefully pull the battery pack from the robot.

    • Remove the batteries from the battery pack.

  3. WowWee MiP Robot LED Light Replacement, Wheel: paso 3, imagen 1 de 2 WowWee MiP Robot LED Light Replacement, Wheel: paso 3, imagen 2 de 2
    • Use a metal spudger to carefully pry off the hubcap without marring the plastic wheel or hubcap.

    • This plastic material is not replaceable. Any damage will be noticeable.

  4. WowWee MiP Robot LED Light Replacement: paso 4, imagen 1 de 2 WowWee MiP Robot LED Light Replacement: paso 4, imagen 2 de 2
    • Remove the 12.0 mm Phillips #2 screw.

    • Hold the wheel in place, or it will rotate as you attempt to remove the screw.

  5. WowWee MiP Robot LED Light Replacement: paso 5, imagen 1 de 1
    • Pull the wheel off of the square axle.

    • Do not use excessive force while removing the wheel. Pulling too hard on the wheel can damage the axle.

  6. WowWee MiP Robot LED Light Replacement, WowWee MiP Robot Body Disassembly: paso 6, imagen 1 de 2 WowWee MiP Robot LED Light Replacement, WowWee MiP Robot Body Disassembly: paso 6, imagen 2 de 2
    • Remove the eight 9.3 mm Phillips #1 screws from the back of the robot.

  7. WowWee MiP Robot LED Light Replacement: paso 7, imagen 1 de 3 WowWee MiP Robot LED Light Replacement: paso 7, imagen 2 de 3 WowWee MiP Robot LED Light Replacement: paso 7, imagen 3 de 3
    • Remove the arms from the body.

    • Carefully open the body compartment.

    • Open the compartment slowly. There are wires connecting the two body pieces together. If pulled too hard, the wires and/or the motherboard could be damaged.

  8. WowWee MiP Robot LED Light Replacement: paso 8, imagen 1 de 1
    • Using precision tweezers, disconnect the following three bundles of wires:

    • Connecting the battery pack to the motherboard.

    • Connecting the power switch to the motherboard.

    • Connecting the speaker to the motherboard.

  9. WowWee MiP Robot LED Light Replacement, LED Light: paso 9, imagen 1 de 2 WowWee MiP Robot LED Light Replacement, LED Light: paso 9, imagen 2 de 2
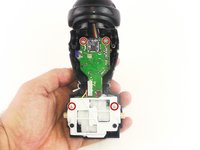
    • Remove the four 7.5mm Phillips #1 screws.

  10. WowWee MiP Robot LED Light Replacement: paso 10, imagen 1 de 2 WowWee MiP Robot LED Light Replacement: paso 10, imagen 2 de 2
    • Carefully pull the motor and motherboard assembly straight out from the base.

    • Be careful not to break the plastic rods that go through the motor assembly and are connect to the shell.

  11. WowWee MiP Robot LED Light Replacement: paso 11, imagen 1 de 1
    • Use the precision tweezers to unplug the bundle of wires.

  12. WowWee MiP Robot LED Light Replacement: paso 12, imagen 1 de 1
    • Slide the head back to separate it from the body.

    • The motherboard does not need to be separated from the head to replace the LED light.

  13. WowWee MiP Robot LED Light Replacement: paso 13, imagen 1 de 1
    • Remove the 7.5mm Phillips #1 screw.

    • The LED light is soldered to the small circuit board.

Conclusión

To reassemble your device, follow these instructions in reverse order.

Una persona más ha completado esta guía.

Courtney

Miembro Desde 02/04/16

236 Reputación

1 Guía escrita

Equipo

USF Tampa, Team 3-4, Wollert Spring 2016 Miembro de USF Tampa, Team 3-4, Wollert Spring 2016

USFT-WOLLERT-S16S3G4

4 Miembros

10 Guías creadas

0 comentarios

Agregar Comentario

Ver Estadísticas:

Ultimas 24 horas: 0

Ultimos 7 días: 2

Ultimos 30 días: 13

Todo El Tiempo: 603