Introducción
Un botón de jeans (también llamado tachuela) mantiene un par de jeans bien abrochado en la cintura.
Esta guía te mostrará cómo instalar un botón nuevo para jeans.
Lee toda la guía antes de comenzar la reparación y reúne las herramientas y los materiales necesarios. Si bien los materiales específicos de Patagonia son ideales, no son obligatorios. Las piezas de repuesto de Patagonia se pueden obtener llamando o enviando un mensaje de texto al Servicio al Cliente de Patagonia.
Alternativamente, los productos Patagonia se pueden llevar a una tienda minorista local para que evalúen la reparación o enviarlos a Patagonia a través de su servicio de reparación por correo.
¡Comencemos a repararlos!
¡ADVERTENCIA! Piezas pequeñas. Patagonia no recomienda realizar estas reparaciones en prendas destinadas a niños de 3 años o menos. En su lugar, recomendamos devolver el producto para que lo reparen profesionales.
Tutorial relacionado: Reemplazo de remaches en pantalones de trabajo
Qué necesitas
-
-
Reúne las piezas de repuesto (incluyendo un botón y una tachuela).
-
Coloca los vaqueros con el frente hacia arriba sobre una mesa resistente o banco de trabajo.
-
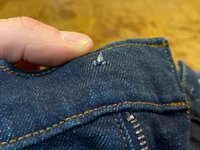
Abre la bragueta y busca el orificio en la cintura donde estaba el botón anterior.
-
Quita por completo los restos del botón anterior antes de colocar el nuevo. Desecha las piezas que has quitado de manera responsable.
-
-
-
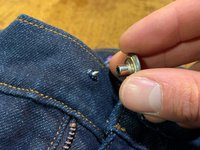
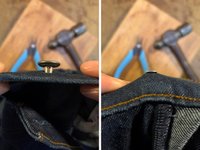
Inserta la tachuela en la parte posterior del orificio.
-
Empuja la tachuela en el orificio hasta que quede al ras de la pretina.
-
-
-
-
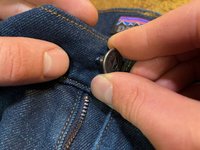
Sosteniendo la tachuela en su lugar desde atrás, coloca el botón encima de la tachuela y sostén las piezas en su lugar con los dedos.
-
-
-
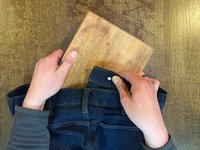
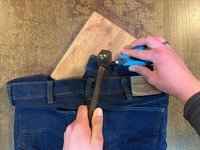
Dale la vuelta a los vaqueros y coloca una superficie de trabajo plana y suave directamente debajo del botón, como un trozo de madera o cuero blando.
-
Usa un par de alicates de punta fina para mantener la tachuela en su lugar, asegurándote de que la tachuela y las piezas del botón sigan alineadas.
-
Martillea la tachuela con un golpe directo hacia abajo.
-
-
-
Prueba el botón nuevo abrochando los jeans y tirando de la pretina para asegurarte de que esté fijado y seguro.
-


Cancelar: No complete esta guía.
48 personas más completaron esta guía.
Un agradecimiento especial a estos traductores:
100%


Estos traductores nos están ayudando a reparar el mundo! ¿Quieres contribuir?
Empezar a traducir ›


10 comentarios
Nice, but let's consider how this situation occurs. The tack comes out of its hole, just simply replacing it is not realistic, unless the new tack is significantly bigger. So how do you "repair" the hole such that it will hold a tack again?
As noted in step 2, you can move the tack over to where the denim isn't damaged. If that will cause the jeans not to fit properly, you can sew a folded piece of denim behind the hole (sew around the edges on the inside of the jeans) and punch the tack through the new piece.
I didn´t have a new button and was in a pinch. Just ripped the old button off completely, jammed it in the tail end of a hammer and yanked it apart with som pliers. Then i followed the instructions in this fix. Worked like a charm, so far...
Thanks I’m gonna try this first!
The best thing to do is patch the hole. I simply use fabric glue and some pieces of blue jeans that you probably have hanging around. Trim off the extra threads and then apply fabric glue to the back of the waist band covering the hole made by the old button. Do the same on the front and then let dry. about 30 minutes or so, if you have a machine I always stitch back and for on the edges. Trim any edges or use additional glue to tack them down. Now because you have strengthened the hole carefully push the back of the button through where you can see the end, add the front to the nail end and turning the garment face down on a protected hard surface hammer about 3 times and check to see if it is sturdy, continue to hammer until you have reached the objective. Now you have got many more years with that button.