Saltar al contenido principal

Sony Xperia XA2 Ultra Cameras Replacement

Qué necesitas

  1. Sony Xperia XA2 Ultra Cameras Replacement, Rear Cover: paso 1, imagen 1 de 2 Sony Xperia XA2 Ultra Cameras Replacement, Rear Cover: paso 1, imagen 2 de 2
    • Turn off your phone before continuing.

    • Remove the SIM card tray on the left side of the phone using a SIM card eject tool.

  2. Sony Xperia XA2 Ultra Cameras Replacement: paso 2, imagen 1 de 1
    • Heat the edge of the phone with the heat gun (recommended) for 30 seconds.

    • If you don't have a heat gun, a hair dryer can be used.

    • Use the hair dryer on the highest setting, constantly going around the phone to heat all of the edges.

    • The phone will become hot to the touch. Use gloves or a towel to touch the phone.

  3. Sony Xperia XA2 Ultra Cameras Replacement: paso 3, imagen 1 de 2 Sony Xperia XA2 Ultra Cameras Replacement: paso 3, imagen 2 de 2
    • Apply the suction handle near an edge of the phone and pull upwards while trying to get an opening large enough for an iFixit opening pick.

  4. Sony Xperia XA2 Ultra Cameras Replacement: paso 4, imagen 1 de 2 Sony Xperia XA2 Ultra Cameras Replacement: paso 4, imagen 2 de 2
    • Pry upwards with the pick to start pulling the rear cover off the adhesive it’s attached to.

    • Insert a second pick once there is enough room.

  5. Sony Xperia XA2 Ultra Cameras Replacement: paso 5, imagen 1 de 2 Sony Xperia XA2 Ultra Cameras Replacement: paso 5, imagen 2 de 2
    • Take one of the picks and try to slide it down the side of the phone, pulling more of the cover off the adhesive.

    • The iFixit opening tool may also be used to gain better leverage.

    • The rear cover will pop off.

  6. Sony Xperia XA2 Ultra Cameras Replacement: paso 6, imagen 1 de 1
    • Once the rear cover is off, use the iFixit opening tool to detach the flex cable.

  7. Sony Xperia XA2 Ultra Cameras Replacement, Motherboard Bracket: paso 7, imagen 1 de 2 Sony Xperia XA2 Ultra Cameras Replacement, Motherboard Bracket: paso 7, imagen 2 de 2
    • Remove the six 3 mm Phillips #000 screws.

  8. Sony Xperia XA2 Ultra Cameras Replacement: paso 8, imagen 1 de 1
    • Remove the motherboard bracket with an iFixit opening tool.

  9. Sony Xperia XA2 Ultra Cameras Replacement, Motherboard: paso 9, imagen 1 de 1
    • Using the Jimmy, remove the two antenna flex cables.

  10. Sony Xperia XA2 Ultra Cameras Replacement: paso 10, imagen 1 de 2 Sony Xperia XA2 Ultra Cameras Replacement: paso 10, imagen 2 de 2
    • Using the iFixit opening tool, pry and remove the motherboard.

  11. Sony Xperia XA2 Ultra Cameras Replacement, Cameras: paso 11, imagen 1 de 1
    Herramienta utilizada en este paso:
    Tweezers
    $4.99
    Comprar
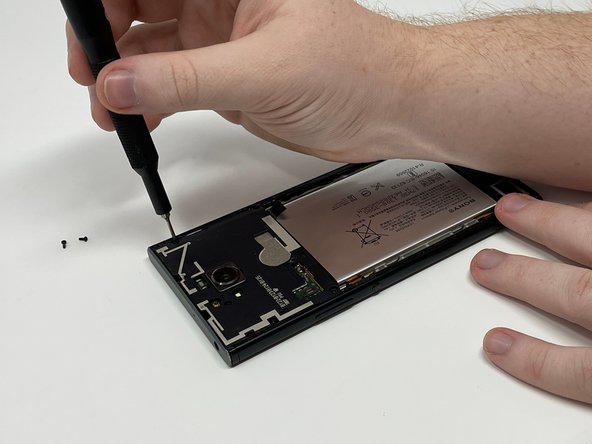
    • Use a pair of tweezers to remove the rear-facing camera.

    • Use a pair of tweezers to remove the magnetic tape covering the front-facing camera.

    • Use a pair of tweezers to remove the front-facing camera.

Conclusión

To reassemble your device, follow these instructions in reverse order.

Kristen Gismondi

Miembro Desde 11/12/14

82,698 Reputación

202 Guías creadas

Equipo

iFixit Miembro de iFixit

Staff

136 Miembros

17,430 Guías creadas

0 comentarios

Agregar Comentario

Ver Estadísticas:

Ultimas 24 horas: 0

Ultimos 7 días: 1

Ultimos 30 días: 2

Todo El Tiempo: 71