Saltar al contenido principal

Rug Doctor Handle Replacement

Sólo Prerrequisito
Esta guía solo debería usarse como prerrequisito para otras guías. Por tanto, estará incompleta.

Qué necesitas

  1. Rug Doctor Handle Replacement, Handle: paso 1, imagen 1 de 1
    • Before you begin disassembly, make sure that the Rug Doctor is not plugged in and that all reservoirs are empty of liquids.

    • Unclip the clear hose from the back of the Rug Doctor.

  2. Rug Doctor Handle Replacement: paso 2, imagen 1 de 2 Rug Doctor Handle Replacement: paso 2, imagen 2 de 2
    • Use a 7/16" (11 mm OK) wrench to hold the handle axle while you use a 7/16" socket to remove the cap nut securing the axle end.

  3. Rug Doctor Handle Replacement: paso 3, imagen 1 de 2 Rug Doctor Handle Replacement: paso 3, imagen 2 de 2
    • Support the handle with one hand. It will be loose after this step.

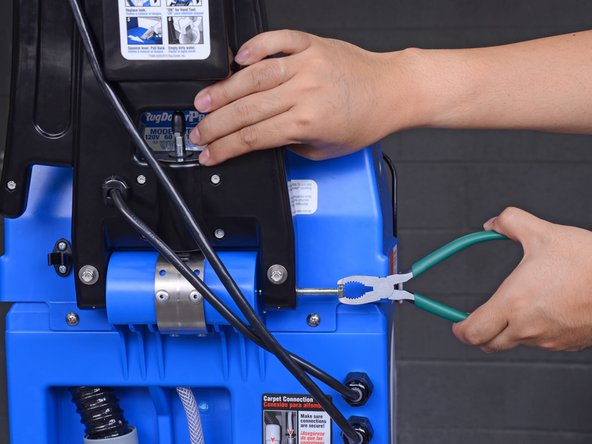
    • Use fingers or pliers to pull out the handle axle.

    • If the axle feels hard to pull out, squeeze the handle release lever to release pressure on the axle.

  4. Rug Doctor Handle Replacement: paso 4, imagen 1 de 1
    • Detach the handle from the Rug Doctor and set it down.

    • If you need more cable slack, you can set the Rug Doctor on its side.

Conclusión

To reassemble your device, follow these instructions in reverse order.

Arthur Shi

Miembro Desde 01/03/18

252,833 Reputación

526 Guías creadas

Equipo

iFixit Miembro de iFixit

Staff

135 Miembros

16,817 Guías creadas

0 comentarios

Agregar Comentario

Ver Estadísticas:

Ultimas 24 horas: 0

Ultimos 7 días: 0

Ultimos 30 días: 0

Todo El Tiempo: 28