Introducción
Tuve un Teclado Inalámbrico de Apple que venia con dos teclas que no funcionaban, Esto fue debido a que se daño por un derrame.
Es muy difícil desarmar este teclado sin destruirlo porque solo hay un tornillo sosteniendo la tarjeta lógica. Todo esta con pegamento o soldado Pero hay una manera de conseguirlo y repararlo para que pueda ser re-ensamblado sin marcas del exterior.
Qué necesitas
-
-
Empieza destornillando el compartimiento de la batería en el LHS del teclado y removiendo las dos pilas AA.
-
Después, gira el teclado boca abajo y localiza la cubierta de plástico. Aplique una presión de compresión firme hacia el interior de la cubierta y levántela lejos del teclado.
-
La carcasa se sostiene en lugar con seis clips, necesitarás usar una herramienta de plástico para forzarlo.
-
También necesitarás remover las teclas. Cada una de ellas. Y sus clips. Ve despacio y no jales las teclas. Usa tu herramienta de palanqueo para desabrocharlas de su clips.
-
-
-
Usando una herramienta de palanqueo o si prefieres tu uñas, levanta con cuidado la barra de bloqueo, soltando el cable plano de su conector en la tarjeta lógica.
-
El cable es delicado, así que si encuentras resistencias mientras lo desconectas, detente y asegúrate que el conector esta desbloqueado. No jales de lado o diagonalmente ya que puedes romper el cable.
-
Ahora localiza el único tornillo en el teclado. Tratándolo con el máximo respeto, cuidadosamente desatorníllalo y colócalo a un lado --saboreando el momento-- porque más tarde vas a desear que haya más de ellos.
-
-
-
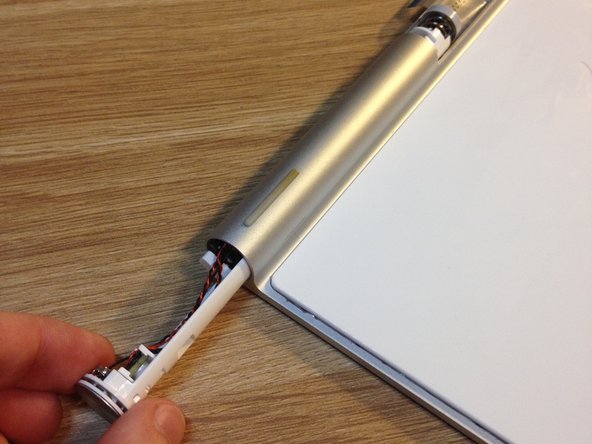
Con cuidado, rota el conjunto de la tarjeta lógica en sentido anti-horario (mirando el botón de encendido) hasta que la tarjeta del circuito esta ∼90° de su posición inicial y ahora enfrentándote.
-
Desliza el conjunto fuera del teclado a través del final con el botón de encendido. Si te encuentras con resistencia trata de rotar la tarjeta ligeramente hasta que salga con facilidad.
-
Ten cuidado de sostener el delicado cable plano fuera del camino mientras haces esto para evitar romperlo accidentalmente.
-
-
-
Este es el punto de no retorno. Si no estas seguro de querer continuar, esta es tu última oportunidad. Todo hasta ahora puede ser deshecho con facilidad.
-
Pon tu teclado en el horno de 100 a 150° C y caliéntalo hasta que tenga un color dorado. (¡Para clarificar, no lo dejes tanto tiempo!) Permite que todo el teclado alcance esta temperatura y déjalo ahí por 5 minutos, después remuévelo del horno. Cuidado, ¡está caliente!.
Esto es en serio?
A much better alternative: Leave the keyboard under a stationary, portable hand dryer for 30min.
Soak the part in alcohol for 24 hours. Then the glue is softened and the parts can easily be disassembled.
Sebastian: even though alcohol is non-conductive, sometimes it does cause glitches. I have yet to find an explanation for that. But it sure sounds much less brutal than sitting in an oven.
150 is above many plastics softening temperature, and if going down that route, I’d remove the keycaps first.
I’m about to find out, as WSX and 2 keys decided to take an extended vacation.
Alcohol will often contain at least a small amount of water, which will promote corrosion of the contacts. Anhydrous alcohol would not have this problem however as it dissolves adhesives they may propagate to the contacts and coat them sufficiently to cause issues. Using heat will soften the adhesive while keeping it in situ. Plastics will also soften somewhat so care is required.
Dan -
-
-
-
-
No te apresures en el siguiente paso. Con una herramienta de palanca, alisa suavemente un borde de la cubierta de plástico. Es posible que necesites una cuchilla de afeitar para comenzar, ya que no hay mucho espacio libre.
-
Ahora, usa la herramienta de palanca para separar la cubierta del adhesivo ahora suavizado que lo mantiene presionado. No sientas la tentación de tirar o doblarlo, esta cubierta de plástico es ABS muy delgada y se deformará.
-
-
-
Todos sabemos que Apple esta encariñado con el pegamento, ¡pero ahora tienes puntos de soldadura con los que lidiar!. Debajo de la cubierta hay un adhesivo recubierto con una placa de aluminio, soldado al cuerpo de aluminio en no menos de 100 lugares distintos.
-
Aquí es donde el taladro viene. Perfora cada uno de los puntos de soldadura, ten cuidado de no perforar tan profundo o dañar los bordes visibles externos.
-
Los agujeros de tu taladro no deben ser tan profundos para tener lados rectos, entonces no deben ser agujeros como tal. Solo un avellanado bastará.
-
-
-
Cerciórate que has perforado cada punto de soldadura, después empieza a hacer palanca en los bordes de la placa. Es extremadamente delgada y no serás capaz de removerla sin doblarla un poco. No te preocupes, puede ser reparada más tarde.
-
Si encuentras una soldadura que aún esta atorada, detente y perfora nuevamente. Otra vez no te presiones o tientes a jalar y doblar la placa.
-
-
-
Finalmente, ¡estamos dentro!
-
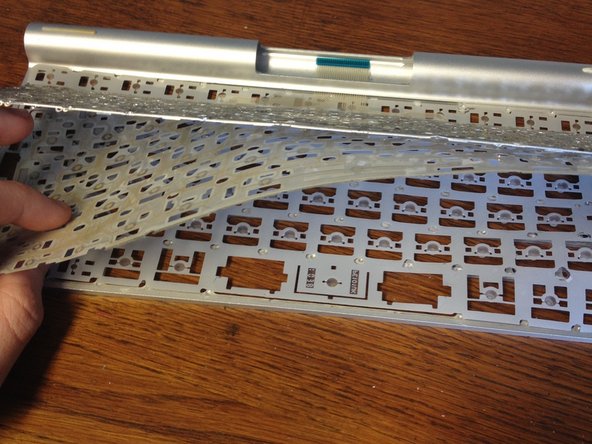
Ahora ya has removido la placa de metal, se te presentara la membrana que necesitamos reparar.
-
El cable plano de antes es parte de esto, y necesita ser capturado a través de su pequeño slot antes de que puedas remover la membrana. Puede que haya un poco de pegamento sosteniendo la membrana, en este caso jala lentamente en un ángulo pequeño para soltarlo.
-
Debajo de la membrana hay una lámina con cúpulas táctiles que sirven para presionar las almohadillas de la membrana juntas. Esta hoja puede quedarse aquí ya que no nos concierne.
-
-
-
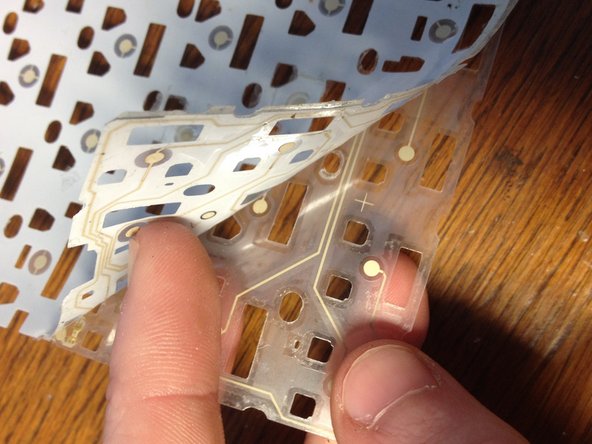
La membrana esta compuesta de dos delgadas capas de plástico que están -adivina que... pegadas juntas. Son muy difícil de separar y la paciencia es la clave.
-
Usa una navaja delgada para separar las capas en una esquina (ayuda empezar en la esquina más cercanas a las teclas que fallan) y pela las capas lentamente. Probablemente no necesites separarlas por completo, solo lo suficiente para exponer la región de la tecla defectuosa.
-
En el interior encontrarás un desastre de líneas blancas y puntos. Estos son los rastros conductores. Localiza las dos almohadillas que se alineas debajo de la(s) tecla(s) con las que estas teniendo problemas.
-
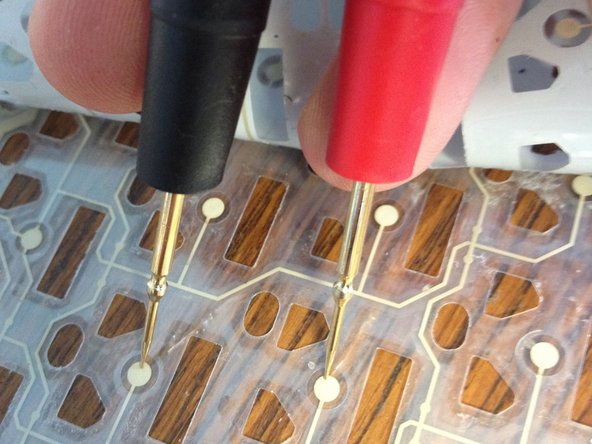
Con el multímetro colocado para medir continuidad, comprueba que no hay roturas entre la pista en cuestión y sus vecinas. Sigue las líneas para ver cuáles están eléctricamente conectadas. Algunas zonas están cubiertas con plástico, por lo que tendrás que trabajar alrededor de ellas.
-
Intenta encontrar el punto exacto en el que la pista está rota y márcala, un marcador puede ser muy útil.
Hi Dan. I have some dead keys on a MacPro USB full size keyboard. I imagine the tear down will be much the same. Tracing the dead keys on the membrane, will bad continuity be only in the region of the key? So I’m my case the A key, will the continuity break just be between the A key ‘dot’ and one of its neighbors?
Not necessarily. They’re wired in a matrix so there could be a break at any point between the key and the ribbon connector and this might not be anywhere near the key, although more often after a spill it will just be corrosion on the contact pads. If it’s just corroded this can sometimes be fixed by polishing the pads with a fibreglass pencil.
Dan -
-
-
-
Una vez que hayas encontrado todas y cada una de las fallas en el circuito de la membrana, toma tu pintura conductora y agítala para mezclar la plata sólida con el solvente.
-
Usa una brocha delgada o un palillo para aplicar una pequeña capa de la pintura sobre la(s) área(s) con la falla que localizaste. Si tienes una plumilla esto funcionará incluso mejor.
-
Permite que seque por al menos 24 horas.
-
Si hay huecos en tu aplicada nueva de pintura, aplica una segunda capa y deja otras 24 horas para que seque.
-
Ahora checa la misma área con tu multímetro. Si funciona, entonces no debe haber una falla. Así que coge una bebida y celebra. Eso es lo complicado. Si aún no funciona, usa tu multímetro para encontrar el lugar exacto donde el lugar aún este roto y añade otra capa de pintura.
-
-
-
Vale la pena testear tu reparación antes de que hagas el esfuerzo de reensamblar tu teclado.
-
Coloca la membrana de vuelta en su lugar, asegúrate que es el modo correcto, y alimenta el cable plano a través del slot del compartimiento de la tarjeta lógica.
-
Sigue las instrucciones en el Paso 3,2 y 1 en reverso y re-instala la tarjeta lógica y las baterías. No necesitas poner la cubierta gris de plástico encima.
-
Conecta el teclado a una computadora Mac y desde la parte inferior, gentilmente presiona en cada almohadilla para comprobar que la tecla correspondiente funciona.
-
Si encuentras que alguna tecla sigue sin funcionar, necesitas volver con el multímetro y encontrar la falla. Recuerda que puede ser en cualquier lado de la membrana y puede no ser visible a simple vista.
-
-
-
Una vez que estés satisfecho que tu teclado funciona completamente, apágalo, y re-instala la capa delgada de metal y usa super pegamento para reemplazar la soldadura y presiónala hacia abajo. Aplica firmemente presión hacia abajo para que no haya huecos.
-
Esto tomará tiempo, pero vale la pena hacerlo propiamente porque esas soldaduras eran importantes.! Ellas detenían el teclado completamente de que se cayera cuando presiones una tecla. El super pegamento será suficiente y con el beneficio de ser removido fácilmente si necesitas volver a entrar al teclado.
-
Si el adhesivo de la parte trasera de la placa está aún en buenas condiciones, deberías ser capaz de pegar la cubierta blanca de plástico de vuelta. Si no, usa un poco de pegamento.
-
Ahora puedes re-instalar la cubierta gris de plástico y cada tecla del teclado. Para hacer esto, aplica presión entre dos dedos para encajar las teclas de vuelta, uno en la parte de abajo. Esto detendrá que el pegamento se rompa.
-
¡Eso es todo! Pruébalo nuevamente para asegurarte que funciona. Si lo hace estas listo para empezar a usarlo nuevamente. Solo toma en cuenta que la estructura ha sido comprometida. Golpear con tus puños en las teclas cualquier vez va a deshacer tu trabajo pegándolo nuevamente.
-


Para reensamblar tu dispositivo, sigue estas instrucciones en orden inverso.
Para reensamblar tu dispositivo, sigue estas instrucciones en orden inverso.
Cancelar: No complete esta guía.
36 personas más completaron esta guía.
Un agradecimiento especial a estos traductores:
100%


Estos traductores nos están ayudando a reparar el mundo! ¿Quieres contribuir?
Empezar a traducir ›
25 comentarios
What was the total time to do this repair? I did the original tear down but didn't think this was even possible. Congratulations on your resolve to succeed. You'll do well in life if you don't waste to much time ;-)
Hi,
It took me about 48 hours allowing two coats of conductive paint to fully dry; maybe two hours actually working on it, figuring everything out as I went along.
Dan -
Hi Mayer,
did you make the photos tear down the keyboard? Could you share the guide photos?
Can you clarify bullet points 2 and 3 under Step 6? Since the aluminum plate is directly below (or above, once it's flipped) the aluminum body, how can the holes be drilled without damaging the body? If we are drilling the welds OUT, how does that work exactly? Thanks for this.
Since they're only spot welds, drilling them out doesn't require going very deep into the body. No more than a millimetre in fact. So the body will be damaged, but only on the inside of the unit where it won't be visible after reassembly.
Hope that helps!
Dan -
Holy !&&* you figured this all out as you went along?? That's talent right there. Thank you sir for the amazing guide!
Will the heat from step 4 destroy the membrane? Nice work
Came here looking for how to replace rubber foot pad. Thanks for showing me what was going on inside (lotsa glue!) before I tried to pry off the corner.
If you're interested:
The little rubber foot pops back in nicely if you curl it between your fingers, press it into the recess, and work in the rest of the rubber edge with the pointed end of a plastic spudger.
Perfect. It worked for me!
My keyboard started to have problems while connecting with bluetooth. I was lucky and got an used logic board from ebay for 10$.
The instruction was exactly what I needed. I only needed the first three steps and now it works again.
Thank you!
Im about to get into this exact repair. Thank you for going before me and the rest of us. I had done everything minus pulling off ALL the keys and began prying at the plastic base when I remembered how I butchered and hacked into my late Galaxy S 7 edge completly destroying every single part in my path because I refused to stop and look online for a guide. That wont happen again thanks to you...well at least I can blame someone else if its destroyed. Ill post my results asap but dont hold your breath.
Two days work? The risk that your repair will not work, or will only last until you drop the keyboard? It’s cheaper to buy a new keyboard. That said, thanks for the description.
Is it possible to only Partially remove that metal backing plate, in order to access the damaged area of the keyboard? My keyboard has a dead Tab key.
A workaround is to use Karabiner-Elements to remap the ‘Approximately equal to’ key, between the left Shift and Z keys to act as Tab. Not perfect, since one rarely-used key is now unavailable, but it took minutes to find the free software, install it and remap the key, over a year ago, and I’ve only really needed that key once in that time. [Simply quitted and then reloaded Karabiner for that.]
Alternative ‘spare’ keys, depending upon your keyboard use, include §, ], [, or maybe even one of the Command and Alt keys.
The biggest disadvantage is that, when using a different keyboard, the wrong key for Tab keeps being used!
I’m tempted to attempt this one just for the fun of it! The guide is beautifully written. But my problem is a torn tactile membrane - the little nub under a keycap got worn off - and I’d have to jury rig something in its place.
My keyboard was perfect, so i dropped some coffee on the right side, and a few keys (10 i think) stopped working! This process you did here work for my case? I don’t know what to do, in my country this keyboard is very expensive and no one repair it.
I'm sorry for you, but is not worth. This is the most difficult repair from Apple so far that I did. In the end you have to broke you keyboard to open it, and it never be the same once opened.
Thank you for this interesting guide! Would you by any chance happen to have a picture of the full trace matrix (like in step 8 but from the other side)? The idea behind my question is that one could follow down the traces of the faulty key(s) without having to disassemble the keyboard entirely :).
Anybody here know how that ribbon cable works? I have read about apple laptops and wireless keyboards having the same fault as mine where keys 1 to 9 and the function keys above them and either the left or right shift stop working. I have reseated the ribbon cable several times, but i am wondering if there is one connection which could go bad to account for this fault.
pin 22(F1~F9,and right shift)、pin 21(1-9,and left control),pin 24 near F5. pin 1 near F9. Your fault is more like a broken wire at the root of the fpc, not the head. Need to remove the film surface protection and apply conductive silver paste
bunnyman -
I recently bought an Apple Magic Keyboard - 2nd hand - but key pressures are highly varied and often do not record a stroke. What could this be? Any idea how to fix it?
Maybe you have DIRT between the key caps and the keyboard membrane.
Pry off the key caps ( on the worst keys first ! ) and clean it … if you have dried liquid on your membrane, it may also be corroded.
If you are lucky, you may be able to blow out dry dirt with compressed air without having to take off the key caps.
MEX -
I made a full video of how to fix this keyboard. You can find it here: https://youtu.be/HRSaTy96Nuw. Also, there's a link in the description where you can find high resolution photos of the membrane and the traces—that should be a big help. And no offense to the original poster—your guide and work is definitely appreciated!—but I don't think super glue is how you should be putting this back together. I showed an alternate, more permanent fix in the video.
Self-tappers is a great solution! It should’ve been made with screws in the first place, but I’m sure blind tapped holes add a lot to cost of manufacture.
Surprisingly the CA glue holding mine together is still there doing it’s job but admittedly I have been very gentle with it since the operation.
Dan -
My small tool kit bit for this size screw is too tapered, so I used my trusty little iFixit screwdriver. Problem is the screwdriver doesn’t provide enough grip area to remove this tenacious screw without stripping it. The screwdriver does have a hex at the end of the handle, which is 9/32” inch. Get a socket and handle, or even a 1/4” ratchet handle and you’ll have an easier time removing it.
Dennis Johnston - Contestar
Make sure you’re using a Philips driver and not pozi, they have different taper angles and are technically incompatible
Dan -