Introducción
Usa esta guía para remplazar una pantalla rota en tu MacBoom Unibody Modelo A1342.
Qué necesitas
Resumen del Video
-
-
Retire los ocho tornillos Phillips de 4 mm que sujetan la carcasa inferior al MacBook.
-
-
-
Usar la punta plana de una spudger para levantar el conector de la batería de su enchufe en la placa lógica.
-
-
-
Remueve los siguientes tornillos del lado del disco óptico de la rejilla trasera:
-
Dos Torx T8 de 10mm
-
Dos Phillips de 5.2mm
-
-
-
-
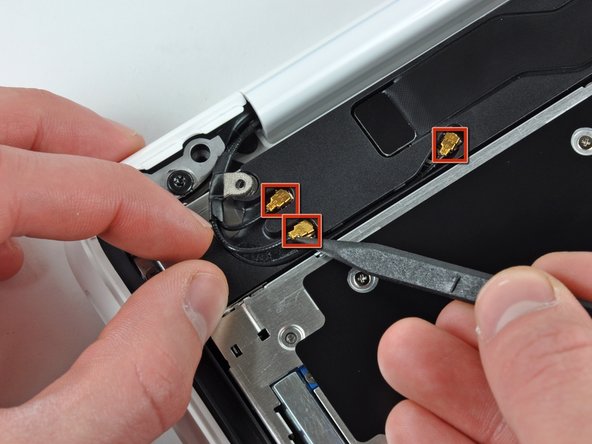
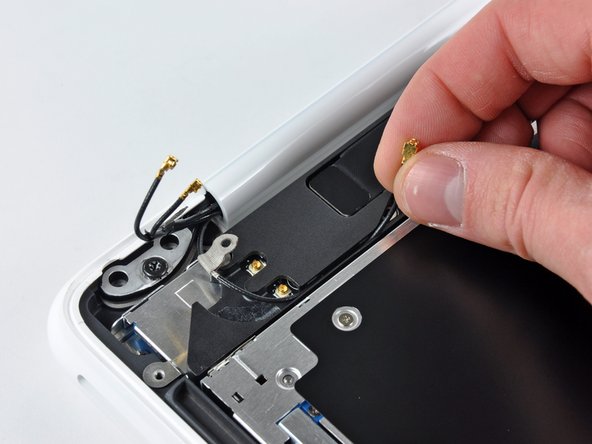
Remueve el único tornillo Phillips de 3 mm asegurando la tira hacia tierra de la antena AirPort/Bluetooth a la bocina derecha.
-
-
-
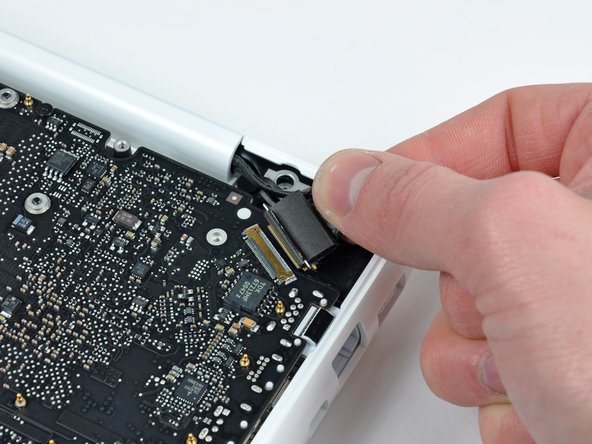
Agarra la lengüeta de plástico asegurado al seguro del cable datos de la pantalla y rétala hacia el lado de DC-In de la computadora.
-
También hay un clip de bloqueo de metal delgado debajo de la pestaña de plástico que debe soltarse (use la punta de un spudger) antes de poder desconectar el cable de datos de la pantalla.
-
-
-
Abre tu MacBook para que la pantalla quede perpendicular a la carcasa superior.
-
Pon tu MacBook abierta en u a mesa como mostrado.
-
Mientras sostienes la pantalla y la carcasa superior juntos con tu mano izquierda, remueve los tornillos Torx T8 con arandelas de seguridad de 7.8 mm del soporte inferior de la pantalla.
-


Para re-ensamblar tu dispositivo, sigue estas instrucciones en orden inverso.
Para re-ensamblar tu dispositivo, sigue estas instrucciones en orden inverso.
Cancelar: No complete esta guía.
78 personas más completaron esta guía.
Un agradecimiento especial a estos traductores:
100%


Estos traductores nos están ayudando a reparar el mundo! ¿Quieres contribuir?
Empezar a traducir ›

3 comentarios
Great guide worked perfectly....
The problems I encountered….
1) (IMPORTANT) The vent cover has a small beveled slot were the picture cable fits into nicely and the first time I reassembled my mac I did not allow the cord adequate space between the vent cover and the computer housing. This lead to a red, green, and blue alternating screen upon booting and troubleshooting the issue to find out that it was just a pinched cable took longer than I would have liked.
2) The picture cable removal and reassembly was not as seamless as it seemed in the picture. The metal connector under the cable was very flimsy and weak. It did not break however it did bend slightly and I wasn’t the happiest about it.
3) The power cord broke (chipped) a small amount. As previously mentioned. Not a big deal but not fun. (Be careful)
Whole process took 45 min… very easy
Couldn’t have done it without the guides and the tools
Thanks for saving me like $300
In your opinion, could I replace the screen of my A1342 (2011) by the screen of a A1181 (mid 2009)?
They seem to be identical.
Wow, what an excellent guide. I watched the video first and it looked easy enough. I ensure I had the right equipment first, followed the steps as per the instructions. Had to be careful with Step 9; i.e. removing the plastic pull tab secured to the display data cable lock as it’s fragile. Step 13/14 was difficult too but followed the advice and got there eventually. Reversing back, step 13/14 took a while as did Step 10 and Step 8. Step 8 was a pain actually as I found it really difficult to get the AirPort and Blue tooth antenna back in again.
All in all, as I’m a novice I think it took me almost 90 minutes but I did it and I now have a new screen working perfectly so have renewed my Apple mac laptop. I’ve been meaning to do this for 2 years, but was too scared and thought hey just buy the part and give it a go. If I mess it up, i’ve not used the laptop in 2-years+ so it can go in the bin. Fortunately, even I (complete novice) was able to follow the instructions! Thank you as I now have use of my mac again.