Introducción
La batería generalmente es la primera pieza que se retira, incluso si no es el problema, hace que otros componentes en el dispositivo sean más accesibles.
Qué necesitas
Resumen del Video
-
-
Con una herramienta de apertura de plástico, inserta suavemente el extremo de palanca entre el digitalizador de vidrio y el marco plateado de la parte frontal del dispositivo.
-
-
-
Trabajando lenta y cuidadosamente, mueve alrededor de la totalidad de la cara del dispositivo. Deben soltarse los pequeños clips de plástico, de lo contrario, aplica una suave presión hacia el exterior hasta que escuches que se sueltan los clips.
I used a dull knife blade and just slide it along the grove. You may have to slide the knife back and forth a couple of times but, the cover will unsnap.
-
-
-
-
Para comenzar la extracción real de la batería, retira los cuatro tornillos designados con su destornillador.
-
Una vez que se quiten los tornillos, usa la punta de su destornillador o un par de pinzas para levantar el conector de la batería. Tira hacia arriba y el conector debe salir.
-
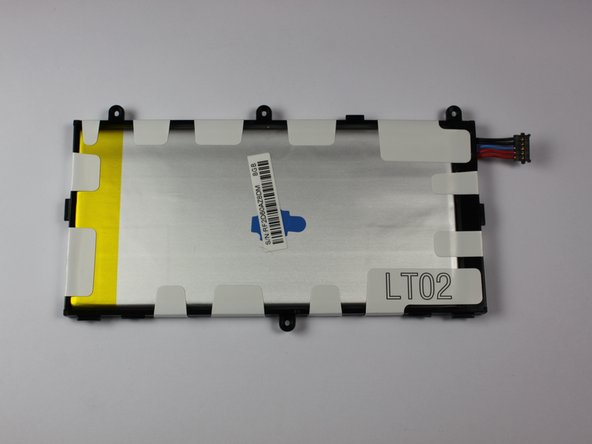
Una vez que se retira la batería, debería verse como lo hace en la tercera imagen.
Gently lift the battery from the inside edge using the battery connector. The battery is hinged on the outside edge by two plastic protrusions which fit into the plastic frame where the battery is located.
Because I was only removing the cameras, I did not have to touch the battery. However on the motherboard; there are 4 screws up top you have to remove. Where your headphones plug in; gently pull up the connector away from the board. Tilt the motherboard up at a 45-60 degree angle. With a pair of tweezers, pull both cameras up (one at a time) while pulling side to side. The connectors will slide out. Then make sure the bottom of motherboard is slipped under small tabs then replace screws up top. Snap connector for earphones back into place.
-
-
-
Para finalizar el reemplazo de la batería, coloca la batería nueva donde estaba la batería vieja en su dispositivo, como se muestra en la imagen.
Don't forget to insert the battery on the outside edge first, locating the plastic protrusions into the frame around the battery. Use the tip of your screwdriver to push down on the protrusions to locate them in the frame. Once the battery is located correctly, it should sit flush with the frame that surrounds it.
No explanation of how to separate the glass from the body in order to access the battery.
Its the 1st step, pry tool down between glass and edge, all the way round. It has pressure clips
-


Para volver a armar tu dispositivo, sigue estas instrucciones en orden inverso.
Para volver a armar tu dispositivo, sigue estas instrucciones en orden inverso.
Cancelar: No complete esta guía.
57 personas más completaron esta guía.
Un agradecimiento especial a estos traductores:
100%


Estos traductores nos están ayudando a reparar el mundo! ¿Quieres contribuir?
Empezar a traducir ›
Equipo

Cal Poly, Team 7-20, Regan Spring 2014 Miembro de Cal Poly, Team 7-20, Regan Spring 2014
CPSU-REGAN-S14S7G20
4 Miembros
10 Guías creadas
6 comentarios
good job for making this as least complicated as possible i completed the guide
Great guide..... If you don't have the plastic tool, my thumb nail worked just fine
Thanks for this great guide.
When attaching the new battery it helped me to actually attach the wiring connector before final placement of the battery. Also, I found it easier to put the single screw in first before pushing the battery all the way down and starting the three on the other side. The cscrew holes in the replacement battery have to be PERFECT and if they’re just slightly off you can’t get the one lonely screw started if you put the other three in first.
I enjoied the guide it was realy easy the video was varry helpfull. I do have a question is there any way to test the batery to make sure that is realy the problem, before i go replaycing it?
I tried this with my Galaxy Tab A. I only wanted to remove the front and rear cameras.
wmcarroll13 - Contestar
How hard do i need to push the plastic part? i tried it but i wont pop off.
Emil Klock - Contestar