Introducción
Usa esta guía para reemplazar o actualizar tu disco duro.
Qué necesitas
-
-
Si estás utilizando la cuña de servicio de cartón iFixit, sigue estas instrucciones de ensamblaje para armarla.
-
-
Herramienta utilizada en este paso:Plastic Cards$2.99
-
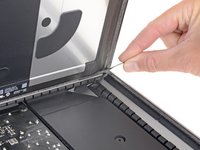
Comenzando desde la esquina superior derecha del iMac, coloca una tarjeta de plástico entre la pantalla y el marco.
-
-
-
-
Toma la lengüeta pequeña al final de una de las tiras adhesivas de la pantalla del borde inferior y tira del adhesivo hacia la parte superior del iMac para quitarlo.
-
Repite este paso con la otra tira adhesiva y retírala.
-
Si cualquiera de las tiras adhesivas se rompe antes de quitarla, usa una tarjeta de plástico para cortar el adhesivo restante.
-
-
-
Levanta la pantalla del marco y retírala del iMac.
-
Puede ser necesario levantarlo lentamente de un lado para pelarlo contra el adhesivo restante.
-
Durante el reensamblaje, dirígete a nuestra guía de adhesivos para pantallas para instalar el nuevo adhesivo.
-
-
-
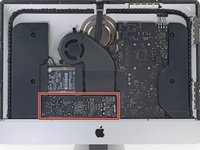
Remueve los siguientes tornillos que aseguran el soporte del disco duro a la carcasa posterior:
-
Dos tornillos Torx T10 de 21 mm de la izquierda.
-
Un tornillo Torx T10 de 9 mm.
-
Un tornillo Torx T10 de 27 mm.
-
-
-
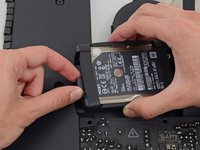
Levanta el disco duro desde el borde más cercano al ventilador y extráelo un poco del hueco.
-
-
-
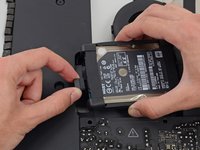
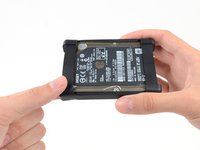
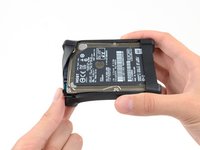
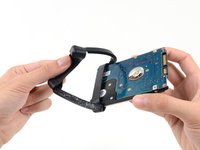
Despega la funda flexible del disco duro de la esquina superior izquierda del disco duro.
-


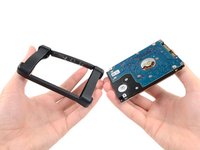
Para volver a armar tu dispositivo, sigue estas instrucciones al revés y usa nuestra [guía | 15854 | Guía de tiras adhesivas] para volver a colocar el cristal de la pantalla.
Cancelar: No complete esta guía.
360 personas más completaron esta guía.
Un agradecimiento especial a estos traductores:
100%

¡ Angel nos está ayudando a reparar el mundo! ¿Quieres contribuir?
Empezar a traducir ›


43Guía Comentarios
I used the iMac Opening Tool just as shown in this guide to separate the tape. DISASTER! The screen cracked! I used the tool slowly and carefully and despite this, the screen cracked. I should have simply used a guitar pick. That said, while I was inside my iMac replacing the Harddisk with a SSD, which was pretty easy to do, I decided to also see if I could replaced the 8GB RAM with 16GB RAM WITHOUT removing the logic board, as shown in other instructions on this site. I found that by simply removing the fan assembly, this makes enough room to reach behind the logic board and unclip the 2 memory modules. I installed 2 8GB modules (1600MHz DDR3L SO-DIMM PC12800 204 Pin) without much trouble. I used a plastic stick to reach behind the logic board and unclip the existing memory modules, then carefully inserted the new ones and clipped them into place. This is much easier than removing the power supply and logic board and all of the associated connectors and screws.
I had to replace the HD as it failed after less than two years. It was a good opportunity to increase the RAM from 8 to 16 GB. So I ordered the RAM chips from Kingston and a 256 GB SSD from Angelbird.
The repair went smoothly: to anyone trying this, please carefully follow the iFixit step-by-step guide. I recommend reading at least twice the whole procedure *before* beginning. Check all the photos. During the operation itself, I had the guide open before my eyes on my iPad and followed it step by step. The opening tool is a bit fragile, the wheel got damaged after the operation, but I guess it was designed to be used only once. After all, the adhesive strips can also be used only once!
For those replacing the hard-disk with an SSD: I highly recommend the Angelbird model "SSD wrk for Mac" (http://www.angelbird.com/en/prod/ssd-wrk...), for several dollars more you spare yourself the need to use additional software to enable TRIM or persuade the fans of your Mac that the HD's temperature is Ok.
Thanks for the tip on the Angelbird, working smoothly so far!
Elling -
Hi! Thanks for the tip! Do you know if can I put an SSD on an imac 21.5 in late 2012 ?