Introducción
Sigue esta guía para sustituir o actualizar el disco duro de su MacBook Prop 13" 2010.
Recuerda copiar todos sus datos del disco duro antiguo al nuevo si es necesario.
Qué necesitas
-
-
Retira los siguientes 10 tornillos que sujetan la tapa inferior del MacBook Pro 13 "Unibody:
-
Siete tornillos Phillips de 3 mm.
-
Tres tornillos Phillips de 13,5 mm.
-
-
-
Levanta ligeramente la tapa inferior y empuja hacia la parte posterior para liberarlo de las pestañas que lo sujetan
-
-
-
Utilice el extremo plano de un spudger para levantar el conector de la batería hacia arriba fuera de su toma en la placa lógica.
-
-
-
-
Retira los dos tornillos Phillips que fijan el soporte del disco duro a la carcasa superior.
-
-
-
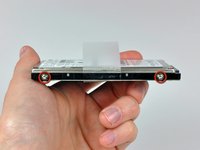
Retire los dos tornillos T6 Torx de cada lado del disco duro (cuatro tornillos en total).
-


Para volver a montar el dispositivo, sigue estas instrucciones en orden inverso.
Para volver a montar el dispositivo, sigue estas instrucciones en orden inverso.
Cancelar: No complete esta guía.
525 personas más completaron esta guía.
Un agradecimiento especial a estos traductores:
100%

¡ Mariana Roca nos está ayudando a reparar el mundo! ¿Quieres contribuir?
Empezar a traducir ›

15 comentarios
THANK YOU! I'm still on a high from repairing my husband's Macbook. It feels so nice to have two computers up and running again. You saved me nearly a grand, and made me realize how much I really did learn as a kid building PC towers with my dad.
Hi, I got the 1TB SSD Hybrid you have listed above. Regardless of what I try, my computer does not recognize it. It sees the 32GB flash drive I used for an install disk and it sees my USB external drive where I have the time machine backup. But it just can't see this drive. Is there any troubleshooting for this product? Thanks!
Hi Robbyglasco, Have you been able to fix the issue? I'm having the same problem :-)
lkaravis -
I know this is a long time after the event for both of you, but for others Im pretty sure that this will be that you haven't yet formatted the SSD in Disk Utility. Before you can reinstall from Time Machine you have to go into Disk Utility and format the SSD. You get to Disk Utility from the option screen after you have booted the computer with "Command and R" (cmd-R).
Thank you very much. This made the job much easier than it would have been if I had to figure it out for myself.
I replaced a 5 year old 320GB hard drive with a new 1TB hard drive. I first cloned the drive by attaching the new one via a USB dongle and running Carbon Copy Cloner. Then I booted the new drive via USB to confirm that it was properly cloned.
Then I followed the directions here. It took all of 15 minutes to do, because I knew exactly what to expect and had all the necessary tools on-hand. Your web site is an incredibly valuable resource. Thanks again.