Introducción
Utiliza esta guía para reemplazar el conjunto del panel frontal de su Nano. Un nuevo conjunto de panel frontal proporcionará un nuevo panel de vidrio frontal, digitalizador y LCD. La pantalla LCD no se puede separar del digitalizador.
Qué necesitas
-
-
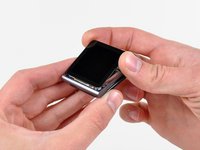
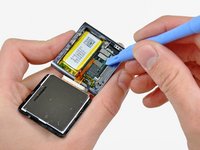
Utiliza una pistola de aire caliente o un secador de pelo para ablandar el adhesivo que sujeta el perímetro del conjunto del panel frontal a la carcasa exterior.
-
-
-
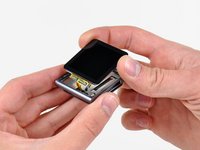
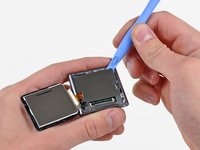
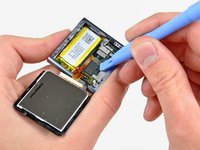
Mientras el panel frontal todavía está caliente, usa el borde de una herramienta de apertura para sacarlo del lado del conector de auriculares del ensamblaje del panel frontal del Nano.
-
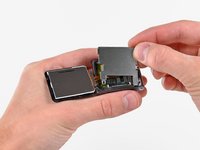
Continúa sacando el perímetro del ensamblaje del panel frontal de la carcasa exterior, teniendo cuidado de no dañar el cable de datos de la pantalla que se encuentra debajo del borde izquierdo.
-
-
Para volver a armar tu dispositivo, sigue estas instrucciones en orden inverso.
Para volver a armar tu dispositivo, sigue estas instrucciones en orden inverso.
Cancelar: No complete esta guía.
120 personas más completaron esta guía.
Un agradecimiento especial a estos traductores:
100%
Estos traductores nos están ayudando a reparar el mundo! ¿Quieres contribuir?
Empezar a traducir ›
10 comentarios
Don't forget to include in your repair the adhesive to hold the new screen on. It does not come with the new display. I as unable to find it at iFixit's site but was able to get it here for $10 incl p&p: http://www.badgizmorepair.com/product/ip...
By the time I paid for the screen, opening tool and glue it turned out to be more economical and less hassle to take it to the Apple store (albeit less satisfying than doing it yourself). I suggest you forego the opening tool if you have a good flat blade jewelers screwdriver. A fine temporary fix for not having the correct screen glue is a piece of packing tape. It leaves the iPod open to the elements though, so I highly recommend the correct glue in order to avoid water leaking in around the edge of the screen.
You will also need a very small jewellers or electronics screwdriver for the two screws. I just managed it with an oversized flathead driver.
i had bought these part and succeeded in repair my drown ipod using these guides (luckily only the lcd that didnt work). and it work nicely. thanks
Thanks for the guide. Very useful and easy to follow.
Had some issues with getting the screen off initially, but that was due to the glass along the headphone jack side being cracked into several small little shards (hence the reason for following the guide ;)
Used a replacement screen (incl. toolkit and replacement precut adhesive) that I purchased from ebay for around US$10 (free shipping).


