Introducción
Usa esta guía para reemplazar las cubiertas de plástico de los botones y los contactos de goma de los botones en cualquier controlador DualShock 3.
Qué necesitas
-
-
Remueve los cinco tornillos Phillips de 7.2 mm que aseguran la carcasa trasera a el control.
-
-
-
Levanta la batería de la tarjeta madre para tener suficiente acceso al conector de la batería.
-
-
-
-
Remueve el único tornillo Phillips de 7.2 mm que asegura la tarjeta madre a la cubierta frontal.
-
-
-
Levanta los contactos de goma de los botones de la cubierta frontal del controlador para acceder a las cubiertas de plástico de los botones.
-
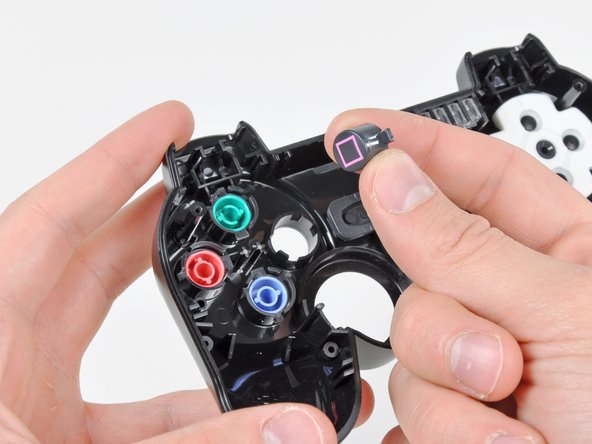
Levanta las cubiertas plásticas de los botones dañadas para sacarlas de la cubierta del controlador.
-


Para reensamblar tu dispositivo, sigue estas instrucciones en orden inverso.
Para reensamblar tu dispositivo, sigue estas instrucciones en orden inverso.
Cancelar: No complete esta guía.
99 personas más completaron esta guía.
Un agradecimiento especial a estos traductores:
100%


Estos traductores nos están ayudando a reparar el mundo! ¿Quieres contribuir?
Empezar a traducir ›

6 comentarios
My Dualshock 3 didn't have the three armed plastic piece on the D-pad. Mine's a red one, relatively recent. My controller also had the problem where it would randomly send button press events when using the L-stick. I traced the problem to the ribbon connector between the board and the contacts, which was very dirty. I cleaned the contacts and put the controller back together with an additional rubber shim between the back cover and the battery, which got rid of the creakiness of the somewhat loose-fitting case. Works great now.
How do you clean the contacts? Is there a special way?
Are these instructions the same for the dual-shock 2?
TNX-could not really figure out where the 3-armed plastic should fit in but tnx to step 11 i know-now im going to dismantle my controller again.