Introducción
Reemplaza el cerebro de tu 3DS con una nueva placa base.
Qué necesitas
-
-
Desatornilla los cuatro tornillos Phillips #00 a lo largo de la parte superior de la tapa trasera.
-
-
-
Inserta una herramienta de apertura de plástico en la muesca de la carcasa inferior sobre la batería.
-
Haz palanca en la batería con la herramienta de apertura de plástico.
-
Toma el borde superior de la batería y levántala para sacarla de la carcasa inferior.
-
-
-
Retira los nueve tornillos Phillips negros de 6,3 mm de la carcasa inferior.
-
Retira el tornillo Phillips plateado de 2,4 mm que se encuentra sobre la ranura del cartucho de juego.
-
-
-
Retira los dos tornillos Phillips de 7,7 mm que sujetan la parte posterior del Circle Pad a la placa base.
-
-
-
Retira los dos tornillos Phillips de 4,5 mm que sujetan la placa SD a la placa base.
-
-
-
-
Inserta el extremo plano de un spudger entre la placa SD y la placa base.
-
Levanta lentamente para aflojar la placa SD del protector de RF que se encuentra debajo. Si haces palanca demasiado rápido, puedes romper el escudo o romper sus puntos de soldadura.
-
Pasa el spudger por los lados de la placa SD para liberarla de la almohadilla adhesiva que la mantiene en su lugar.
-
Una vez liberada por completo, levanta la placa SD directamente de la placa base.
-
-
-
Desliza el extremo plano de un spudger debajo de la esquina de la placa Wi-Fi y levántalo para separarlo de la placa base.
-
-
-
Sujeta el cable de cinta del micrófono cerca del micrófono con un par de pinzas.
-
Tira del micrófono hacia arriba para sacarlo de la carcasa superior.
-
-
-
Usa la punta de un spudger o tus dedos para retirar la cinta blanca que cubre el conector del cable plano de la pantalla táctil.
-
-
-
Usa el extremo plano de un spudger o la uña para levantar la solapa de retención en el conector ZIF del cable plano del micrófono.
-
-
-
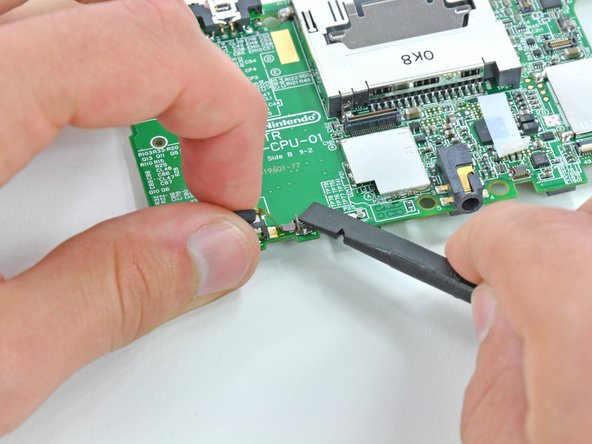
Usa el extremo plano de un spudger para sacar el conector del interruptor de volumen de su zócalo en la placa base.
-


Para volver a armar tu dispositivo, sigue estas instrucciones en orden inverso.
Para volver a armar tu dispositivo, sigue estas instrucciones en orden inverso.
Cancelar: No complete esta guía.
37 personas más completaron esta guía.
Un agradecimiento especial a estos traductores:
100%


Estos traductores nos están ayudando a reparar el mundo! ¿Quieres contribuir?
Empezar a traducir ›

11 comentarios
This guide seriously helped me get a broken 3DS and replace the motherboard to make it a working one. Thank you for doing this guide, you are awesome. :)
I can't thank you enough for this guide! My 3 year old submerged my 8yr olds coveted 3DS in the toilet yesterday...I frantically took it apart as soon as I found it (knew not to turn it on) and wisely took pics on my phone as I frantically took apart each piece to get it dried....was however up all night dreading my ability to put it back together again...until I found this awesome step by step guide. Won't try to put it back together for another few days, but I will update my post and let you know if I got it working again:) Thanks so much!
I need help!
My 3DS is acting alone directional up!
I opened the device and realized that there is a short between TP85 and ground !
I need to know what CI is responsible for the control functions !
Thanks!
The control functions are on the back of the motherboard facing the lower screen. It is the 4 white buttons right below the huge gap where the circular pad goes
Excellent guide. This is an incredibly frustrating device to take apart and get back together.
Probably the toughest part is the ribbon cables. They're positively tiny and some of them force you to insert them without much space to work. The best strategy I've found is to use a small poking tool like a pen cap clip to nudge them very patiently into place. First one corner in the socket so it doesn't fly back out, then nudge it along and get the other corner. Then straighten it out to line up perfectly. Being extremely patient and gentle are key -- if you even slightly bend a corner without damaging the wires, it becomes infinitely harder to get it in successfully. Most of the ribbons have small notches you can use to help you push them in and judge how far in they are.
Also if the wifi antenna wire gets loose when you're putting it back together, you'll have to undo everything to get it back into the right spot.