Saltar al contenido principal

Reemplazo de la fuente de alimentación de la PlayStation 4 Pro

Qué necesitas

  1. Reemplazo de la fuente de alimentación de la PlayStation 4 Pro, Fuente de alimentación: paso 1, imagen 1 de 3 Reemplazo de la fuente de alimentación de la PlayStation 4 Pro, Fuente de alimentación: paso 1, imagen 2 de 3 Reemplazo de la fuente de alimentación de la PlayStation 4 Pro, Fuente de alimentación: paso 1, imagen 3 de 3
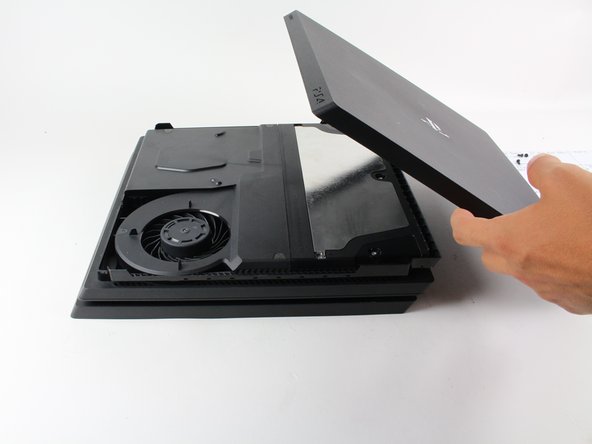
    • Empieza volteando la consola boca abajo.

    • Usa tu dedo para tirar de la cubierta de plástico que contiene el disco duro y sacarla.

  2. Reemplazo de la fuente de alimentación de la PlayStation 4 Pro: paso 2, imagen 1 de 2 Reemplazo de la fuente de alimentación de la PlayStation 4 Pro: paso 2, imagen 2 de 2
    • Usa un destornillador para quitar el único tornillo Phillips #0 que sujeta el carrito del disco duro.

    • Tira del carrito del disco duro hacia afuera.

  3. Reemplazo de la fuente de alimentación de la PlayStation 4 Pro: paso 3, imagen 1 de 3 Reemplazo de la fuente de alimentación de la PlayStation 4 Pro: paso 3, imagen 2 de 3 Reemplazo de la fuente de alimentación de la PlayStation 4 Pro: paso 3, imagen 3 de 3
    • Voltea de nuevo la consola boca arriba.

    • Agarra las dos esquinas que se encuentran en el frontal de la consola.

    • Tira hacia arriba hasta que se escuche un fuerte click.

    • Esto ppuede requerir bastante fuerza, asñi que no tengas miedo de ser un poco duro con tu consola.

    • Después de que ambas esquinas se suelten, desliza la cubierta hacia atrás y levántala.

  4. Reemplazo de la fuente de alimentación de la PlayStation 4 Pro: paso 4, imagen 1 de 3 Reemplazo de la fuente de alimentación de la PlayStation 4 Pro: paso 4, imagen 2 de 3 Reemplazo de la fuente de alimentación de la PlayStation 4 Pro: paso 4, imagen 3 de 3
    • Usa un destornillador T8 Torx de seguridad para quitar los 5 tornillos.

    • Dos tornillos de 31 mm.

    • Tres tornillos de 10 mm.

    • Quita la placa de metal.

    I couldn’t open the middle 10mm screw with T8 Torx Security screwdriver :(

    Rifat Nabi - Contestar

    I can’t get that middle black screw out with anything. My torx isn’t doing anything.

    Cai Hayz - Contestar

    How do I get the middle plastic black screw out? It's not doing anything but stripping it.

    Mike Strong - Contestar

    it’s like rubber or something on that middle screw.

    Coker Lisonbee - Contestar

    On newer models the black screw in the middle is just plastic and does not have to be removed. Skip it or you’ll just drive yourself crazy and end up producing a small pile of plastic-dust and that’s it.

    Allan Paiste - Contestar

  5. Reemplazo de la fuente de alimentación de la PlayStation 4 Pro: paso 5, imagen 1 de 3 Reemplazo de la fuente de alimentación de la PlayStation 4 Pro: paso 5, imagen 2 de 3 Reemplazo de la fuente de alimentación de la PlayStation 4 Pro: paso 5, imagen 3 de 3
    • Voltea de nuevo la consola boca abajo.

    • Usa un destornillador T8 Torx de seguridad para quitar los tres tornillos negros en el panel trasero.

    • Quita la cubierta inferior de la misma forma que la superior. Agarra de ambos lados, tira hacia arriba hasta que oigas el click y deslízala.

    If you have a console that has not been fixed before - these screws will be hidden under warranty stickers - so make sure you understand that completing this step will basically void the warranty.

    Allan Paiste - Contestar

  6. Reemplazo de la fuente de alimentación de la PlayStation 4 Pro: paso 6, imagen 1 de 2 Reemplazo de la fuente de alimentación de la PlayStation 4 Pro: paso 6, imagen 2 de 2
    • Usa un destornillador de seguridad T8 Torx para quitar los dos tornillos plateados de 10 mm de la placa de metal.

  7. Reemplazo de la fuente de alimentación de la PlayStation 4 Pro: paso 7, imagen 1 de 3 Reemplazo de la fuente de alimentación de la PlayStation 4 Pro: paso 7, imagen 2 de 3 Reemplazo de la fuente de alimentación de la PlayStation 4 Pro: paso 7, imagen 3 de 3
    • Voltea la consola para continuar trabajando en la parte superior.

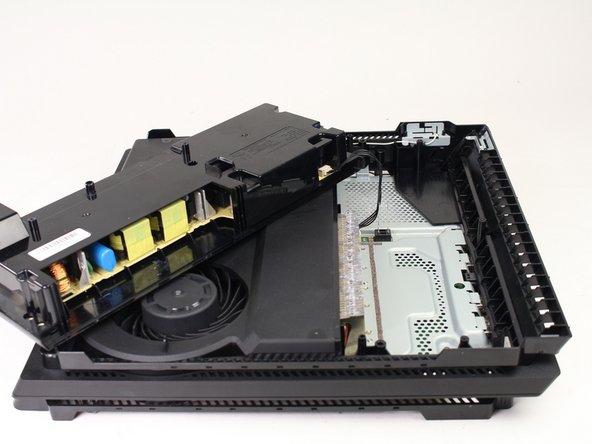
    • Coloca los dedos debajo del borde de la fuente de alimentación en ambos lados y tira hacia arriba.

    • Ten cuidado de no tirar demasiado, el conjunto todavía está conectado en un punto.

    • Sujeta el conector detrás de la fuente de alimentación y tira hacia afuera.

    If you are having trouble lifting the power supply from the system with all screws already out flip the system over and push inward and up on the plug

    blake - Contestar

    what kind of wire is that ive been looking everywhere for a replacement

    craclighterr - Contestar

    Are all ps4 pro power supply models compatible with all motherboard models? I want to change all the components from a newer ps4 pro to a white ps4 pro, but this one has different power cable and should keep its power supply. Is this possible?

    icaroxp - Contestar

    Nice, pretty detailed repair work done, thanks!

    kmsit - Contestar

    There are 3 different power supplies for the pro model.......... take it apart and read the numbers off it to make sure you get the correct one. 300ER, 300CR, 300FR

    Alan Sears - Contestar

    This is the only screw I can't get out on top of the power supply so I can replace my pasta what size is it

    MillerGuy2008 - Contestar

    This is the screw I had trouble with I don't know why and it's the only screw holding the power supply in on top in the middle when you take the foil off

    MillerGuy2008 - Contestar

Conclusión

Para volver a montar tu dispositivo, sigue estas instrucciones en sentido contrario.

36 personas más completaron esta guía.

Un agradecimiento especial a estos traductores:

en es

100%

¡ Angel nos está ayudando a reparar el mundo! ¿Quieres contribuir?
Empezar a traducir ›

Ashlyn Chow

Miembro Desde 04/25/17

3,345 Reputación

1 Guía escrita

Equipo

Cal Poly, Team S21-G5, Livingston Spring 2017 Miembro de Cal Poly, Team S21-G5, Livingston Spring 2017

CPSU-LIVINGSTON-S17S21G5

4 Miembros

49 Guías creadas

10 comentarios

Thank you soooo much for helping me save my ps4 pro guys! At the moment I love you like no one before! ;D

Fayce D D - Contestar

Can you go further in your tear-down and show us how to open up the power supply without breaking the PSU plastic case? Thanks. ^_^

Matt - Contestar

I bought a PS4 power supply CR 300 and my PS4 has an FR 300 power supply will they interchange

joseph fish - Contestar

My PlayStation Pro has a power supply FR 300 and the power supply I bought was a CR 300 power supply will they interchange

joseph fish - Contestar

Hola como saber que tipo de fuente vida mi ps4 pro modelo 7215b

Tomás Javier - Contestar

Solucionaste el problema?

JUZZ0U_XIII -

for anyone attempting this please note that the motherboard connector for the power supply is very fragile and might break off will trying to disconnect. Try pinching the connector on the motherboard and gently pulling on the cables to try and keep that from happening

Markus Cevera - Contestar

When the power supply finally fails, is this a fire hazard?

dotcomtim - Contestar

Good morning do you have a number to call for I can call about a ps4 Pro

Pompanothekidd - Contestar

Because I need my PS4 to get fixed I think one of the cords inside of it is broken and it do not want to turn on and stuff like that so ya what is the number I can contact you on

Pompanothekidd - Contestar

Agregar Comentario

Ver Estadísticas:

Ultimas 24 horas: 21

Ultimos 7 días: 169

Ultimos 30 días: 784

Todo El Tiempo: 91,602