Introducción
Aunque estas luces tienen 3 años de garantía, es mas barato arreglarlas Ud. mismo, que pagar el flete de envío al fabricante. Compré LEDs T1 3/4 (5mm) en Digikey, buscando algo en el rango de 800 mcd o mayor, en los colores adecuados. Acabé comprando:
404-1096-Nd (rojo)
404-1097-MD (naranja)
C503B-GCN-CV0Z0461-ND (azul)
C503B-GCN-CY0C0791-ND (verde)
404-1092-ND- (amarillo)
Los LEDs están alambrados en series en grupos-3 grupos en una línea. Si uno de los LEDs de un grupo falla, ninguno encenderá. El problema es saber cual o cuales están mal.
Es mas fácil si funciona un tramo o parte de uno, Tome un LED del tramo bueno, y use ese zócalo o base, para probar cada LED del tramo malo, uno a la vez. Si un LED no enciende en el tramo bueno, reemplácelo por uno bueno, según las instrucciones siguientes. Puede haber más LEDs malos, de modo que si después de cambiarlo, el tramo sigue sin encender, continúe con el siguiente.
Si no hay ningún tramo para probar, y no tiene otra manera de probar los LEDs, entonces, saque cada LED, uno por uno, y verifique si las terminales no están rotas, Si lo están, reemplácelo. si no, siga con el siguiente hasta terminar.
Qué necesitas
-
-
Quitar la bombilla facetada. Las cubiertas de las lámparas de color se rompen... algunas son bastante rígidas, pero salen. No se desenroscan.
-
-
-
-
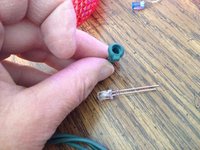
Retira el LED defectuoso del enchufe para que puedas volver a utilizarlo. Observa que el nuevo LED tiene una pata más larga que la otra.
-
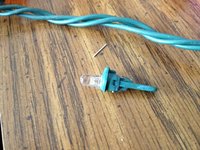
El cable largo va en el lado del enchufe con la llave como se muestra en la imagen.
-
La bombilla del LED puede no asentarse perfectamente pero a quién le importa, estará debajo de la tapa de plástico de la bombilla facetada.
-
Dobla los cables y corta.
-
Prueba la bombilla en tu "buen" filamento si tienes uno. Si funciona, ponla en la rama mala y mira si eso ha solucionado el problema. Si no, sabes que el LED está bien ahora, así que pasa al siguiente.
-


Para rearmar el dispositivo, siga las instrucciones en orden inverso.
Para rearmar el dispositivo, siga las instrucciones en orden inverso.
Cancelar: No complete esta guía.
9 personas más completaron esta guía.
Un agradecimiento especial a estos traductores:
100%

Estos traductores nos están ayudando a reparar el mundo! ¿Quieres contribuir?
Empezar a traducir ›
13 comentarios
Hi! Can you tell me the difference between the two types of light bases you show above? The situation I have is I bought a set of the clear LEDs figuring we could get replacements since my husband prefers the colored ones. But, once we started pulling them apart, we found the different sized bases and the only replacement ones I could find had the short stubby base. Are they interchangeable if we pull the bulb out of the base? Do you have any suggestions for us? Thanks for any help!
The reason for the two different size sockets is that if you look at your strand, every so many lights three wire come into the socket instead of two. I think (and this is only a hypothesis) than the shorter sockets are to allow room for the connection of the third wire. Why they didn't just use short sockets for everything I don't know. But it seems likely to me that the short one would work everywhere. I have not tried it.
Thanks so much for posting this guide! My outdoor light strings are far from waterproof and I live in a rainy climate (yes, even in December), so my original LEDs corroded badly and the strings stopped working.
I ordered a whack of replacement LEDs using the reference numbers you provided. Replacement was simple. The results were spectacular -- better than I had dared hope. For $10 and a few minutes work, I kept $200 worth of strings from getting tossed. Thanks a bunch!