Introducción
Para acceder a las RAM se requiere de la remoción del marco interno
Qué necesitas
Resumen del Video
-
-
Apaga el Mac mini, desconecta todos los cables y dale la vuelta.
-
Inserta el Jimmy en la grieta entre la carcasa superior de aluminio y la carcasa inferior de plástico.
-
Insertar traducción aquí
-
-
-
Doble suavemente el Jimmy hacia fuera para abrir un poco más la grieta y levante un poco la carcasa inferior.
Patience is your best friend.
Do not insert “jimmy in too far. Marking a line from tip upwards on the tool will prevent too far insertion, possibly breaking tabs or damaging internal components.
To prevent the cover closing back up, small strips of matchbook cover (os equivalent) can be inserted about half inch hold prevent closure.
-
-
-
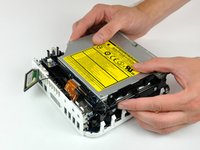
Da la vuelta al Mac mini y levanta la carcasa superior de la inferior.
-
-
-
-
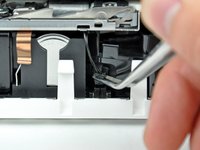
Aprieta ligeramente los dos brazos de sujeción entre sí y levanta la antena AirPort de su poste.
-
-
-
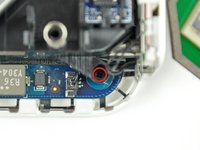
Utiliza la punta de un spudger para levantar ligeramente el lado izquierdo del bloqueo del cable ZIF de su zócalo.
Good catch of the incomplete unlocking instructions. ;P
Hmmm... what if I didn't read this before and I removed the cable and the lock sort of broke?... what would happen... would I experience problems? I can still put the cable back in place and push the lock back down with the spudger.
Same. I totally removed the lock , the edges are busted and won't stay in place, How can I get the cable to stay? what's the fix?
Suzanne -
Dan O & Suzanne, hold the cable in the socket and put a dab of hot glue on both sides, It's non-conductive and should hold...worked for me.
does any one know, where to get the connector from zhe ZIF Cable?
someone, that preowned my mac broke the holder!
Julian, did you ever find where to get a replacement lock for the Zip Cable. Mine is also broken..
Suzanne -
This is not my first memory replacement in a Mini and I got over-confident and stupidly fully removed the audio cable ZIF lock and assumed I had broken something. But, now that I have read this guide more carefully, I am not sure. I sure would love to hear some detailed instructions for putting a ZIF lock back on.
Is it possible that I have removed it without having broken it? If I have broken it, do I have to buy a new cable? Just a new ZIF lock? A new audio board? This is a 2.0 GHz A1176.
Thanks!
Michael, Mine seems to be broken. I bought & tried the Kapton Tape that was suggested & still no sound.
Suzanne -
-
-
-
Levanta el cable plano de la tarjeta de audio y sácalo de su alojamiento.
As an option to avoid potential damage when disconnecting the cable from the ZIF socket and clip, it is possible to unscrew the audio board and remove it along with the internal frame.
-
-
Herramienta utilizada en este paso:Tweezers$4.99
-
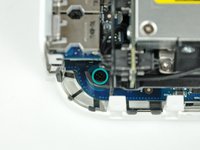
Utiliza un par de pinzas para levantar el conector del cable del sensor térmico del disco duro de su zócalo en la placa lógica.
I've had to remove a few of these connectors on iBooks and other small Apple devices ... I've found that, with careful and gentle pressure (working first one side and then the other) using a small flat-headed jeweller's screwdriver is best.
I agree Mike.
-
-
-
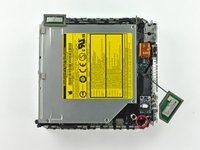
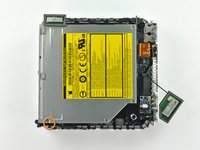
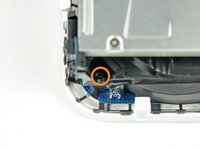
Retira el tornillo Phillips del marco interno cerca de la antena Bluetooth.
Before removing any of these screws, there is another step needed which is not here:
On the front of the optical drive, right side as you look at the slot-load, is a small blue board attached by a single black screw. This needs to be removed before the optical drive can be taken out.
-
-
-
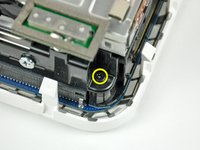
Retira el tornillo Phillips situado cerca de los puertos de audio que sujeta el marco interno a la carcasa inferior.
-
-
-
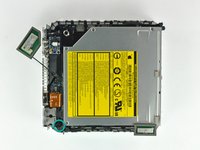
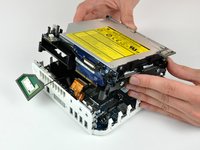
Levanta suavemente el marco interno de la carcasa inferior, teniendo cuidado con la antena AirPort y cualquier otro cable que pueda quedar atrapado.
At this point be careful that you don't pull out the Airport antenna ... but if you do, just check that it is back before re-assembling.
During re-assembly, the internal frame has to go in at an angle ... the back of the optical drive goes in first.
This means that you can seat the fan cover correctly, but more importantly, there is an interconnect board on the back of the optical drive that must be firmly pushed back into its housing on the logic board.
If, like me, you pull the wire on the airport antenna free, it snaps back into place easily. The connector is on the extra card screwed to the motherboard that looks like it has a phone battery embedded in it. The connector is at the top of the 'battery'. This accessory card is the wifi card, so it makes sense that the antenna plugs onto this.
-
-
-
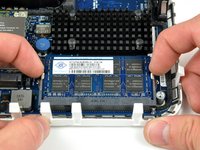
Al mismo tiempo, retire las pestañas a cada lado del módulo RAM desde el centro del mismo. Estas pestañas bloquean el módulo en su lugar y al soltarlas hará que el mismo "salte".
-
-
-
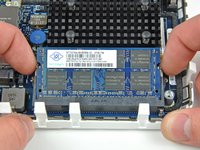
Saque el módulo de la RAM directamente de su conector.
-


Para reensamblar su equipo siga las instrucciones de manera inversa
Para reensamblar su equipo siga las instrucciones de manera inversa
Cancelar: No complete esta guía.
308 personas más completaron esta guía.
Un agradecimiento especial a estos traductores:
100%
¡ Hernan Rivera nos está ayudando a reparar el mundo! ¿Quieres contribuir?
Empezar a traducir ›

19 comentarios
As a quick warning for noobs (that'd be me before I attempted this repair :P ), you need a matching pair of RAM (two chips the same size and spec). Otherwise, the computer won't boot up. ^_^
There were 2x 1GB chips in my 2007 mini. I bought 1x 2GB chip, because I read somewhere that model only would allow 3GB. After replacing a 1GB chip with the new 2GB chip, the system is only showing 1GB RAM installed. Is this what you’re talking about? If I buy another 2GB chip, will it work? PC2-5300 2 GB RAM Chip
Jeff Box -
That is not always true. Often, perhaps…60/40, ish? My 2007 mac mini 2,1 is running one 1gb stick and one 2gb stick, a 500gb Kingston SSD and a salvaged superdrive from a MBP. I am tempted to try a core 2 quad or Xeon in it. For no particular reason than to see if it runs. anyone tried that one? I also had a 2008 mac pro 3,1 running four 2gb and four 4gb of under spec ram without issues.
In the 25 years i’ve been hanging out in server rooms, the client side of the working guidelines for ram matching has become less strict., but still, I believe, the ability to mix is in the manufacturing process. there’s no way but experience to be able to confirm that different makes, speed or size will function together. Unless of course stated in manufacturers documentation. The quality of the individual components will decide.
It will either work or it wont.
If you don’t have ram laying about, then your 100% right, buy matching pairs. otherwise, try it 'till it fires!
I successfully run 3GB in my A1176 Minis. When I put the 2GB chip in the bottom slot with the 1GB chip in the top slot, the machine would not boot and the power LED would blink continuously. When I put the 1GB chip in the bottom slot with the 2GB chip in the top slot, the machine works perfectly and sees all 3GB of RAM. (I don’t know if this is a rule or not, this is strictly my anecdotal experience.) I have *not* experienced installing 3GB and having the Mini run and only report 1GB. If you do that, I’d recommend checking to assure that the 2GB stick is seated properly.
I’ve also used 4GB without any trouble in A1176 Minis, but this model can only address a maximum of 3GB RAM. I have run performance comparisons between one equipped with 4GB and equipped with 3GB RAM and they measured identically. If you’re upgrading an A1176 from 2GB (equipped with a pair of 1GB chips) to 3GB, you can save a few dollars by just buying a single PC2-5300 2GB stick.
Mark B -
Thanks a lot, 1Gb -> 4Gb is done !
This was easier than it looked, the only thing I had trouble with was getting the cover off (tried to use a flexible palette knife, bad idea) and getting the little sensor plug back in (it's SO tiny.) Oh, and one screw I had trouble getting back into the hidden recessed hole because my screwdriver isn't magnetized.
Speaking of which, size of screwdriver matters, I bought a set with a size 0 and size 000, but no 00, neither worked. Fortunately I had one of those cheap eyeglass repair kits, and the Phillips screwdriver worked perfectly.
The covers are the Worst….then and Now!!!
Thank you so much iFixit! Very nice guide. Followed and worked like a charm. Keep up the good info coming!
Great step-by-step instructions, but now it won't boot... What to do?
did you change ram
Great job, went like a charm. btw, the old Mac mini 2007 can accept 4 Gb, and it looks like it uses the full monthly according to the memory app I am using.
Some say t can't but how can I make sure of that, does any one knows?
Went from 2 towards 4 Gb, now my old iMac from the same year is most lightly the same hardware as this Mini and that one can hold 4 to 6 Gb.
Grts
The Mac Fiddler
Instructions along with comments worked well. Thank you. Tab of silicon grease very helpful on reassembly.
Excellent! Thanks a million! :-)
Nice equipment
This update worked very well. Tougher to get apart than expected. My experience was that the prying tool is very flexible and bends. You are trying to find and push the plastic hooks inward slightly to release them rather than prying on the back housing. Also be careful with the Airport antena - it can pop off the connector from the interior pc-board. I didn’t find this out until I went to re-attach it and found he wire had popped free and I had to take out all the screws and and connectors and disassemble a second time to re-connect it! Fortunately ifixit has instructions on where that goes, thanks!
that is so right. the prying is not good. the tabs, especially on a ten or more years old device, are brittle and the intake vents don’t leave much for them to be mounted on. I have broken a couple, when I was a Mac mini virgin.
there’s always that one screw/bolt/nut that gives you the gears. cars, macs, anything mechanical always has that one @#!@#@ fastener.
Thank you, it has worked very good!
Thank you! Works very well!
I found a pizza cutter is the best tool to separate cover from the bottom part.
A spackle knife makes these steps go much faster.
jouniseppanen - Contestar
A double sided letter opener or a thin non-serrated butter knife will suffice.
To prenent cosmetic blemishes, place a matchbook cover or similar thin cardboard on the outer perimeter under the “jimmy”.
Mike - Contestar
Despite mentioning recommended tools at the top I think it’s really worthwhile making a point about narrow Philips screwdrivers at this point before people start putting the case apart.
Matt D - Contestar