Saltar al contenido principal

Esta versión puede contener ediciones incorrectas. Cambie a la última instantánea verificada.

Reemplazo del inversor de pantalla PowerBook G4 Aluminio 15" 1-1.5 GHz

Qué necesitas

  1. Reemplazo del inversor de pantalla PowerBook G4 Aluminio 15" 1-1.5 GHz, Batería: paso 1, imagen 1 de 1
    • Usa una moneda para girar el tornillo de bloqueo de la batería 90 grados en sentido horario.

    • Saca la bateria del ordenador.

  2. Este paso está sin traducir. Ayuda a traducirlo

    Reemplazo del inversor de pantalla PowerBook G4 Aluminio 15" 1-1.5 GHz: paso 2, imagen 1 de 1
    • The following procedure allows the changing of the rear display bezel without removing the display assembly from the computer. Do not attempt to rotate the display back farther than the hinges allow or your computer may be damaged.

    • Open the computer with the display facing you and rotate the display back as far as possible.

    • Remove the T6 Torx screw from the bottom left corner of the display assembly. The computer casing will not allow the screwdriver to be inserted directly into the screw, so be careful not to strip the screw.

  3. Este paso está sin traducir. Ayuda a traducirlo

    Reemplazo del inversor de pantalla PowerBook G4 Aluminio 15" 1-1.5 GHz: paso 3, imagen 1 de 1
    Herramienta utilizada en este paso:
    Tweezers
    $4.99
    Comprar
    • Remove the T6 Torx screw from the bottom right corner of the display assembly.

    • To avoid cross-threading these screws during reinstallation, use a pair of tweezers to start each screw in its hole before using your Torx screwdriver to tighten them.

  4. Este paso está sin traducir. Ayuda a traducirlo

    Reemplazo del inversor de pantalla PowerBook G4 Aluminio 15" 1-1.5 GHz: paso 4, imagen 1 de 3 Reemplazo del inversor de pantalla PowerBook G4 Aluminio 15" 1-1.5 GHz: paso 4, imagen 2 de 3 Reemplazo del inversor de pantalla PowerBook G4 Aluminio 15" 1-1.5 GHz: paso 4, imagen 3 de 3
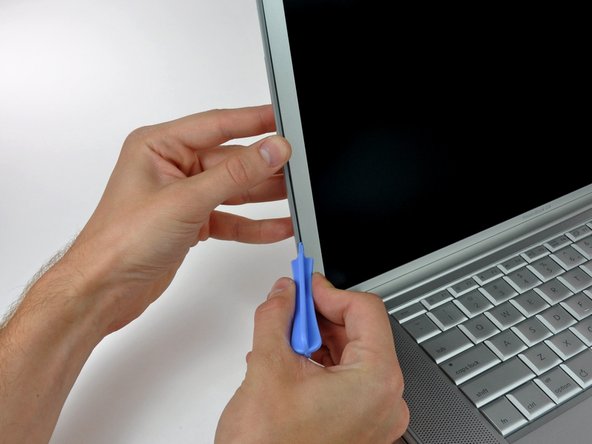
    • The next few steps require the use of plastic opening tools and spudgers that will probably be destroyed in the process. Have a few spares of each tool handy.

    • Insert a plastic opening tool between the left edge of the front display bezel and the plastic strip attached to the rear bezel, with the edge of the tool angled toward the LCD.

    • Rotate the tool away from the LCD to pop the rear bezel off the tabs on the front display bezel.

    • Work along the left edge of the display until the rear bezel is evenly separated from the front bezel.

    • Freeing these tabs may require some force. Be sure to support the display assembly with your other hand to avoid putting too much strain on the hinges.

  5. Este paso está sin traducir. Ayuda a traducirlo

    Reemplazo del inversor de pantalla PowerBook G4 Aluminio 15" 1-1.5 GHz: paso 5, imagen 1 de 2 Reemplazo del inversor de pantalla PowerBook G4 Aluminio 15" 1-1.5 GHz: paso 5, imagen 2 de 2
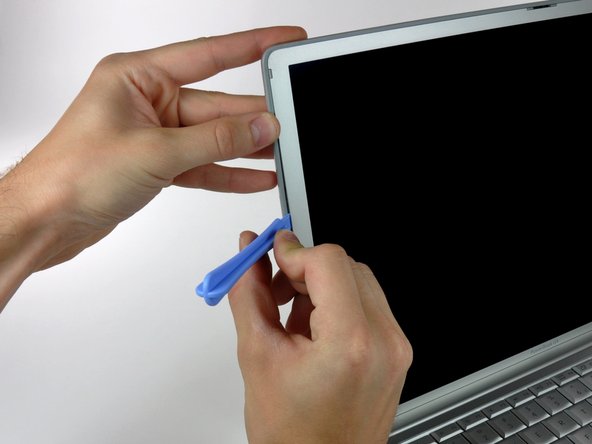
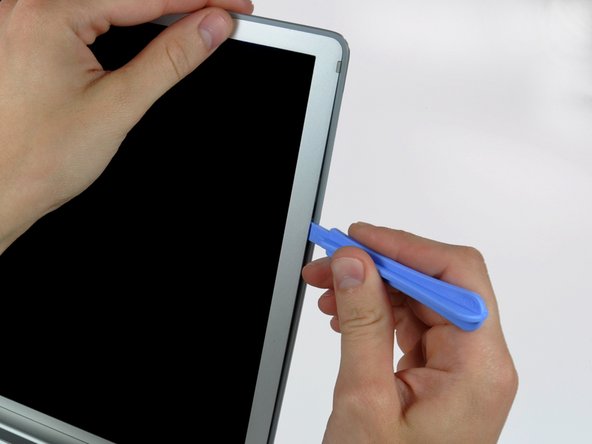
    • Insert a plastic opening tool between the right edge of the front display bezel and the plastic strip attached to the rear bezel, with the edge of the tool angled toward the LCD.

    • Rotate the tool away from the LCD to pop the rear bezel off the tabs on the front display bezel.

    • Work along the right edge of the display until the rear bezel is evenly separated from the front bezel.

  6. Este paso está sin traducir. Ayuda a traducirlo

    Reemplazo del inversor de pantalla PowerBook G4 Aluminio 15" 1-1.5 GHz: paso 6, imagen 1 de 3 Reemplazo del inversor de pantalla PowerBook G4 Aluminio 15" 1-1.5 GHz: paso 6, imagen 2 de 3 Reemplazo del inversor de pantalla PowerBook G4 Aluminio 15" 1-1.5 GHz: paso 6, imagen 3 de 3
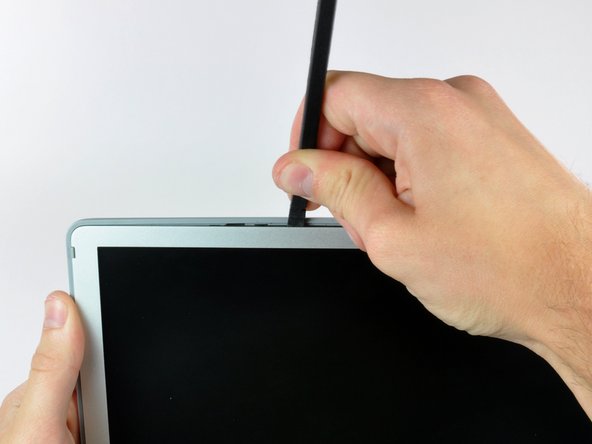
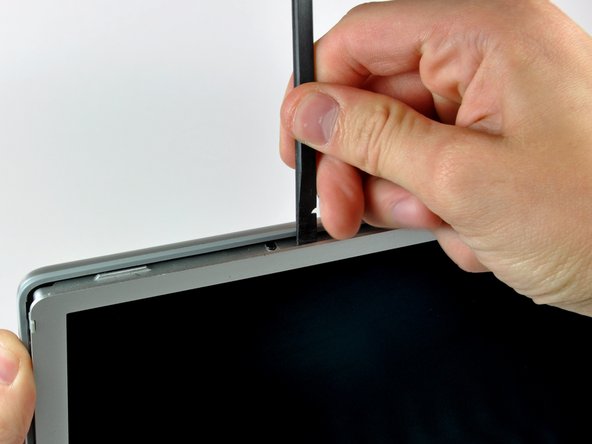
    • Insert a spudger just to the left of the hinge opening on the top edge of the display between the front display bezel and the plastic strip attached to the rear bezel.

    • Pry the rear bezel away from the front bezel along the top left half of the display.

    • If the flat end of your spudger is flexing too much, trim about .125" of the end to increase its stiffness.

  7. Este paso está sin traducir. Ayuda a traducirlo

    Reemplazo del inversor de pantalla PowerBook G4 Aluminio 15" 1-1.5 GHz: paso 7, imagen 1 de 2 Reemplazo del inversor de pantalla PowerBook G4 Aluminio 15" 1-1.5 GHz: paso 7, imagen 2 de 2
    • Insert a spudger just to the right of the hinge opening on the top edge of the display between the front display bezel and the plastic strip attached to the rear bezel.

    • Pry the rear bezel away from the front bezel along the top right half of the display.

    • To release the clips in the far left and right corners of the display, it may be necessary to run a spudger parallel to the face of the display along the top edge of the front display bezel and force it into the corners to pop the rear bezel off.

  8. Este paso está sin traducir. Ayuda a traducirlo

    Reemplazo del inversor de pantalla PowerBook G4 Aluminio 15" 1-1.5 GHz: paso 8, imagen 1 de 2 Reemplazo del inversor de pantalla PowerBook G4 Aluminio 15" 1-1.5 GHz: paso 8, imagen 2 de 2
    • Now that the top edge is released, use a spudger to completely release the clips along the left edge of the display.

  9. Este paso está sin traducir. Ayuda a traducirlo

    Reemplazo del inversor de pantalla PowerBook G4 Aluminio 15" 1-1.5 GHz: paso 9, imagen 1 de 2 Reemplazo del inversor de pantalla PowerBook G4 Aluminio 15" 1-1.5 GHz: paso 9, imagen 2 de 2
    • Use a spudger to release the clips along the right edge of the display.

  10. Este paso está sin traducir. Ayuda a traducirlo

    Reemplazo del inversor de pantalla PowerBook G4 Aluminio 15" 1-1.5 GHz: paso 10, imagen 1 de 3 Reemplazo del inversor de pantalla PowerBook G4 Aluminio 15" 1-1.5 GHz: paso 10, imagen 2 de 3 Reemplazo del inversor de pantalla PowerBook G4 Aluminio 15" 1-1.5 GHz: paso 10, imagen 3 de 3
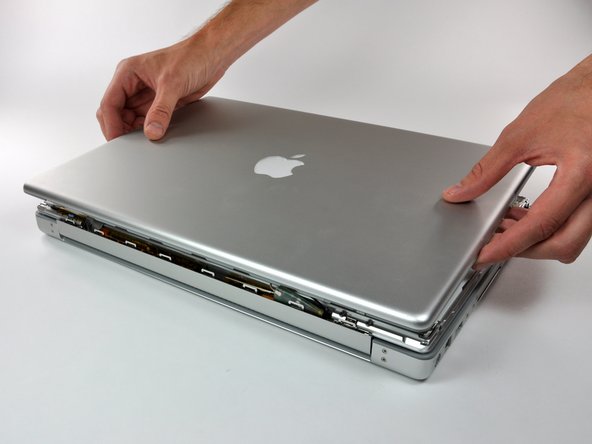
    • Close the display.

    • The rear bezel is still attached to the display by the antenna cables.

    • Rotate the top edge of the rear display bezel slightly away from the rest of the display, and then lift the lower edge of the rear bezel away from the clutch cover.

  11. Este paso está sin traducir. Ayuda a traducirlo

    Reemplazo del inversor de pantalla PowerBook G4 Aluminio 15" 1-1.5 GHz: paso 11, imagen 1 de 3 Reemplazo del inversor de pantalla PowerBook G4 Aluminio 15" 1-1.5 GHz: paso 11, imagen 2 de 3 Reemplazo del inversor de pantalla PowerBook G4 Aluminio 15" 1-1.5 GHz: paso 11, imagen 3 de 3
    • Carefully lift the antenna board out of the clutch assembly.

    • Peel the three self-adhesive flaps off the plastic cover on the underside of the antenna board.

    • Remove the protective plastic cover from the antenna board.

  12. Este paso está sin traducir. Ayuda a traducirlo

    Reemplazo del inversor de pantalla PowerBook G4 Aluminio 15" 1-1.5 GHz: paso 12, imagen 1 de 2 Reemplazo del inversor de pantalla PowerBook G4 Aluminio 15" 1-1.5 GHz: paso 12, imagen 2 de 2
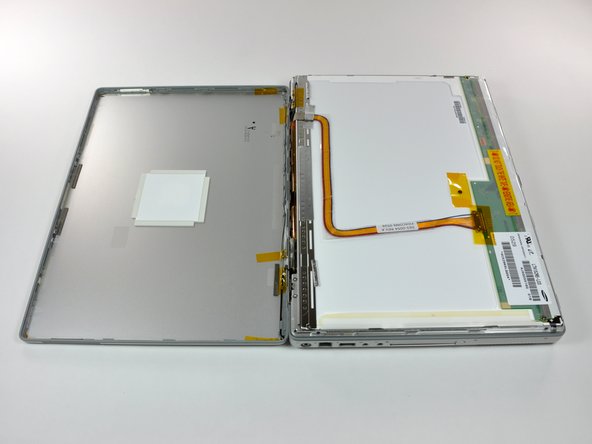
    • Use the flat end of a spudger to disconnect both antenna connectors from the antenna board.

    • The gray antenna attaches near the corner of the antenna board.

    • The rear bezel can now be completely removed from the LCD assembly.

  13. Reemplazo del inversor de pantalla PowerBook G4 Aluminio 15" 1-1.5 GHz, Inversor de la pantalla: paso 13, imagen 1 de 2 Reemplazo del inversor de pantalla PowerBook G4 Aluminio 15" 1-1.5 GHz, Inversor de la pantalla: paso 13, imagen 2 de 2
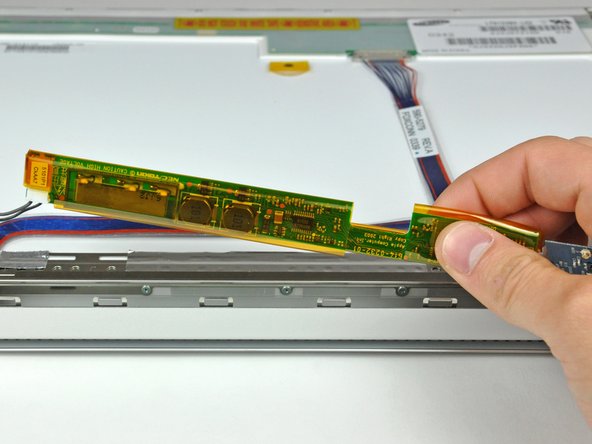
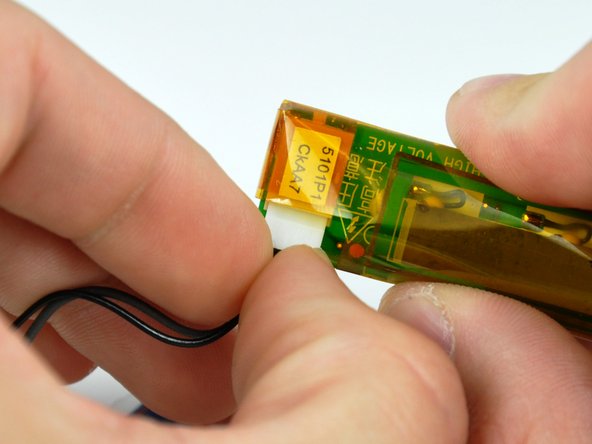
    • El inversor es una placa de circuito extremadamente delgada que es muy delicada y se agrieta fácilmente. Ten cuidado al manipularlo.

    • Usando la punta de un spudger, levanta el inversor de la cubierta del embrague.

    • Levanta el inversor lo suficiente para revelar ambos conectores de cable.

    • Levanta el inversor lo suficiente para revelar ambos conectores de cable.

  14. Reemplazo del inversor de pantalla PowerBook G4 Aluminio 15" 1-1.5 GHz: paso 14, imagen 1 de 2 Reemplazo del inversor de pantalla PowerBook G4 Aluminio 15" 1-1.5 GHz: paso 14, imagen 2 de 2
    • Desconecta ambos cables del inversor separando sus conectores de los enchufes de la placa del inversor.

    • Quita el inversor de la pantalla.

Conclusión

Para volver a armar tu dispositivo, sigue estas instrucciones en orden inverso.

10 personas más completaron esta guía.

Un agradecimiento especial a estos traductores:

en es

100%

¡ Angel nos está ayudando a reparar el mundo! ¿Quieres contribuir?
Empezar a traducir ›

Documentos Adjuntos

0 comentarios

Agregar Comentario

Ver Estadísticas:

Ultimas 24 horas: 0

Ultimos 7 días: 4

Ultimos 30 días: 13

Todo El Tiempo: 8,886