Introducción
Use this guide to replace the CD-ROM drive in your Power Mac G5.
-
-
-
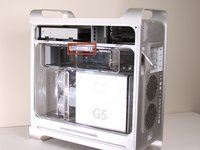
Locate the CD-ROM Drive on the top left corner of desktop.
The front of the existing photo does not show a polished faceplate that Apple added to the drive, at least on my late 2004 G5. At first I was concerned that I'd damage it, as if it were physically attached to the chassis, but thankfully it was not. My drive ended up sliding out as the instructions show.
That faceplate is easily popped off the old drive and placed atop your new drive. BE ADVISED: The door of your new drive is unlikely to completely clear the opening of your G5. Until I shave off a couple of millimeters from the new drive's top door face, I have to help it by pulling the tray with my two index fingers. You will too.
Best would be to remove the front bezel from the tray, leaving just the tray itself.
-
-
-
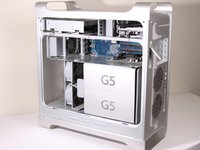
Wiggle and pull out the CD Drive.
Be careful here - my G5 had the ribbon cable taped to the top of the drive. I had to peel it off before I could remove the drive from the case.
The service manual deals with this differently: detach the other end of the ribbon cable from the logic board, and let the cable come out with the drive. You need to remove the intake fans to see it, but that's no big deal.
You can then peel off the tape from the old drive (they recommend "gently, so the double-sided tape stays on the cable"), and re-tape the cable to the new drive.
When re-assembling, let the cable fall behind the logic board, feed it through the slot and plug it in. Then put the fans back in place.
-


To reassemble your device, follow these instructions in reverse order.
To reassemble your device, follow these instructions in reverse order.
Cancelar: No complete esta guía.
43 personas más completaron esta guía.
Equipo

Cal Poly, Team 5-8, Forte Winter 2010 Miembro de Cal Poly, Team 5-8, Forte Winter 2010
CPSU-FORTE-W10S5G8
7 Miembros
20 Guías creadas
2 comentarios
Misleading title. I know how to unplug the drive, thank you very much.
I've replaced the original drive with a better one and the %#*@ tray is stuck because it's too high.