Introducción
Los cepillos de dientes eléctricos funcionan con una batería recargable que permite el movimiento de cepillado alternativo de las cerdas. Si tu cepillo de dientes eléctrico pierde energía rápidamente o no retiene la carga, lo más probable es que debas reemplazar la batería recargable.
Qué necesitas
-
-
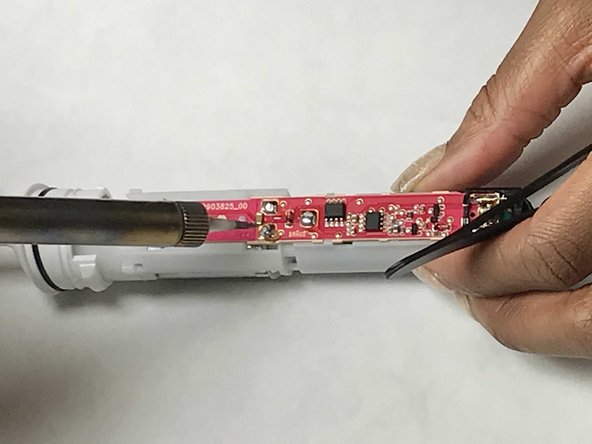
Saca la cabeza y usa unos alicates para quitar la tapa blanca. Extrae el núcleo del circuito.
-
-
-
Desuelda en estas cuatro (4) ubicaciones.
-
Las dos (2) conexiones del motor
-
El lado positivo (+) de la batería
-
El lado negativo (-) de la batería
I am hoping the author of his guide receives theses comments. I have a Braun brush with dud battery, and am hoping to replace. I am afraid it is not at all clear from the photographs which are the points that need de-soldering. Thanks for any help.
Having now noticed and browsed the guide history, I see that there were indicators for where to desolder (on one photo only). I can’t understand why these clarifying marks were then removed from the final draft?!?!?!
IFixit technical team advised us to remove the indicators on the photo before we could publish it .
How do I contact the technical team to complain about their censoring of indicators. Bonkers!
Unless you are extremely skilled at soldering I advise against attempting to do this battery replacement. I had two brushes with rapidly discharging batteries. After the first one failed to work with replacement battery, I tried on the second, only to discover that, by the time the solder had heated enough to liquify and remove, the fine circuits on the circuit board had fried and the brush was useless. (And I have done my fair share of soldering)
-
-
-
Der neue Akku sollte entweder passende Lötfahnen haben oder die alten sollten an den neuen angelötet werden.
Lötfahnen kann man nicht anlöten, das geht nur im Werk.
VauWeh -


Para volver a armar tu dispositivo, sigue estas instrucciones en orden inverso. Recuerda aplicar suficiente soldadura para volver a conectar los terminales.
Para volver a armar tu dispositivo, sigue estas instrucciones en orden inverso. Recuerda aplicar suficiente soldadura para volver a conectar los terminales.
Cancelar: No complete esta guía.
15 personas más completaron esta guía.
Un agradecimiento especial a estos traductores:
100%

¡ Francisco Javier Saiz Esteban nos está ayudando a reparar el mundo! ¿Quieres contribuir?
Empezar a traducir ›
Equipo

IUPUI, Team S2-G1, Harley Fall 2017 Miembro de IUPUI, Team S2-G1, Harley Fall 2017
IUPUI-HARLEY-F17S2G1
3 Miembros
8 Guías creadas
8 comentarios
This is very easy to do. I had no problems following your instructions.
Thanks.
Is this a regular rechargeable AA?
Thanks again.
The original battery is a NiCd with tabs. I just spot welded tabs onto a standard AA NiMH battery and it worked fine.
T C -
@stephen Shaw These batteries worked for me: https://www.amazon.com/dp/B00CR0R8KQ/ref...
Ruotare per estrarre
sergio_storato - Contestar
You can use the hole in the bottom of the charging base (underside) that the top fits into and catches. Just twist gentilly back and forth until it loosens, then pull up with your fingers or pliers. Note, this is not like the Braun sonic care where the bottom comes off… should Have looked at the guides first as a I cracked the bottom trying to twist off the bottom like that brush.
Aaron Giesick - Contestar
Die weiße Kappe kann nicht einfach nur abgezogen werden. Sie muss nach links gedreht werden!
Freubert - Contestar
I saw on a Youtube video you can use the center hole of the charging base instead of pliers. It fits perfectly on mine.
George Tedrick - Contestar
Don't grab it with pliers--you will break off the narrow retainer stub. Instead use a thin blade to pry up an edge of the cap, then insert a wide flat blade to pry up the core out of the handle. Plier could be used for pulling but not for twisting. This also works for the Dentiguard version from Aldis.
Kiev Kenny - Contestar
I don't believe it opens like this. Pulling on the top thing like on the picture did break mine. It's alright though because I kind of knew while I was pulling and I kept on pulling knowing it would break any second. But if you need yours, you better look for some other instruction. Would be nice to update this one as well.
Simeon - Contestar