Saltar al contenido principal

Nintendo DS Lite Top Screen Replacement

Qué necesitas

  1. Nintendo DS Lite Top Screen Replacement, Nintendo DS Lite Battery Disconnect: paso 1, imagen 1 de 1
    • Place your device upside down and locate the battery compartment.

    • Find the Phillips head screw securing the battery cover in the bottom right hand corner of the device.

    • Loosen the screw enough to remove the battery cover but leave the screw in the cover for reassembly.

    • Use only a Phillips screwdriver to remove screw.

  2. Nintendo DS Lite Top Screen Replacement: paso 2, imagen 1 de 1
    • Slowly remove the battery cover with the iFixit opening tool.

    • Make sure to remove the cover carefully to keep from losing Phillips screw in the cover. It will be needed for reassembly.

  3. Nintendo DS Lite Top Screen Replacement: paso 3, imagen 1 de 2 Nintendo DS Lite Top Screen Replacement: paso 3, imagen 2 de 2
    • Use the iFixit opening tool to carefully pry the battery out of the case.

    • After the old battery is removed replace it with a new battery facing the same direction as when the cover was opened.

    • For some devices, you may be able to remove the battery by flipping the DS over and letting the battery fall into your hand.

  4. Nintendo DS Lite Top Screen Replacement, Disassembling Nintendo DS Lite Bottom Case: paso 4, imagen 1 de 1
    • Remove the following seven screws that secure the lower case to the DS Lite:

    • Three silver tri-wing screws (5mm long)

    • One black tri-wing screw (4mm)

    • Two gold Phillips screws (4mm)

    • One silver Phillips screw (3mm)

    • Do not remove the silver PH screw (3mm) in the battery compartment yet. It holds the main PCB in place.

  5. Nintendo DS Lite Top Screen Replacement: paso 5, imagen 1 de 1
    • On the front edge of the Nintendo DS between the headphone jack plug and volume controls remove the plastic insert (or cartridge) from the lower slot (Slot 2).

  6. Nintendo DS Lite Top Screen Replacement: paso 6, imagen 1 de 2 Nintendo DS Lite Top Screen Replacement: paso 6, imagen 2 de 2
    • Flip the unit over so that it is facing right-side up.

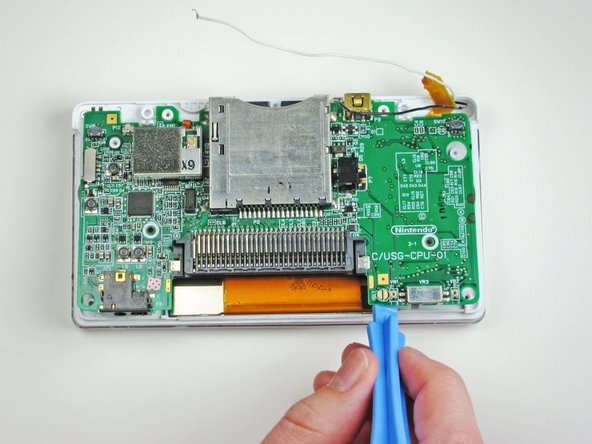
    • Use a spudger to pry open the gap between the bottom case and the front panel. Work all the way around the case until the panel is free.

    • Avoid touching the L and R shoulder buttons, because they easily detach and are difficult to reassemble. Keep the bottom case flat against your workbench to help hold the shoulder buttons in place.

  7. Nintendo DS Lite Top Screen Replacement: paso 7, imagen 1 de 3 Nintendo DS Lite Top Screen Replacement: paso 7, imagen 2 de 3 Nintendo DS Lite Top Screen Replacement: paso 7, imagen 3 de 3
    • Carefully separate the two pieces by hand.

    • The two shoulder buttons are made up of three pieces -- the plastic button, a pin, and a spring. If they accidentally pop out while you are working, study the picture and make sure you put the spring in the correct position.

    • When reassembling the cover, make sure that the power switch caver on the bottom case is in the off (down) position to avoid breakage.

  8. Aviso: los pasos 8-11 provienen de una guía que está marcada como "En progreso".

    Nintendo DS Lite Top Screen Replacement, Motherboard: paso 8, imagen 1 de 2 Nintendo DS Lite Top Screen Replacement, Motherboard: paso 8, imagen 2 de 2
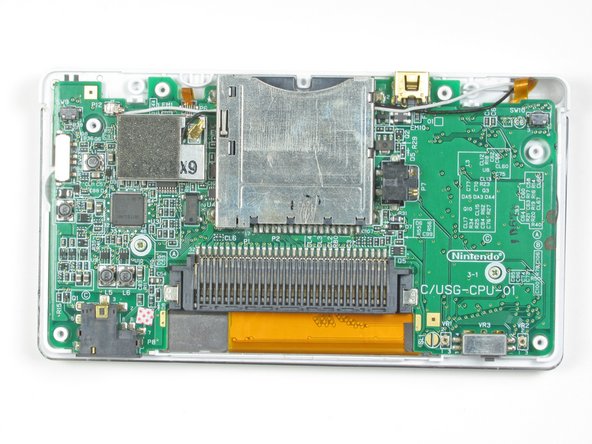
    • Locate the two screws that attach the logic board to the device.

    • Unscrew the two Phillips head screws.

  9. Nintendo DS Lite Top Screen Replacement: paso 9, imagen 1 de 1
    • With a plastic opening tool, gently separate the logic board from the device base.

    • The ribbon cable and two wires are still connected to the logic board.

    • The buttons may fall out, but can easily be put back in place.

  10. Nintendo DS Lite Top Screen Replacement: paso 10, imagen 1 de 3 Nintendo DS Lite Top Screen Replacement: paso 10, imagen 2 de 3 Nintendo DS Lite Top Screen Replacement: paso 10, imagen 3 de 3
    • Flip the logic board over so that the touch screen is facing up.

    • Using metal tweezers, carefully disconnect the other ribbon cable that connects the touch screen with the logic board.

  11. Nintendo DS Lite Top Screen Replacement: paso 11, imagen 1 de 1
    • Using one finger nail or the plastic opening tool, carefully lift the brown securing flap of the connector. Then disconnect the ribbon cable that connects the logic board to the upper screen.

  12. Nintendo DS Lite Top Screen Replacement, Top Screen: paso 12, imagen 1 de 2 Nintendo DS Lite Top Screen Replacement, Top Screen: paso 12, imagen 2 de 2
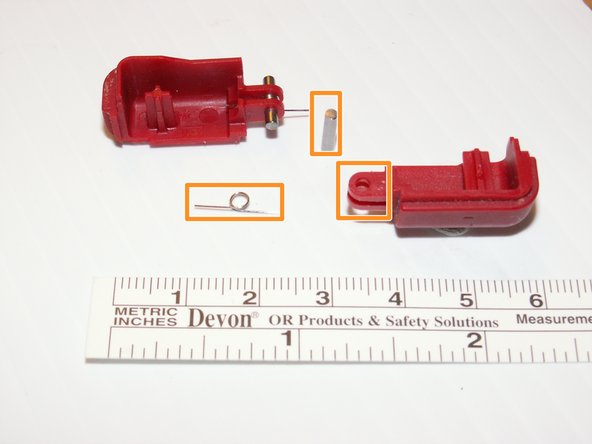
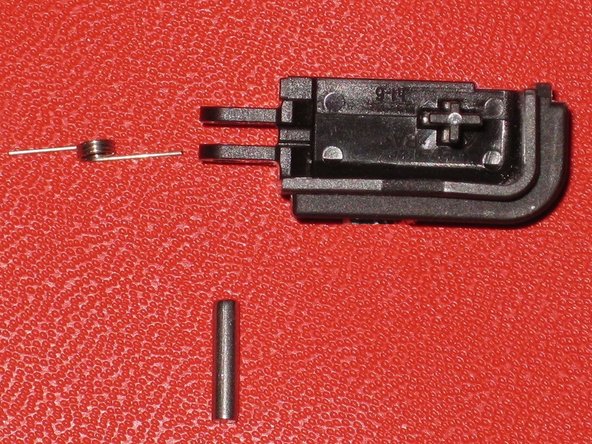
    • Remove the two Phillips-head screws that hold the hinge in place.

    • Open the system up (just like if you were about to use it normally).

  13. Nintendo DS Lite Top Screen Replacement: paso 13, imagen 1 de 2 Nintendo DS Lite Top Screen Replacement: paso 13, imagen 2 de 2
    • After opening it, carefully unhinge them from each other by sliding the bottom piece to the left and the top piece to the right.

    • Be aware that you can pinch wires while doing this, so don't yank it apart.

  14. Nintendo DS Lite Top Screen Replacement: paso 14, imagen 1 de 1
    • Using a push pin, remove the four rubber bumpers located at the corners of the top screen.

    • After removing the LEDs and pulling apart the hinge, remove the round hinge shaft. This should be in the top screen piece.

  15. Nintendo DS Lite Top Screen Replacement: paso 15, imagen 1 de 2 Nintendo DS Lite Top Screen Replacement: paso 15, imagen 2 de 2
    • Unscrew the four Phillips-head screws and remove the top panel.

    • Be careful not to damage the wires and the ribbon cable.

  16. Nintendo DS Lite Top Screen Replacement: paso 16, imagen 1 de 2 Nintendo DS Lite Top Screen Replacement: paso 16, imagen 2 de 2
    • Carefully remove the two speakers and the green wireless card from the top panel.

  17. Nintendo DS Lite Top Screen Replacement: paso 17, imagen 1 de 1
    • Remove the screen by orienting it face down and pushing up on the screen from underneath.

    • Don't press on the screen too hard, or you may crack the screen.

  18. Nintendo DS Lite Top Screen Replacement: paso 18, imagen 1 de 1
    • Carefully slide the ribbon cable through the clip.

    • Be careful not to damage the ribbon cable by pulling to hard or creasing it.

Conclusión

To reassemble your device, follow these instructions in reverse order.

21 personas más completaron esta guía.

Brittany K

Miembro Desde 01/21/10

1,484 Reputación

4 Guías creadas

Equipo

Cal Poly, Team 16-30, Maness Winter 2010 Miembro de Cal Poly, Team 16-30, Maness Winter 2010

CPSU-MANESS-W10S16G30

4 Miembros

24 Guías creadas

6 comentarios

This guide is extremely poor. Please do not follow if you wish to repair your DS top screen. The steps finish before you get the end probably due to the fact the author blatantly doesn't want to mention the fact you need to solder the speakers on.

There should also be more warnings about the power switch broke on both the examples I tried to repair.

Neil Baker - Contestar

iFixit will be creating new DS Lite guides very soon. Give the authors credit though, because it's not easy to create a full set of repair guides!

Matthew Newsom -

no im with neil this is just bad

Brian Girnus - Contestar

Yeah, this guide really sucks. I ripped one of the tips of the orange tapes trying to remove the old screen. I don’t think it’ll work now. Thanks a whole lot, @%^$$@$#.

MR J - Contestar

Honestly, thats a mistake on your end.

HeronEgret -

Agregar Comentario

Ver Estadísticas:

Ultimas 24 horas: 8

Ultimos 7 días: 75

Ultimos 30 días: 370

Todo El Tiempo: 40,893