Saltar al contenido principal

Nikon COOLPIX P7700 Reflective Mirror Replacement

Qué necesitas

  1. Nikon COOLPIX P7700 Reflective Mirror Replacement, Back Casing: paso 1, imagen 1 de 2 Nikon COOLPIX P7700 Reflective Mirror Replacement, Back Casing: paso 1, imagen 2 de 2
    • Turn camera to the left side and remove the two 4.3 mm black side screws using the Phillips #00 screwdriver.

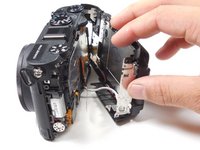
    • Remove the side panel.

  2. Nikon COOLPIX P7700 Reflective Mirror Replacement: paso 2, imagen 1 de 1
    • Open the touch screen, and remove the three 4.3 mm black screws inside using the Phillips #00 screwdriver.

  3. Nikon COOLPIX P7700 Reflective Mirror Replacement: paso 3, imagen 1 de 1
    • Remove the 4.3 mm black screw on top of the camera, right above where the screen folds out. Use the Phillips #00 screwdriver.

  4. Nikon COOLPIX P7700 Reflective Mirror Replacement: paso 4, imagen 1 de 1
    • Remove the two 4.3 mm black screws on the right side of the camera using the Phillips #00 screwdriver.

  5. Nikon COOLPIX P7700 Reflective Mirror Replacement: paso 5, imagen 1 de 1
    • Remove the 4.3 mm black screws on the bottom of the camera using the Phillips #00 screwdriver.

  6. Nikon COOLPIX P7700 Reflective Mirror Replacement: paso 6, imagen 1 de 2 Nikon COOLPIX P7700 Reflective Mirror Replacement: paso 6, imagen 2 de 2
    • Begin separating the camera into two parts.

    • It is okay to remove the orange ribbon. This will be easily put back into place when re-assembling.

  7. Nikon COOLPIX P7700 Reflective Mirror Replacement: paso 7, imagen 1 de 1
    • Remove the back casing.

  8. Nikon COOLPIX P7700 Reflective Mirror Replacement, Reflective Mirror: paso 8, imagen 1 de 2 Nikon COOLPIX P7700 Reflective Mirror Replacement, Reflective Mirror: paso 8, imagen 2 de 2
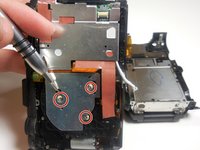
    • Remove the three 4.3 mm screws on the right metal sheet using a Phillips #00 screwdriver.

    • It is okay to remove the orange ribbon.

  9. Nikon COOLPIX P7700 Reflective Mirror Replacement: paso 9, imagen 1 de 1
    • Lift the metal sheet up to locate the reflective mirror, but do not bend or remove it.

  10. Nikon COOLPIX P7700 Reflective Mirror Replacement: paso 10, imagen 1 de 1
    • Delicately remove the glass mirror and exchange it with the replacement mirror.

    • Place the metal sheet back down and secure the three 4.3 mm screws.

Conclusión

To reassemble your device, follow these instructions in reverse order.

Una persona más ha completado esta guía.

Dustin Wahl

Miembro Desde 03/11/15

775 Reputación

4 Guías creadas

Equipo

2 comentarios

There is a further screw hidden under the black cover on the left hand side of the camera (visible in step 1).

Without removing this silver screw, it is not possible to take the camera apart.

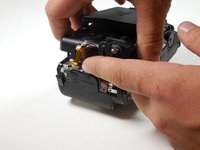
There should be an explanation about how to properly remove the ribbon cable. One has to flick up a dark part attached to the ribbon cable socket (opposite to where the ribbon cable enters). Putting the cable back is not “easy”, it is rather fiddly. One needs to put down the dark part again, after inserting the cable.

The three screws for the silver backplate that presses the sensor against the spacers and lens need to be tighten just the right amount. One cannot just fully tighten them. These three screws determine the distance of the sensor to the lens and also its alignment to the lens. One essentially needs to perform a sensor calibration when putting the camera together again.

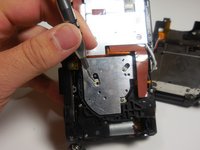
Finally, the part replaced in this guide is not a “reflective mirror”. It is probably a low pass filter, potentially an IR filter or both.

Tom C - Contestar

And how can you calibrate, adjust?

lothar4460 - Contestar

Agregar Comentario

Ver Estadísticas:

Ultimas 24 horas: 0

Ultimos 7 días: 3

Ultimos 30 días: 11

Todo El Tiempo: 1,620