Saltar al contenido principal

Motorola Moto X Battery Replacement

Sólo Prerrequisito
Esta guía solo debería usarse como prerrequisito para otras guías. Por tanto, estará incompleta.

Qué necesitas

  1. Motorola Moto X Battery Replacement, Battery: paso 1, imagen 1 de 3 Motorola Moto X Battery Replacement, Battery: paso 1, imagen 2 de 3 Motorola Moto X Battery Replacement, Battery: paso 1, imagen 3 de 3
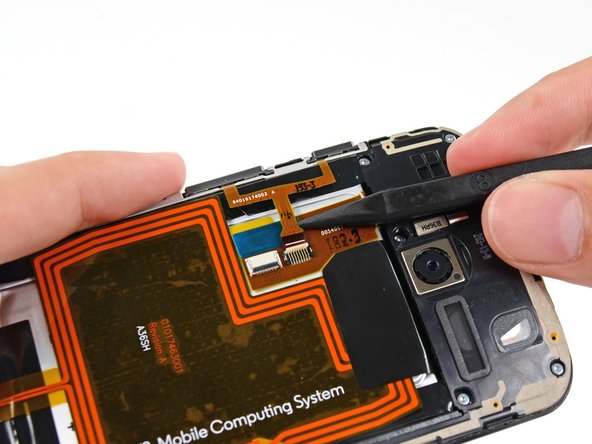
    • Insert the tip of a spudger under the battery cable near the connector to lift it straight up from its socket.

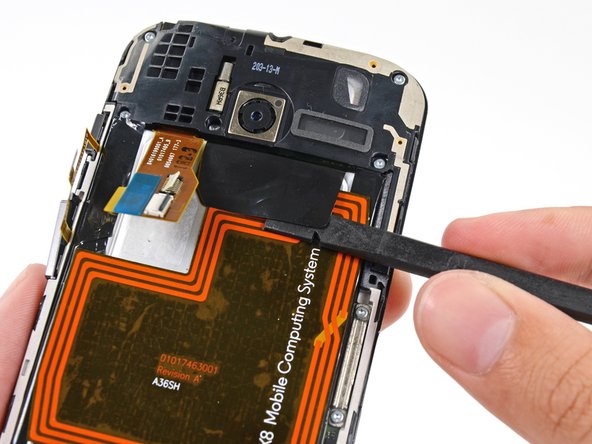
    • Use the flat end of a spudger to disconnect the NFC antenna cable connector.

  2. Motorola Moto X Battery Replacement: paso 2, imagen 1 de 3 Motorola Moto X Battery Replacement: paso 2, imagen 2 de 3 Motorola Moto X Battery Replacement: paso 2, imagen 3 de 3
    • Use the tip of a spudger to flip up the ZIF retaining flap from the button assembly cable connector.

    • Slide the tip of the spudger under the button assembly cable near the connector to pull the cable straight out of its socket.

  3. Motorola Moto X Battery Replacement: paso 3, imagen 1 de 2 Motorola Moto X Battery Replacement: paso 3, imagen 2 de 2
    • Insert the flat end of a spudger under the interconnect cable to free it from the adhesive holding it to the battery.

  4. Motorola Moto X Battery Replacement: paso 4, imagen 1 de 2 Motorola Moto X Battery Replacement: paso 4, imagen 2 de 2
    • Use the flat end of a spudger to peel the adhesive pull-tab off the top of battery.

  5. Motorola Moto X Battery Replacement: paso 5, imagen 1 de 3 Motorola Moto X Battery Replacement: paso 5, imagen 2 de 3 Motorola Moto X Battery Replacement: paso 5, imagen 3 de 3
    Herramienta utilizada en este paso:
    Tesa 61395 Tape
    $5.99
    Comprar
    • Use the adhesive pull-tab to lift the battery from its recess.

    • The battery is secured to the motherboard with mild adhesive. Peel slowly, and be careful not to bend or puncture the battery.

    • Remove the battery from the phone.

    • When reassembling your phone secure the battery with double-sided tape or pre-cut adhesive strips.

Conclusión

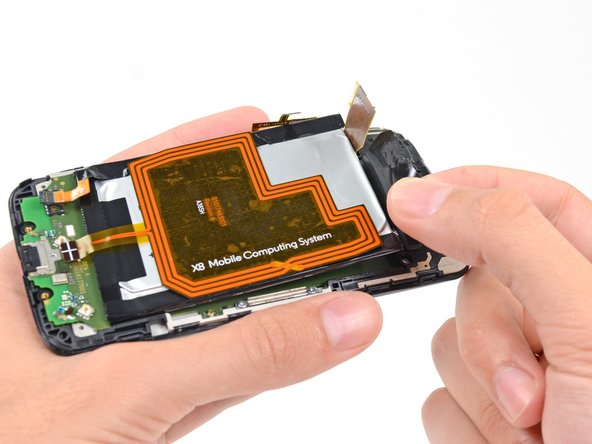
Compare your new replacement part to the original part. You may need to transfer remaining components or remove adhesive backings from the new part before installing.

To reassemble your device, follow these instructions in reverse order.

Take your e-waste to an R2 or e-Stewards certified recycler.

Repair didn’t go as planned? Check out our Motorola Moto X Answers community for troubleshooting help.

Sam Goldheart

Miembro Desde 10/18/12

465,777 Reputación

538 Guías creadas

Equipo

iFixit Miembro de iFixit

Staff

135 Miembros

16,817 Guías creadas

0 comentarios

Agregar Comentario

Ver Estadísticas:

Ultimas 24 horas: 0

Ultimos 7 días: 0

Ultimos 30 días: 0

Todo El Tiempo: 43