Esta versión puede contener ediciones incorrectas. Cambie a la última instantánea verificada.
Qué necesitas
-
Este paso está sin traducir. Ayuda a traducirlo
-
Insert the rear cover removal tool, or a paper clip, in the hole near the back camera lens.
-
Slide the cover down to remove.
-
-
Este paso está sin traducir. Ayuda a traducirlo
-
Remove the sticker on the rear compartment to reveal the battery.
-
-
Este paso está sin traducir. Ayuda a traducirlo
-
Use the T5 Torx Screwdriver to remove both 2.5 mm screws from the battery cable.
-
Use the Spudger to unstick the battery.
-
-
Este paso está sin traducir. Ayuda a traducirlo
-
Using the blue plastic opening tool, pry off the thin plastic camera cover.
-
-
-
Este paso está sin traducir. Ayuda a traducirlo
-
Remove the four screws, indicated by the red circles, with the screwdriver and T5 Torx bit.
-
-
Este paso está sin traducir. Ayuda a traducirlo
-
Insert the spudger between the rear bezel and the main housing.
-
Slide the spudger around all sides of the phone to separate the bezel from the housing.
-
Pry the bezel free.
-
-
Este paso está sin traducir. Ayuda a traducirlo
-
Remove the 12 screws holding the housing in place using a T5 Torx screwdriver.
-
Follow the red circles, indicated in the picture, to locate the screws.
-
-
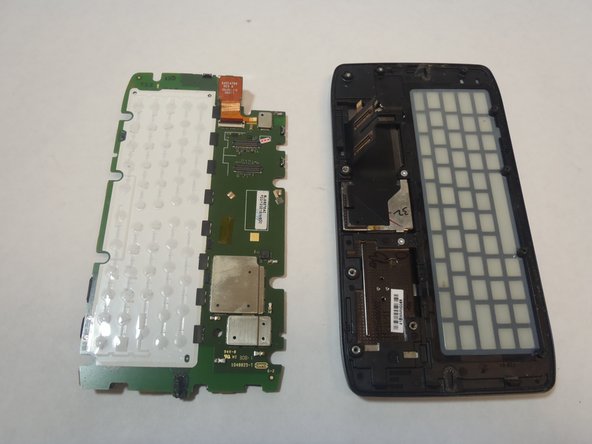
Este paso está sin traducir. Ayuda a traducirlo
-
Using the spudger, separate the motherboard from the keyboard frame.
-
Tilt the motherboard upward from the side of the charger connection as shown in the picture.
-
-
Este paso está sin traducir. Ayuda a traducirlo
-
Using the spudger, gently disconnect the two motherboard connections.
-


Cancelar: No complete esta guía.
Una persona más ha completado esta guía.
Equipo

USF Tampa, Team 5-1, Mcgee Fall 2014 Miembro de USF Tampa, Team 5-1, Mcgee Fall 2014
USFT-MCGEE-F14S5G1
5 Miembros
5 Guías creadas