Saltar al contenido principal

Esta guía ha sufrido modificaciones. Revisa la última versión sin revisar.

Microsoft Lumia 640 LTE Headphone Jack Replacement

Qué necesitas

  1. Microsoft Lumia 640 LTE Headphone Jack Replacement, Back Cover: paso 1, imagen 1 de 2 Microsoft Lumia 640 LTE Headphone Jack Replacement, Back Cover: paso 1, imagen 2 de 2
    • Use your thumb or fingernail on the edge/corner of the phone to pry the back cover off the phone.

  2. Microsoft Lumia 640 LTE Headphone Jack Replacement, Screen: paso 2, imagen 1 de 3 Microsoft Lumia 640 LTE Headphone Jack Replacement, Screen: paso 2, imagen 2 de 3 Microsoft Lumia 640 LTE Headphone Jack Replacement, Screen: paso 2, imagen 3 de 3
    Herramienta utilizada en este paso:
    Tweezers
    $4.99
    Comprar
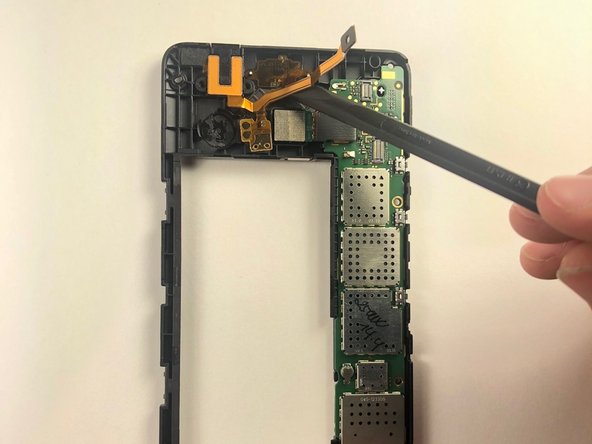
    • Use the tweezers to pull back the sticker, revealing the screw underneath.

    • Be careful when removing the screws as they can strip easily.

  3. Microsoft Lumia 640 LTE Headphone Jack Replacement: paso 3, imagen 1 de 2 Microsoft Lumia 640 LTE Headphone Jack Replacement: paso 3, imagen 2 de 2
    • Use a T4 Torx driver to remove the screws in the four corners, along with the two in the middle left side (six total).

  4. Microsoft Lumia 640 LTE Headphone Jack Replacement: paso 4, imagen 1 de 2 Microsoft Lumia 640 LTE Headphone Jack Replacement: paso 4, imagen 2 de 2
    • Using the T4 Torx driver, unscrew the two screws.

    • Keep these screws separate from the screws from back of the phone to ensure that the right screws go where they belong.

  5. Microsoft Lumia 640 LTE Headphone Jack Replacement: paso 5, imagen 1 de 2 Microsoft Lumia 640 LTE Headphone Jack Replacement: paso 5, imagen 2 de 2
    • Use a plastic opening tool to separate the screen from the back plastic casing

    • Use tweezers to release the clip on the side of device, and remove the back of the phone.

  6. Microsoft Lumia 640 LTE Headphone Jack Replacement: paso 6, imagen 1 de 2 Microsoft Lumia 640 LTE Headphone Jack Replacement: paso 6, imagen 2 de 2
    • Using the tweezers or a spudger, pull the gold tab up gently.

    • Using tweezers or a spudger, lift the white connector up gently to completely detach the screen from the phone.

    • For motherboard replacement, skip to Step 11 after finishing this step.

  7. Microsoft Lumia 640 LTE Headphone Jack Replacement: paso 7, imagen 1 de 3 Microsoft Lumia 640 LTE Headphone Jack Replacement: paso 7, imagen 2 de 3 Microsoft Lumia 640 LTE Headphone Jack Replacement: paso 7, imagen 3 de 3
    • Using a plastic opening tool to carefully get under the gold strip.

    • Use tweezers to pull up the camera.

    • Use tweezers to pull up on the depth sensor.

    • This is held in by a strong adhesive.

  8. Microsoft Lumia 640 LTE Headphone Jack Replacement: paso 8, imagen 1 de 1
    • Use a plastic opening tool to pry up the ear speaker.

    • This is held in by strong adhesive.

  9. Microsoft Lumia 640 LTE Headphone Jack Replacement, Headphone Jack: paso 9, imagen 1 de 1
    • Unscrew 2 remaining screws with T-4 bit.

  10. Microsoft Lumia 640 LTE Headphone Jack Replacement: paso 10, imagen 1 de 1
    • Remove speaker using tweezers.

  11. Microsoft Lumia 640 LTE Headphone Jack Replacement: paso 11, imagen 1 de 3 Microsoft Lumia 640 LTE Headphone Jack Replacement: paso 11, imagen 2 de 3 Microsoft Lumia 640 LTE Headphone Jack Replacement: paso 11, imagen 3 de 3
    • Use the plastic opening tool to lift up black tab

    • Using the tweezers, gently pull up on the gold tab

    • using the spudger, slowly get underneath the gold sticker to pry it up. Held down with strong adhesive

  12. Microsoft Lumia 640 LTE Headphone Jack Replacement: paso 12, imagen 1 de 1
    • Remove orange insulator foam with tweezers.

Conclusión

To reassemble your device, follow these instructions in reverse order.

0 comentarios

Agregar Comentario

Ver Estadísticas:

Ultimas 24 horas: 0

Ultimos 7 días: 6

Ultimos 30 días: 13

Todo El Tiempo: 416