Esta versión puede contener ediciones incorrectas. Cambie a la última instantánea verificada.
Qué necesitas
-
-
Quitar los siguientes tornillos pentalobe que sujetan la tapas inferior del MacBook Pro:
-
Ocho 3.0 mm
-
Dos 2.3 mm
-
-
-
-
Retira la etiqueta de advertencia que cubre el conector de la batería
-
-
-
Usando el extremo plano de un spudger, levanta suavemente el conector de la batería directamente fuera de su zócalo en la placa lógica.
-
Dobla los cables de la batería hacia afuera y fuera del camino, asegurándose de que el conector de la batería no entre en contacto accidentalmente con la placa lógica.
-
-
Este paso está sin traducir. Ayuda a traducirlo
-
Use the tip of a spudger to detach the three antenna connectors up from their sockets on the AirPort board.
-
-
Este paso está sin traducir. Ayuda a traducirlo
-
Remove the single 2.9 mm T5 Torx screw securing the AirPort board to the logic board.
-
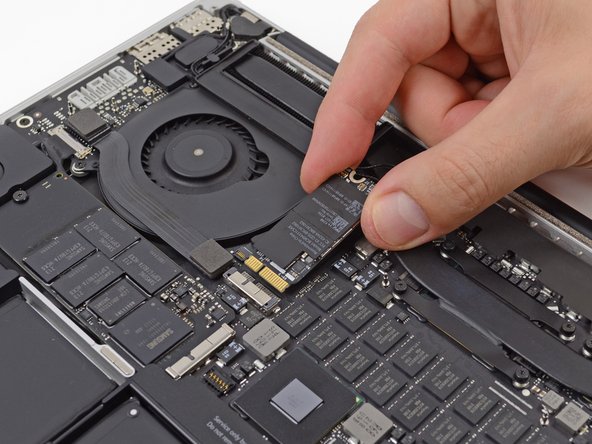
Grasp the edges of the board and slide it out from its connector.
-
Lift and remove the AirPort board.
-


Cancelar: No complete esta guía.
19 personas más completaron esta guía.


8 comentarios
This tutorial worked perfectly for me and I have never, ever, considered working on my computer before. I ordered the tools from ifixit.com and it was a breeze!!!! Everything works perfectly -thank you so very much!
Everything worked great, took me about 30 minutes to complete. I replaced my working adapter with an 802.11ac module (BCM94360CSAX), cost me $12 on Ebay. I now have 802.11ac (instead of just 802.11n) and with working 802.11v support provided by the new adapter, I can now unlock my MBP with my apple Watch! Thank you.
The required hardware seems correct -- I needed a T5 bit and a P5 Pentalobe, as well as a spudger. I used the flat end of the spudger to gently press the antenna connectors together. They make a distinctive "snap" when they connect.
When you replace the Airport card, (or at least if you’ve upgraded it to a newer but compatible 802.11ac/BT4.0 card) any apps you downloaded from the App Store won’t launch, but complain that they were downloaded on a different Mac. You’ll either need to authenticate with your Apple ID for each one, or reinstall them.
Success here using this tutorial to upgrade to an Airport card that supports 802.11ac/BT4.0. It took 30 minutes, and with the upgraded card I can now unlock my MacBook Pro with my Apple Watch.
As Alan mentions above, some of my App Store purchases have prompted me for my AppleID password. The bigger correction was that upon starting up my computer I had to System Preference >> Date & Time to update the calendar and clock. All I had to do was click the lock at the bottom left of the dialog box, enter my MacBook Pro password, and it auto-updated.
Then to get it to recognize my Apple Watch I went to System Preferences >> Security & Privacy and checked the box for “Allow your Apple Watch to unlock your Mac.” Then I clicked the lock in the bottom left to lock it, quit out of System Preferences, and I was good to go.