Saltar al contenido principal

Esta versión puede contener ediciones incorrectas. Cambie a la última instantánea verificada.

Guía Archivada
Esta guía se mantiene únicamente para fines históricos. Utiliza la última versión de la guía para llevar a cabo tu reparación.

Qué necesitas

  1. , Parte inferior de la carcasa: paso 1, imagen 1 de 1
    • Quita los 10 tornillos que aseguran la parte inferior de la carcasa a la parte superior:

    • Dos tornillos Pentalobe P5 de 2.3 mm

    • Ocho tornillos Pentalobe P5 de 3.0 mm

    • A lo largo de esta reparación, realiza un seguimiento de cada tornillo y asegúrate de que vuelva exactamente de donde proviene para evitar dañar tu dispositivo.

  2. : paso 2, imagen 1 de 1
    • Introduce tus dedos entre la parte superior y la parte inferior de la carcasa.

    • Tira suavemente de la carcasa inferior para retirarla.

  3. : paso 3, imagen 1 de 2 : paso 3, imagen 2 de 2
    • La carcasa inferior está conectada a la carcasa superior con dos clips de plástico cerca de su centro.

    • Durante el reensamblaje, empuja suavemente hacia abajo el centro de la carcasa inferior para volver a sujetar los dos clips de plástico.

  4. , Conector de Batería: paso 4, imagen 1 de 1
    • Si es necesario, remueve la cubierta de plástico adherida a la placa de contacto de la batería.

  5. : paso 5, imagen 1 de 2 : paso 5, imagen 2 de 2
    • Utiliza el extremo plano de un spudger para levantar el conector de batería directamente de su enchufe en la placa lógica.

    • Asegúrate de levantar solo en el conector o puedes arriesgarte a dañar la placa lógica permanentemente.

  6. : paso 6, imagen 1 de 1
    • Pliega el conector de la batería hacía arriba y sácalo del medio para prevenir contacto accidental con su enchufe durante la reparación.

  7. , Altavoz Derecho: paso 7, imagen 1 de 1
    • Remueve los dos tornillos Torx T5 de 2.1 mm que sujetan el extremo de la placa lógica del soporte del cable de placa de E/S.

  8. : paso 8, imagen 1 de 1
    • Agarra el soporte del cable de placa de E/S con un par de pincitas y remuévelo de tu MacBook.

  9. : paso 9, imagen 1 de 2 : paso 9, imagen 2 de 2
    • Usa el extremo plano del spudger para sacar el conector de placa de E/S directamente de su enchufe en la placa lógica.

    • Ten cuidado de sacarlo del cable de placa de E/S y no del enchufe porque corres el riesgo de dañar tu placa lógica.

  10. : paso 10, imagen 1 de 2 : paso 10, imagen 2 de 2
    • Levanta el extremo de la placa lógica del cable de placa de E/S para plegarlo y sacarlo del medio.

    • Para evitar dañar el cable, dobla solo en el pliegue del extremo del cable de placa de E/S.

  11. : paso 11, imagen 1 de 2 : paso 11, imagen 2 de 2
    • Con cuidado coloca la punta del spudger bajo el cable del altavoz derecho cerca del conector y levántalo de su enchufe en la placa lógica.

  12. : paso 12, imagen 1 de 3 : paso 12, imagen 2 de 3 : paso 12, imagen 3 de 3
    • Con cuidado quita el cable del altavoz derecho de la caja superior.

  13. : paso 13, imagen 1 de 1
    • Remueve los siguientes tornillos que sujetan el altavoz derecho de la caja superior:

    • Un tornillo Torx T5 de 5.7 mm

    • Un tornillo Torx T5 de 6.5 mm

    • Un tornillo Torx T5 de 3.8 mm

  14. : paso 14, imagen 1 de 3 : paso 14, imagen 2 de 3 : paso 14, imagen 3 de 3
    • Levanta el altavoz derecho del extremo de cable y sácalo de la caja.

  15. , Altavoz Izquierdo: paso 15, imagen 1 de 2 , Altavoz Izquierdo: paso 15, imagen 2 de 2
    • Con cuidado coloca la punta del spudger bajo el cable del altavoz izquierdo cerca del conector y levántalo de su enchufe en la placa lógica.

  16. : paso 16, imagen 1 de 1
    • Remueve los siguientes tornillos que sujetan el altavoz izquierdo de la caja superior:

    • Un tornillo Torx T5 de 5.7 mm

    • Un tornillo Torx T5 de 6.5 mm

    • Un tornillo Torx T5 de 3.8 mm

  17. : paso 17, imagen 1 de 3 : paso 17, imagen 2 de 3 : paso 17, imagen 3 de 3
    • Levanta la esquina del altavoz izquierdo y deslízalo alrededor de la batería para sacarlo de la carcasa superior.

    • Ten cuidado de no enganchar el cable del altavoz en el orificio del tornillo al lado de la caja.

  18. Este paso está sin traducir. Ayuda a traducirlo

    : paso 18, imagen 1 de 1
    • Remove the five 3.7 mm T5 Torx screws securing the battery to the upper case.

  19. Este paso está sin traducir. Ayuda a traducirlo

    : paso 19, imagen 1 de 1
    • The liquid adhesive remover provided in your iFixit battery replacement kit can affect the antireflective coating on your MacBook Pro's display.

    • To protect your display, place a sheet of aluminum foil between the display and keyboard and leave it there while you work.

  20. Este paso está sin traducir. Ayuda a traducirlo

    : paso 20, imagen 1 de 2 : paso 20, imagen 2 de 2
    • If you have an iFixit battery kit with liquid adhesive remover, it's time to get it prepped.

    • Alternatively, if you are using the hot iOpener method, skip the following three steps.

    • iFixit adhesive remover contains acetone, a mild skin and eye irritant.

    • Wear eye protection when handling and applying the adhesive remover. (Eye protection is included in your kit.)

    • Do not wear contact lenses without eye protection.

    • Protective gloves are also included in your kit. If you are concerned about skin irritation, put your gloves on now.

  21. Este paso está sin traducir. Ayuda a traducirlo

    : paso 21, imagen 1 de 2 : paso 21, imagen 2 de 2
    • Open your container of adhesive remover.

    • Fill the syringe included in your kit with a small amount (approximately 1-2 milliliters) of adhesive remover.

    • It's best to fill the syringe with no more than about 1-2 milliliters of adhesive remover at a time, so as to avoid accidentally applying too much.

    • Refill your syringe as needed throughout the rest of this procedure.

  22. Este paso está sin traducir. Ayuda a traducirlo

    : paso 22, imagen 1 de 1
    • Apply a small amount of adhesive remover (approximately 1 ml) evenly under the edge of the rightmost battery cell.

    • Wait 2-3 minutes for the liquid adhesive remover to penetrate underneath the battery cell before you proceed to the next step.

    • Do not apply more than 1 ml of the adhesive remover at a time. Using too much can allow the adhesive remover to make its way to the backside of your keyboard and potentially damage it.

  23. Este paso está sin traducir. Ayuda a traducirlo

    : paso 23, imagen 1 de 2 : paso 23, imagen 2 de 2
    • If you don't have a liquid adhesive remover, you'll be using a hot iOpener to warm and soften a section of the adhesive securing the battery to the upper case, and then carefully prying at that point.

    • Use the hot iOpener to cover half of the two right-most battery cells.

    • After about a minute, reheat the iOpener and move it to cover the other half of the right-most battery cells.

  24. Este paso está sin traducir. Ayuda a traducirlo

    : paso 24, imagen 1 de 2 : paso 24, imagen 2 de 2
    Herramienta utilizada en este paso:
    Plastic Cards
    $2.99
    Comprar
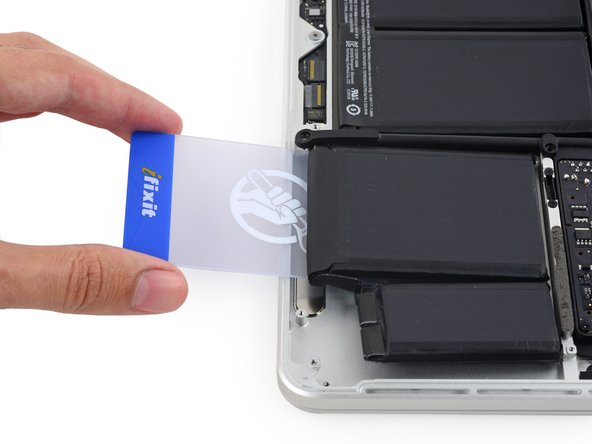
    • Push a plastic card between the right-most battery cell and the upper case, cutting the adhesive between the two.

    • Throughout this procedure, be careful not to damage any of the battery cells with your tools. A damaged lithium-ion battery may leak dangerous chemicals and/or catch fire. Use only plastic pry tools.

    • When using the hot iOpener method, if you encounter significant resistance to prying, stop and use the iOpener to reheat the section you're working on.

  25. Este paso está sin traducir. Ayuda a traducirlo

    : paso 25, imagen 1 de 2 : paso 25, imagen 2 de 2
    • Use the plastic card to pry the right-most battery cell up from the rear case.

  26. Este paso está sin traducir. Ayuda a traducirlo

    : paso 26, imagen 1 de 3 : paso 26, imagen 2 de 3 : paso 26, imagen 3 de 3
    • Repeat this procedure with the adjacent battery cell:

    • Apply a small amount (about 1 ml) of liquid adhesive remover under the battery cell, and wait 2-3 minutes for it to penetrate and soften the adhesive.

    • Alternatively, re-heat this section with your iOpener if needed.

    • Push a plastic card about an inch between the battery cell and the upper case, and slowly pry the cell up to separate all of the adhesive.

  27. Este paso está sin traducir. Ayuda a traducirlo

    : paso 27, imagen 1 de 3 : paso 27, imagen 2 de 3 : paso 27, imagen 3 de 3
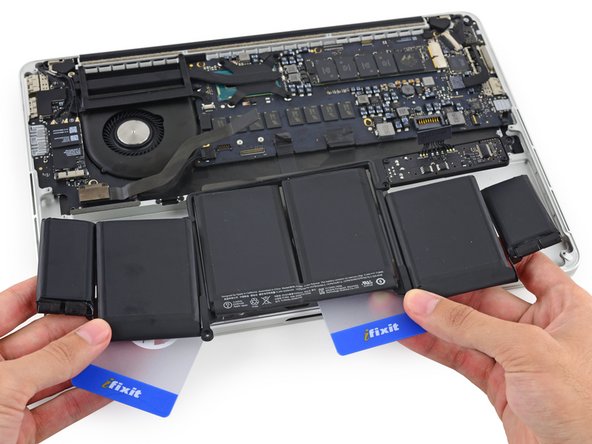
    • Temporarily leave your plastic card underneath the two rightmost battery cells to prevent them from re-adhering to the upper case.

    • If using an iOpener, reheat it and reapply it, this time to the left-most battery cells.

    • Again, leave the iOpener in each position for about a minute, reheating in between, to heat each half of the left-most battery cells.

  28. Este paso está sin traducir. Ayuda a traducirlo

    : paso 28, imagen 1 de 3 : paso 28, imagen 2 de 3 : paso 28, imagen 3 de 3
    • Repeat the above procedure to separate the two leftmost battery cells from the upper case.

    • Remember to apply a small amount (about 1 ml) of adhesive remover to each battery cell, and wait 2-3 minutes for it to penetrate and soften the adhesive.

    • Use a second plastic card to separate the two leftmost battery cells from the upper case.

  29. Este paso está sin traducir. Ayuda a traducirlo

    : paso 29, imagen 1 de 1
    • Leave the second card in the corner between the two left cells.

    • In the following steps, you can either use a third card, or the card from the right corner. The right corner adhesive should be dry/cool enough that the cells can easily be pulled up again when needed.

  30. Este paso está sin traducir. Ayuda a traducirlo

    : paso 30, imagen 1 de 2 : paso 30, imagen 2 de 2
    • To separate the adhesive securing the final two, middle battery cells, apply another 1 milliliter or so of liquid adhesive remover (or your iOpener) to each cell.

    • It may help to elevate one side of your MacBook Pro a few inches so that the adhesive remover flows in the correct direction, underneath the battery cells. You can use a sturdy book or foam block to prop up one side of your MacBook Pro while you work.

    • Insert the card about an inch between the left-center battery cell and the upper case, separating the adhesive between the cell and the case.

  31. Este paso está sin traducir. Ayuda a traducirlo

    : paso 31, imagen 1 de 2 : paso 31, imagen 2 de 2
    • Pull the card back out and insert it about an inch between the right-center battery cell and the upper case, separating the adhesive between the cell and case.

  32. Este paso está sin traducir. Ayuda a traducirlo

    : paso 32, imagen 1 de 2 : paso 32, imagen 2 de 2
    • By this point, the outer cells should be free, and you should only encounter resistance from the two center cells. If this is not the case, go back and completely loosen the four outer-most cells from the upper case.

    • Pry up on the two center cells to separate the last of the adhesive and lift the battery from the device.

  33. Este paso está sin traducir. Ayuda a traducirlo

    : paso 33, imagen 1 de 2 : paso 33, imagen 2 de 2
    • Remove the battery.

    • Before installing your new battery, remove all the old adhesive from the MacBook Pro's case.

    • With a little luck, you can slowly pull out each strip of adhesive with your fingers.

    • Otherwise, soak each section of adhesive with a bit of adhesive remover for 2-3 minutes, and then scrape it out with an opening pick or one of the other tools in your kit. This can take quite a bit of work, so be patient.

    • Mop up any remaining adhesive remover and give your MacBook Pro a few minutes to air dry.

    • The replacement battery included in your iFixit kit comes with adhesive pre-installed. Test the battery's fit and alignment carefully before peeling off the film covering the adhesive, and then press each cell firmly into place. If any additional films/liners are present that weren't on your original battery, remove them now.

    • Calibrate your battery before using it: allow it to drain overnight, then charge it to 100% and drain it again until your MacBook Pro shuts down automatically. Charge it again and use it normally.

    • If you notice any unusual behavior or problems after installing your new battery, you may need to reset your MacBook Pro's SMC.

Linea de Meta

2 personas más completaron esta guía.

Sam Goldheart

Miembro Desde 10/18/12

465,927 Reputación

538 Guías creadas

Equipo

iFixit Miembro de iFixit

Staff

135 Miembros

17,259 Guías creadas

0 comentarios

Agregar Comentario

Ver Estadísticas:

Ultimas 24 horas: 1

Ultimos 7 días: 11

Ultimos 30 días: 26

Todo El Tiempo: 1,279