Esta versión puede contener ediciones incorrectas. Cambie a la última instantánea verificada.
Qué necesitas
-
-
Usa un destornillador P5 Pentalobe para quitar los diez tornillos que sujetan la carcasa. Los tornillos tienen las siguientes medidas:
-
Dos tornillos Pentalobe P5 de 9 mm
-
Ocho tornillos Pentalobe P5 de 2,6 mm
-
-
-
Agarre la lengüeta de plástico transparente unida al conector de la batería y tire de ella hacia el borde frontal del Air para desconectar la batería de la placa lógica.
-
-
-
Utilice el extremo plano de una paleta para sacar el cable del conector I/O de la tarjeta tire hacia arriba fuera del zócalo I/O sobre la tarjeta.
-
-
-
Mientras hale suavemente el cable de la tarjeta I/O hacia arriba está cerca la conexión de la tarjeta lógica, use la punta de una paleta para hacer palanca hacia arriba sobre los lados alternos del conector para ayudar a "desplazarlo" fuera del conector.
-
Remueva el cable de la tarjeta I/O
-
-
-
Utiliza la punta de la espátula para levantar con cuidado la lengüeta que retiene el cable ZIF del ventilador del conector.
-
-
-
Desconecta la placa de E/S tirando del cable de alimentación para separarlo de su zócalo en la placa lógica.
-
-
-
-
Retire los siguientes cinco tornillos que sujetan la batería a la carcasa superior:
-
Tres tornillos Tx Torx de 6,3 mm
-
Dos tornillos Torx T5 de 2,4 mm
-
-
-
Usa la punta de un spudger o tu uña para levantar la solapa de retención en el conector ZIF del cable plano del trackpad.
-
Asegúrese de levantar la solapa de retención con bisagras, no el zócalo en sí.
-
-
-
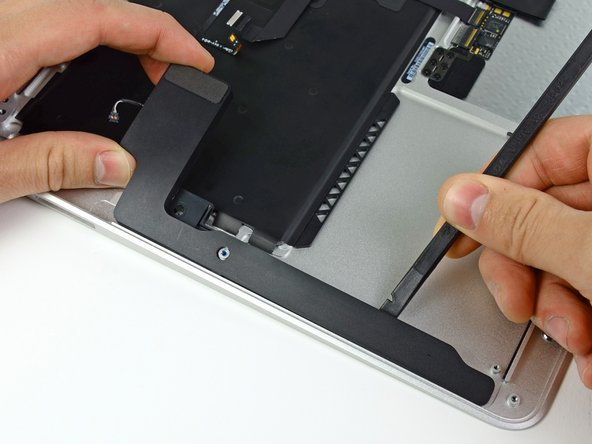
Empuja suavemente la punta de un spudger debajo de la solapa de plástico negro pegada al bloqueo del cable de datos de la pantalla para que el bloqueo salte hacia arriba y se aleje del zócalo.
-
Mientras mantienes la cerradura alejada del zócalo, usa la punta de un spudger y tus dedos para quitar suavemente el cable de datos de la pantalla de su zócalo.
-
-
-
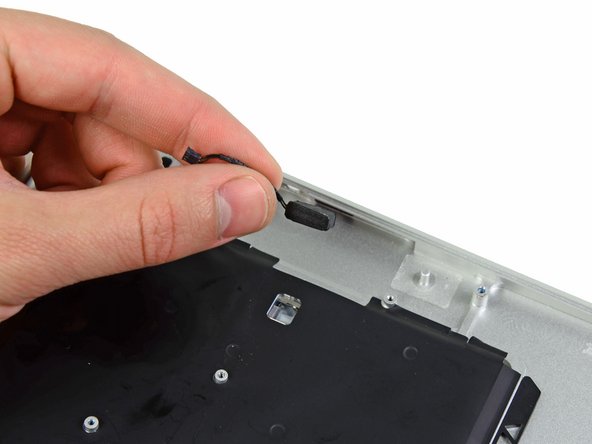
Con cuidado extra los cables de antena fuera del corte de canal en la carcasa superior.
-
-
Este paso está sin traducir. Ayuda a traducirlo
-
Use the flat end of a spudger to pry the right speaker off the adhesive securing it to the upper case.
-
Remove the right speaker from the upper case.
-
-
Este paso está sin traducir. Ayuda a traducirlo
-
Use the flat end of a spudger to pry the left speaker off the adhesive securing it to the upper case.
-
Remove the left speaker from the upper case.
-
-
Este paso está sin traducir. Ayuda a traducirlo
-
Use the tip of a spudger to pry the microphone away from the left side of the upper case.
-
Remove the microphone from the upper case.
-
Upper case remains.
-
-
Este paso está sin traducir. Ayuda a traducirlo
-
Use the tip of a spudger or your fingernail to flip up the retaining flap on the trackpad ribbon cable ZIF socket.
-
Pull the trackpad ribbon cable straight out of its socket toward the rear edge of the Air.
-
-
Este paso está sin traducir. Ayuda a traducirlo
-
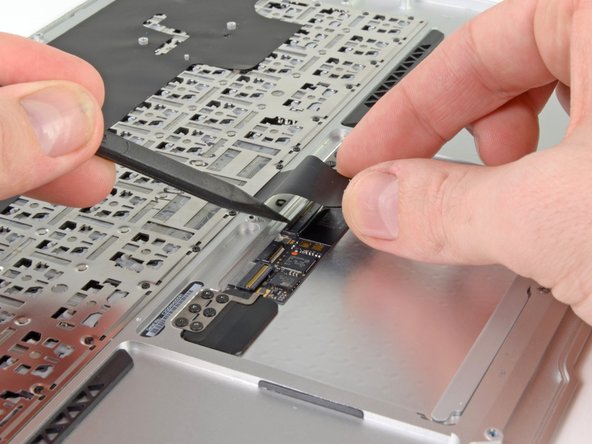
While carefully lifting the keyboard ribbon cable with one hand, use the tip of a spudger or your fingernail to flip up the retaining flap on the keyboard ribbon cable ZIF socket.
-
Pull the keyboard ribbon cable straight out of its socket toward the front edge of the Air.
-
-
Este paso está sin traducir. Ayuda a traducirlo
-
Remove the following seven screws:
-
Six 1.6 mm Phillips screws securing the trackpad to the upper case.
-
One 1.4 mm T5 Torx set screw from its tapped hole near the front edge of the upper case.
-
-
Este paso está sin traducir. Ayuda a traducirlo
-
Carefully lift the edge of the trackpad closest to the keyboard from its recess in the upper case by lifting it away from the brackets attached to the upper case.
-
Remove the trackpad from the upper case.
-
The upper case remains.
-


Cancelar: No complete esta guía.
62 personas más completaron esta guía.

9 comentarios
On step 41 the 1.4 mm T5 Torx set screw remember that this screw does not come out. I was racking my brain for like 30 minutes and realized that this screw is not and can not be removed, rather it's just used to adjust the sensitivity of the clicking on the mouse pad.
I got mine out, but it was unnecessary for the procedure. You're right that it doesn't hold anything down really.
lionfish -
I had a Torx 6 in order to not strip the screw...
I spilt liquid on my MacBook Air and luckily only busted the keyboard, mainly the power and right arrow key buttons.
I purchased the uppercase from iFixit and it is a good quality part. The install took about 45 minutes, but there was a good hour of troubleshooting afterwards. See my comment on connecting the I/O connector cable above.
After doing any sort of hardware install, especially one as extensive as this, run the Apple Hardware Test application by holding down the D button while booting. It looks at a range of issues that you might miss (like a fan that doesn't spin!) that could cause you problems down the track.
Happy repairs.
This was an awesome and clearly understandable guide, helped by color-coded circles for the various screw sizes! I disassembled, replaced the top and keyboard and reassembled in less than an hour, with my son watching over my shoulder. Well done!