Esta versión puede contener ediciones incorrectas. Cambie a la última instantánea verificada.
Qué necesitas
-
-
Retira los siguientes 10 tornillos:
-
Dos tornillos Pentalobe de 5 Puntos de 8 mm
-
Ocho tornillos Pentalobe de 5 Puntos de 2.5 mm
-
-
-
Utiliza la parte plana de un spudger con un movimiento de palanca hacia arriba para retirar ambos lados del conector de la batería del socket de la tarjeta madre.
-
Dobla ligeramente el conector de la batería hacia arriba para evitar que accidentalmente haga contacto con el socket.
-
-
-
-
Levanta la batería de la orilla más cercana a la tarjeta madre y retírala de la computadora.
-
Cárgala al 100%, y mantenla cargando por, al menos, 2 horas más. Después, desconéctala y úsala normalmente para agotar la batería. Cuándo veas la notificación de batería baja, guarda tu trabajo, y mantén tu laptop encendida hasta que se le acabe la batería. Espera por lo menos 5 horas, y vuelve a cargar tu laptop sin interrupciones a 100%
-
Si notas un comportamiento inusual o problemas después de instalar tu nueva batería, tal vez debas restablecer el SMC de tu MacBook.
-
-
Este paso está sin traducir. Ayuda a traducirlo
-
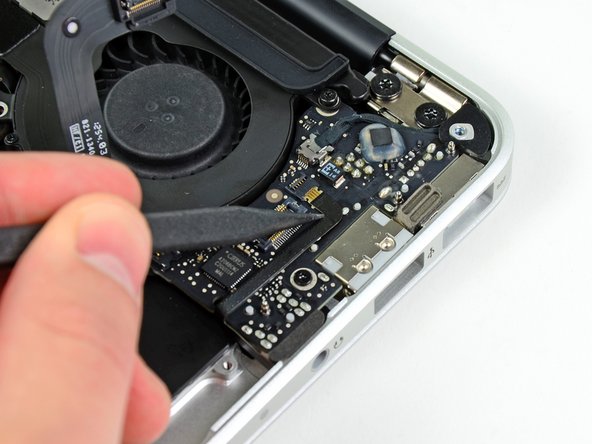
Use the flat end of a spudger to pry the I/O board cable connector up off its socket on the I/O board.
-
Bend the cable away from the I/O board.
-
-
Este paso está sin traducir. Ayuda a traducirlo
-
Use the tip of a spudger to de-route the left speaker cable from the notch cut into the edge of the I/O board.
-
-
Este paso está sin traducir. Ayuda a traducirlo
-
Use the flat end of a spudger to pry the left speaker connector up and out of its socket on the I/O board.
-
-
Este paso está sin traducir. Ayuda a traducirlo
-
Use the flat end of a spudger to pry the left speaker off the adhesive securing it to the upper case.
-
-
Este paso está sin traducir. Ayuda a traducirlo
-
Use the tip of a spudger to flip up the retaining flap on the microphone ribbon cable ZIF socket.
-
Use the tip of a spudger to pull the microphone ribbon cable out of its socket.
-
-
Este paso está sin traducir. Ayuda a traducirlo
-
Use the tip of a spudger to pry the microphone away from the side of the upper case.
-
Remove the microphone from the upper case.
-


Cancelar: No complete esta guía.
2 personas más completaron esta guía.

2 comentarios
Very straightforward replacement.
Take special care when removing the microphone and speaker connectors from their respective sockets. Just be gentle and methodical.
Ensure you press down firmly, but not hard, after microphone replacement when reconnecting the battery connector to the motherboard.
When re-attaching the speaker connector, also pay special attention to pushing down firmly on this to ensure a connection is made. Again, not too hard, but it is easy to push down enough to think it is connected but it can easily not be.