Esta versión puede contener ediciones incorrectas. Cambie a la última instantánea verificada.
Qué necesitas
-
-
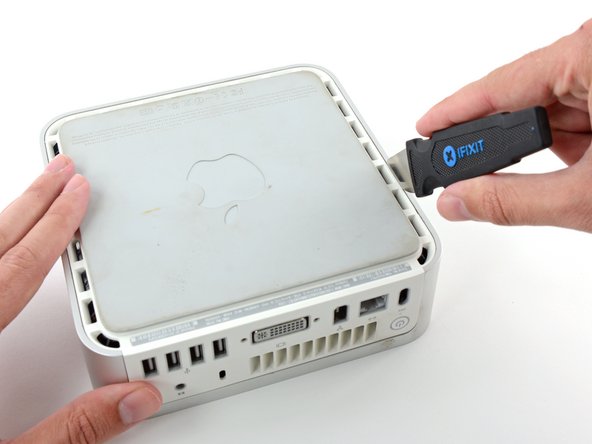
Apaga el Mac mini, desconecta todos los cables y dale la vuelta.
-
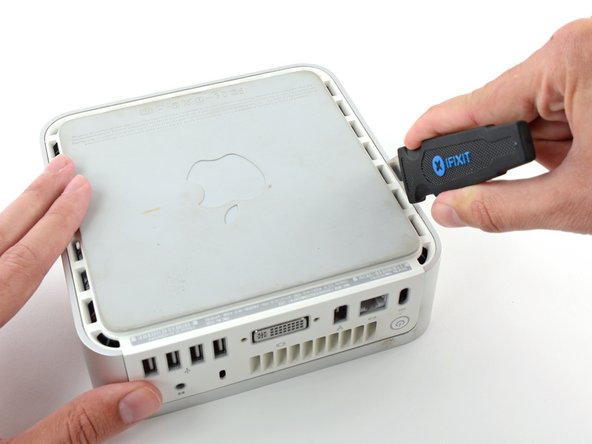
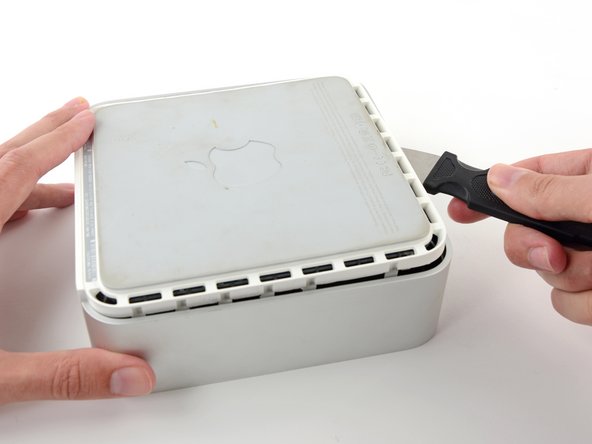
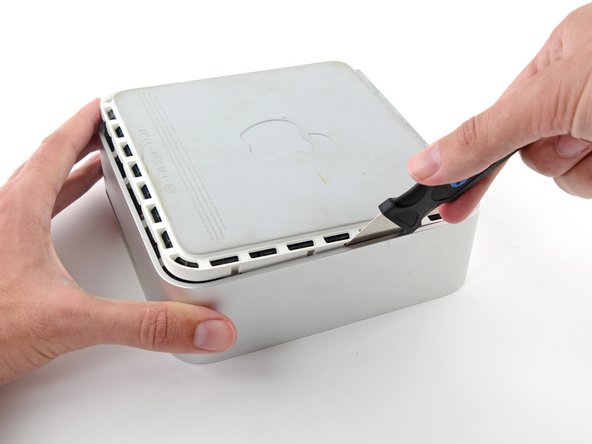
Inserta el Jimmy en la grieta entre la carcasa superior de aluminio y la carcasa inferior de plástico.
-
Insertar traducción aquí
-
-
Este paso está sin traducir. Ayuda a traducirlo
-
Grasp the Airport antenna board and lift it off of the two plastic posts holding it in place. You may need to push back the black plastic tab jutting through the lower left corner of the board.
-
-
-
Este paso está sin traducir. Ayuda a traducirlo
-
Remove the yellow tape securing the power button cable to the black plastic framework.
-
-
Este paso está sin traducir. Ayuda a traducirlo
-
Remove the three black Phillips screws securing the plastic framework to the logic board and lower case.
-
-
Este paso está sin traducir. Ayuda a traducirlo
-
Grasp the optical drive and mass storage unit in one hand and lift up enough so that you can see beneath it.
-
-
Este paso está sin traducir. Ayuda a traducirlo
-
With your free hand, pull the Bluetooth cable up from Bluetooth board and unplug the Airport antenna cable from the right of the Airport card. Caution: both of these connections are very small. When re-assembling unit after repair, you may want to remove the two screws holding the airport card to the assembly and lift the card up and out to re-attach the cables.
-
-
Este paso está sin traducir. Ayuda a traducirlo
-
Remove the three long, black Phillips screws from the corners of the fan. These screws are strongly threaded, and will offer significant resistance.
-
-
Este paso está sin traducir. Ayuda a traducirlo
-
Peel up the yellow tape securing the speaker and fan cables to the bottom of the hard drive.
-
-
Este paso está sin traducir. Ayuda a traducirlo
-
Use a #1 Phillips to remove the two screws attaching the right side of the hard drive to the plastic framework. You'll need to angle the screwdriver down to get access to the lower right screw. Be sure to apply steady force to the screws and turn slowly so as not to strip them.
-
-
Este paso está sin traducir. Ayuda a traducirlo
-
Use the same screwdriver and steady force to remove the two screws attaching the left side of the hard drive to the plastic framework.
-
-
Este paso está sin traducir. Ayuda a traducirlo
-
Use a spudger to pry the hard drive away from the interface board. Wedge the flat end of the spudger between the interface board and the far right side of hard drive and wiggle back and forth until the hard drive slides out about a sixteenth of an inch. Then move to the other side and repeat the procedure. Go back and forth until the hard drive slides free.
-
-
Este paso está sin traducir. Ayuda a traducirlo
-
While holding the assembly with the speaker resting on the table, remove the four black Phillips screws holding the speaker in place and their associated rubber bumpers.
-
-
Este paso está sin traducir. Ayuda a traducirlo
-
Deroute the speaker cable from the plastic framework, removing tape as necessary.
-
-
Este paso está sin traducir. Ayuda a traducirlo
-
Disconnect the speaker connector from the interface board.
-
Pull the speaker out from the plastic framework.
-
Cancelar: No complete esta guía.
2 personas más completaron esta guía.


