Saltar al contenido principal

Lenovo IdeaPad Yoga 11S Trackpad Replacement

Qué necesitas

  1. Lenovo IdeaPad Yoga 11S Trackpad Replacement, Top Assembly: paso 1, imagen 1 de 3 Lenovo IdeaPad Yoga 11S Trackpad Replacement, Top Assembly: paso 1, imagen 2 de 3 Lenovo IdeaPad Yoga 11S Trackpad Replacement, Top Assembly: paso 1, imagen 3 de 3
    • Remember to power off the device before removing any parts.

    • Position the laptop so that the bottom enclosure is facing upward.

    • Use a Phillips #0 Screwdriver to remove the ten 1.9mm screws holding the bottom enclosure in place.

    • Use an opening tool to carefully pry up the rubber pads.

    • Use a Phillips screwdriver to remove the two screws under the rubber pads, which secure the keyboard.

  2. Lenovo IdeaPad Yoga 11S Trackpad Replacement, Remove Keyboard: paso 2, imagen 1 de 1
    • Flip the laptop over and swing open the display.

    • Lift the edge of the keyboard closest to the trackpad up.

    • Carefully disconnect keyboard ribbon cable from the laptop.

    • Remove the keyboard.

  3. Lenovo IdeaPad Yoga 11S Trackpad Replacement: paso 3, imagen 1 de 1
    • Remove the two screws securing the midframe.

  4. Lenovo IdeaPad Yoga 11S Trackpad Replacement: paso 4, imagen 1 de 3 Lenovo IdeaPad Yoga 11S Trackpad Replacement: paso 4, imagen 2 de 3 Lenovo IdeaPad Yoga 11S Trackpad Replacement: paso 4, imagen 3 de 3
    • Grab the front edge of the top assembly and lift it up carefully.

    • There are three ribbon cables that attach the top assembly to the motherboard. Lift carefully to avoid damaging them.

    • Gently slide the three ribbon cables out of their slots.

    • Remove the top assembly completely by pulling it off of the device.

  5. Lenovo IdeaPad Yoga 11S Trackpad Replacement, Trackpad: paso 5, imagen 1 de 2 Lenovo IdeaPad Yoga 11S Trackpad Replacement, Trackpad: paso 5, imagen 2 de 2
    • Position the removed top encasing where it sits on the keyboard and trackpad. The inside of the top encasing should be upward facing.

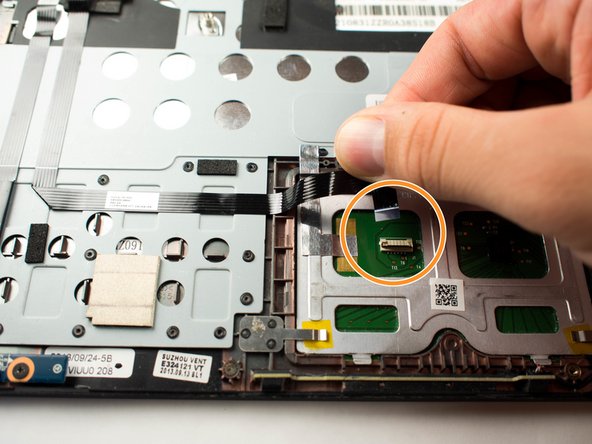
    • Use a plastic opening tool to lift the retaining flap to disconnect the ZIF connector.

    • Gently pull the trackpad cable out of the socket.

  6. Lenovo IdeaPad Yoga 11S Trackpad Replacement: paso 6, imagen 1 de 1
    • Locate the four 1.6mm screws that connect the trackpad to the top housing.

    • Use a Phillips #00 Screwdriver to remove the screws.

  7. Lenovo IdeaPad Yoga 11S Trackpad Replacement: paso 7, imagen 1 de 1
    • Flip the top assembly over so the keyboard is on top.

    • Gently push the trackpad out of its position.

Conclusión

To reassemble your device, follow these instructions in reverse order.

Una persona más ha completado esta guía.

Landon Epps

Miembro Desde 03/26/15

982 Reputación

5 Guías creadas

Equipo

Baylor, Team 7-11, Williams Spring 2015 Miembro de Baylor, Team 7-11, Williams Spring 2015

BU-WILLIAMS-S15S7G11

3 Miembros

10 Guías creadas

0 comentarios

Agregar Comentario

Ver Estadísticas:

Ultimas 24 horas: 0

Ultimos 7 días: 1

Ultimos 30 días: 7

Todo El Tiempo: 4,094