Saltar al contenido principal

Lenovo IdeaPad U530 Touch Hard Drive Replacement

Qué necesitas

  1. Lenovo IdeaPad U530 Touch Hard Drive Replacement, Battery: paso 1, imagen 1 de 3 Lenovo IdeaPad U530 Touch Hard Drive Replacement, Battery: paso 1, imagen 2 de 3 Lenovo IdeaPad U530 Touch Hard Drive Replacement, Battery: paso 1, imagen 3 de 3
    • Remove the back panel by removing all screws. Use a PH000 screwdriver head.

    • Make sure to also remove the hinge screws.

  2. Lenovo IdeaPad U530 Touch Hard Drive Replacement: paso 2, imagen 1 de 2 Lenovo IdeaPad U530 Touch Hard Drive Replacement: paso 2, imagen 2 de 2
    • To remove the panel, use a plastic opening tool to prevent any damage.

  3. Lenovo IdeaPad U530 Touch Hard Drive Replacement: paso 3, imagen 1 de 1
    • Locate and assess the battery. Pictured in the upper right area of the computer.

  4. Lenovo IdeaPad U530 Touch Hard Drive Replacement: paso 4, imagen 1 de 2 Lenovo IdeaPad U530 Touch Hard Drive Replacement: paso 4, imagen 2 de 2
    • Locate and remove all screws attaching the battery to the hull of the computer. It is recommended that you use a JIS #1 screwdriver head for this task.

    • Be careful to keep track of all removed screws.

  5. Lenovo IdeaPad U530 Touch Hard Drive Replacement: paso 5, imagen 1 de 1
    • Detach the connection from the battery to the motherboard. This is the only connection that needs to be disconnected for the battery.

    • To remove the connection, please pull firmly, as it well secured.

  6. Lenovo IdeaPad U530 Touch Hard Drive Replacement: paso 6, imagen 1 de 1
    • Simply lift the battery out of the computer, and acquire a replacement.

  7. Lenovo IdeaPad U530 Touch Hard Drive Replacement, Hard Drive: paso 7, imagen 1 de 3 Lenovo IdeaPad U530 Touch Hard Drive Replacement, Hard Drive: paso 7, imagen 2 de 3 Lenovo IdeaPad U530 Touch Hard Drive Replacement, Hard Drive: paso 7, imagen 3 de 3
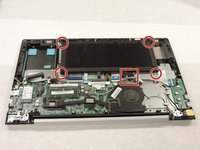
    • Remove two 3 mm screws connecting the hard drive to the computer base using a JIS #1 screwdriver.

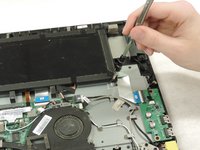
    • Detach the connection from the hard drive to the motherboard.

    • Remove the hard drive from the laptop.

Conclusión

To reassemble your device, follow these instructions in reverse order.

0 comentarios

Agregar Comentario

Ver Estadísticas:

Ultimas 24 horas: 1

Ultimos 7 días: 4

Ultimos 30 días: 12

Todo El Tiempo: 586