Saltar al contenido principal

Lenovo IdeaPad S340-15IWL Motherboard Replacement

Qué necesitas

  1. Lenovo IdeaPad S340-15IWL Motherboard Replacement, Back Panel: paso 1, imagen 1 de 2 Lenovo IdeaPad S340-15IWL Motherboard Replacement, Back Panel: paso 1, imagen 2 de 2
    • Power off the laptop and place it face-down on a non-scratching surface.

    • Using a Torx T5 screwdriver head, remove all ten 6 mm screws holding the back panel in place.

  2. Lenovo IdeaPad S340-15IWL Motherboard Replacement: paso 2, imagen 1 de 1
    • Slide a plastic opening tool underneath the back case near the screen hinges.

    • Gently pry up on either side of the case.

    • You may hear popping sounds as you pry up the back case. This is normal. If the case does not open, try prying at a different angle/position.

  3. Lenovo IdeaPad S340-15IWL Motherboard Replacement, Battery: paso 3, imagen 1 de 2 Lenovo IdeaPad S340-15IWL Motherboard Replacement, Battery: paso 3, imagen 2 de 2
    • Disconnect the battery cable by gently pulling it straight out of the connector.

    • Be sure to pull parallel to the device to avoid bending the motherboard connector.

    • The battery connector does not lock and only requires light pressure to insert and remove.

    • Remove the battery from the laptop.

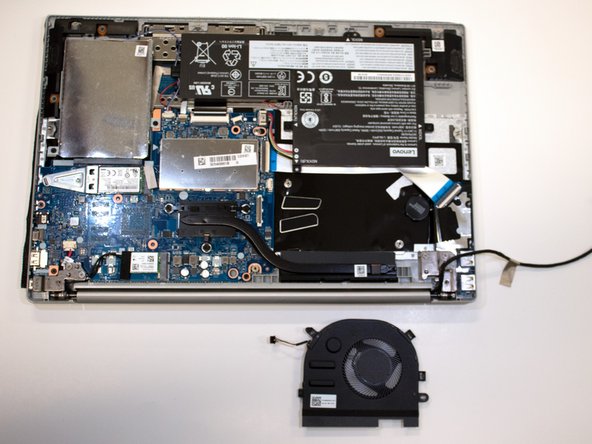
  4. Lenovo IdeaPad S340-15IWL Motherboard Replacement, Fan: paso 4, imagen 1 de 1
    • Remove the two 3 mm screws connecting the fan to the casing using a Phillips #0 screwdriver.

  5. Lenovo IdeaPad S340-15IWL Motherboard Replacement: paso 5, imagen 1 de 2 Lenovo IdeaPad S340-15IWL Motherboard Replacement: paso 5, imagen 2 de 2
    • Using a spudger, gently disconnect the fan's cable from the motherboard.

  6. Lenovo IdeaPad S340-15IWL Motherboard Replacement: paso 6, imagen 1 de 1
    • Carefully unwind the black cable that runs between the top of the battery and the bottom of the fan from the grooves along the side of the fan.

    • In order to do so, you will need to pull up the metallic tape that holds the cable in place using either your fingers or a plastic prying tool to lift up the edge.

    • If you attempt to remove the device’s fan without removing the battery, the black cable may be wedged underneath the top of the battery. In this scenario, it is recommended that you at least loosen the screws holding the battery in place to allow for the cable to be removed with less resistance.

  7. Lenovo IdeaPad S340-15IWL Motherboard Replacement: paso 7, imagen 1 de 3 Lenovo IdeaPad S340-15IWL Motherboard Replacement: paso 7, imagen 2 de 3 Lenovo IdeaPad S340-15IWL Motherboard Replacement: paso 7, imagen 3 de 3
    • Carefully pick up the fan by the corners and detach the small connector wire by pulling parallel to the device.

    • Remove the fan from the laptop.

  8. Lenovo IdeaPad S340-15IWL Motherboard Replacement, Speakers: paso 8, imagen 1 de 3 Lenovo IdeaPad S340-15IWL Motherboard Replacement, Speakers: paso 8, imagen 2 de 3 Lenovo IdeaPad S340-15IWL Motherboard Replacement, Speakers: paso 8, imagen 3 de 3
    • Unplug the wire connecting the speakers to the motherboard.

    • Remove the speakers from each side of the laptop.

  9. Lenovo IdeaPad S340-15IWL Motherboard Replacement, Hard Drive: paso 9, imagen 1 de 3 Lenovo IdeaPad S340-15IWL Motherboard Replacement, Hard Drive: paso 9, imagen 2 de 3 Lenovo IdeaPad S340-15IWL Motherboard Replacement, Hard Drive: paso 9, imagen 3 de 3
    • Remove the four 3 mm screws holding the hard drive expansion slot in place using a Phillips #0 screwdriver.

  10. Lenovo IdeaPad S340-15IWL Motherboard Replacement, RAM: paso 10, imagen 1 de 2 Lenovo IdeaPad S340-15IWL Motherboard Replacement, RAM: paso 10, imagen 2 de 2
    • Using the opening tool, gently pop off the metal cover for the RAM stick.

  11. Lenovo IdeaPad S340-15IWL Motherboard Replacement: paso 11, imagen 1 de 2 Lenovo IdeaPad S340-15IWL Motherboard Replacement: paso 11, imagen 2 de 2
    • Using your thumbs, gently pull the two metal prongs that secure the RAM outwards.

    • The RAM will pop up at an angle.

    • Remove the RAM from the laptop.

  12. Lenovo IdeaPad S340-15IWL Motherboard Replacement, Heat Sink: paso 12, imagen 1 de 3 Lenovo IdeaPad S340-15IWL Motherboard Replacement, Heat Sink: paso 12, imagen 2 de 3 Lenovo IdeaPad S340-15IWL Motherboard Replacement, Heat Sink: paso 12, imagen 3 de 3
    • Remove the three 3 mm screws that secure the black heat sink near the top of the computer using a Phillips #0 screwdriver.

    • Lift the heat sink vertically to remove it from the laptop.

  13. Lenovo IdeaPad S340-15IWL Motherboard Replacement, Video Cable: paso 13, imagen 1 de 3 Lenovo IdeaPad S340-15IWL Motherboard Replacement, Video Cable: paso 13, imagen 2 de 3 Lenovo IdeaPad S340-15IWL Motherboard Replacement, Video Cable: paso 13, imagen 3 de 3
    • Using an opening tool, carefully flip up the retaining flaps holding the silver video cable in place.

    • Slide the ribbon cable out of each connector.

  14. Lenovo IdeaPad S340-15IWL Motherboard Replacement, Wi-Fi Card: paso 14, imagen 1 de 2 Lenovo IdeaPad S340-15IWL Motherboard Replacement, Wi-Fi Card: paso 14, imagen 2 de 2
    • Pull up the black foam adhesive that covers the screw and connectors holding the Wi-Fi card in place.

  15. Lenovo IdeaPad S340-15IWL Motherboard Replacement: paso 15, imagen 1 de 2 Lenovo IdeaPad S340-15IWL Motherboard Replacement: paso 15, imagen 2 de 2
    • Using an opening tool, lift up on the black and white coaxial cables on the Wi-Fi card and gently pull upward to unplug them.

    • When reconnecting the cables, be sure to match the colors to the arrows on the Wi-Fi card.

  16. Lenovo IdeaPad S340-15IWL Motherboard Replacement: paso 16, imagen 1 de 2 Lenovo IdeaPad S340-15IWL Motherboard Replacement: paso 16, imagen 2 de 2
    • Remove the single 3 mm screw holding the Wi-Fi card in place using a Phillips #0 screwdriver.

    • Gently lift the Wi-Fi card out of the computer.

  17. Lenovo IdeaPad S340-15IWL Motherboard Replacement, Motherboard: paso 17, imagen 1 de 3 Lenovo IdeaPad S340-15IWL Motherboard Replacement, Motherboard: paso 17, imagen 2 de 3 Lenovo IdeaPad S340-15IWL Motherboard Replacement, Motherboard: paso 17, imagen 3 de 3
    • Using an opening tool, flip up the retaining flap that holds the connector to the thin black ribbon cable at the bottom of the motherboard.

    • Gently remove the ribbon cable from its connector.

    • The cable is folded over and connected to itself with an adhesive. Be careful to only pull at the top fold of the cable.

  18. Lenovo IdeaPad S340-15IWL Motherboard Replacement: paso 18, imagen 1 de 2 Lenovo IdeaPad S340-15IWL Motherboard Replacement: paso 18, imagen 2 de 2
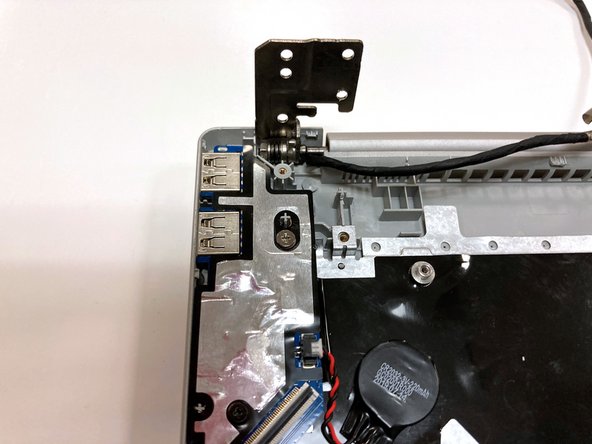
    • Remove the three total silver 6 mm screws from the hinges of the screen in the top corners of the device using a Phillips #0 screwdriver.

  19. Lenovo IdeaPad S340-15IWL Motherboard Replacement: paso 19, imagen 1 de 3 Lenovo IdeaPad S340-15IWL Motherboard Replacement: paso 19, imagen 2 de 3 Lenovo IdeaPad S340-15IWL Motherboard Replacement: paso 19, imagen 3 de 3
    • Use an opening tool to flip up the hinges.

    • You may have to apply some force.

  20. Lenovo IdeaPad S340-15IWL Motherboard Replacement: paso 20, imagen 1 de 2 Lenovo IdeaPad S340-15IWL Motherboard Replacement: paso 20, imagen 2 de 2
    • Remove the three 3 mm screws holding the motherboard in place using a Phillips #0 screwdriver.

  21. Lenovo IdeaPad S340-15IWL Motherboard Replacement: paso 21, imagen 1 de 2 Lenovo IdeaPad S340-15IWL Motherboard Replacement: paso 21, imagen 2 de 2
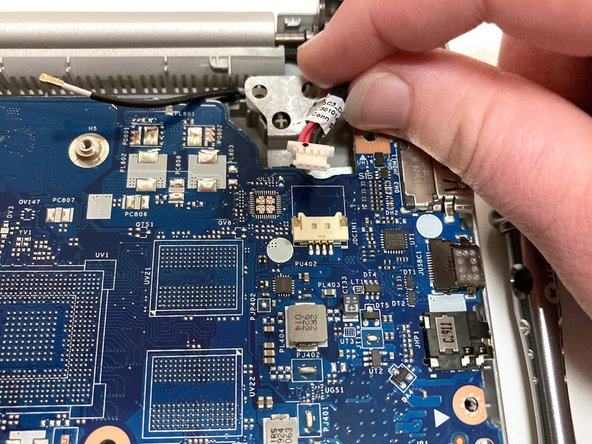
    • Carefully unplug the black and red wires connected to the upper right corner of the motherboard.

    • These wires connect to the device’s charging port.

  22. Lenovo IdeaPad S340-15IWL Motherboard Replacement: paso 22, imagen 1 de 2 Lenovo IdeaPad S340-15IWL Motherboard Replacement: paso 22, imagen 2 de 2
    • Carefully lift the motherboard from the base of the computer and remove it from the laptop.

Conclusión

To reassemble your device, follow these instructions in reverse order.

3 personas más completaron esta guía.

Kristen Gismondi

Miembro Desde 11/12/14

81,907 Reputación

200 Guías creadas

Equipo

iFixit Miembro de iFixit

Staff

135 Miembros

17,125 Guías creadas

0 comentarios

Agregar Comentario

Ver Estadísticas:

Ultimas 24 horas: 4

Ultimos 7 días: 22

Ultimos 30 días: 80

Todo El Tiempo: 2,671