Saltar al contenido principal

Lenovo IdeaPad S210 Touch Hard Drive Replacement

Qué necesitas

  1. Lenovo IdeaPad S210 Touch Hard Drive Replacement, Battery: paso 1, imagen 1 de 1
    • Ensure your device is unplugged and shut down.

    • Place the laptop down with the cooling vents facing upwards.

  2. Lenovo IdeaPad S210 Touch Hard Drive Replacement: paso 2, imagen 1 de 2 Lenovo IdeaPad S210 Touch Hard Drive Replacement: paso 2, imagen 2 de 2
    • Use your finger to slide the latch towards the unlocked position (away from the other latch). If done correctly you will see red.

    • Slide the second latch to the unlocked position while gently pulling the battery away from the laptop.

  3. Lenovo IdeaPad S210 Touch Hard Drive Replacement, Back Panel: paso 3, imagen 1 de 2 Lenovo IdeaPad S210 Touch Hard Drive Replacement, Back Panel: paso 3, imagen 2 de 2
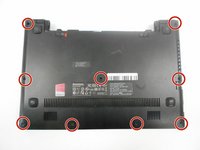
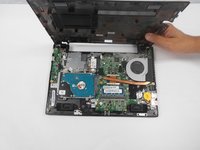
    • Using the #0 Phillips screwdriver, remove the nine 4mm screws on the back panel.

  4. Lenovo IdeaPad S210 Touch Hard Drive Replacement: paso 4, imagen 1 de 1
    • Gently pull the two rubber feet closest to battery away from the device. Using a #0 Phillips screwdriver, remove the 5mm screw under each rubber foot.

  5. Lenovo IdeaPad S210 Touch Hard Drive Replacement: paso 5, imagen 1 de 3 Lenovo IdeaPad S210 Touch Hard Drive Replacement: paso 5, imagen 2 de 3 Lenovo IdeaPad S210 Touch Hard Drive Replacement: paso 5, imagen 3 de 3
    • Slowly begin working your plastic opening tool along the panel to undo the latches around the laptop.

  6. Lenovo IdeaPad S210 Touch Hard Drive Replacement, Hard Drive: paso 6, imagen 1 de 2 Lenovo IdeaPad S210 Touch Hard Drive Replacement, Hard Drive: paso 6, imagen 2 de 2
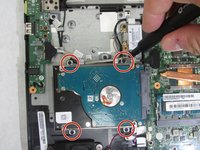
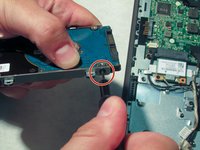
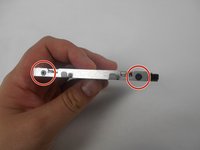
    • Using a #0 Phillips screwdriver, remove the four 4mm screws that secure the hard drive bracket to the motherboard.

  7. Lenovo IdeaPad S210 Touch Hard Drive Replacement: paso 7, imagen 1 de 2 Lenovo IdeaPad S210 Touch Hard Drive Replacement: paso 7, imagen 2 de 2
    • Slide your hard drive away from your motherboard until fully removed.

    • Be careful not to snag any wires routed along the battery side of the hard drive.

  8. Lenovo IdeaPad S210 Touch Hard Drive Replacement: paso 8, imagen 1 de 3 Lenovo IdeaPad S210 Touch Hard Drive Replacement: paso 8, imagen 2 de 3 Lenovo IdeaPad S210 Touch Hard Drive Replacement: paso 8, imagen 3 de 3
    • This step is only necessary if you are swapping your old hard drive for a new one.

    • Using a Phillips #0 screwdriver, remove four 2.5mm screws, two per side, to release the hard drive from its mounting bracket. These screws are directly next to each mounting screw you removed previously.

    • Install the mounting brackets onto the new hard drive during reassembly.

Conclusión

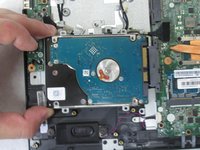
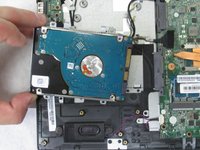
To reassemble your device, follow these instructions in reverse order.

2 personas más completaron esta guía.

Zack Colman

Miembro Desde 07/08/19

885 Reputación

8 Guías creadas

0 comentarios

Agregar Comentario

Ver Estadísticas:

Ultimas 24 horas: 1

Ultimos 7 días: 4

Ultimos 30 días: 12

Todo El Tiempo: 1,396