Esta traducción podría no reflejar los cambios más recientes añadidos a la guía de referencia. Ayúdanos a actualizar la traducción o revisa la guía original.
Introducción
Esta guía fue creada para ayudar a los usuarios a reemplazar los botones en su Nintendo Switch Joy-con izquierdo. Ten en cuenta que esta guía no contiene pasos para la Joy-Con correcta. El proceso para la Joy-con correcta es diferente y un poco más difícil. El proceso para reemplazar los botones en la Joy-Con izquierda consiste en abrir el Joy-Con, quitar cada una de las piezas internas, las baterías y la placa base, luego ubicar, quitar y reemplazar los botones deseados.
Qué necesitas
-
-
Retira los cuatro tornillos ubicados en la carcasa trasera con un destornillador Y00.
-
Inserta una herramienta de apertura de plástico o púa en el costado del Joy-Con sin el riel y haz palanca suavemente hacia abajo para liberar la placa posterior.
-
-
-
Tira suavemente del cable que conecta la batería a la placa base hacia arriba y hacia afuera del Joy-Con.
This step is very precise and it is easy to break the connector if done incorrectly.
Yeah I broke it… it would be nice to see a more in-depth version of the video on their YouTube.
Rosie -
So lucky I had one to "dissect" turns out you don't pull in line with the wire it's more of a pry up/pull straight up from the board
-
-
-
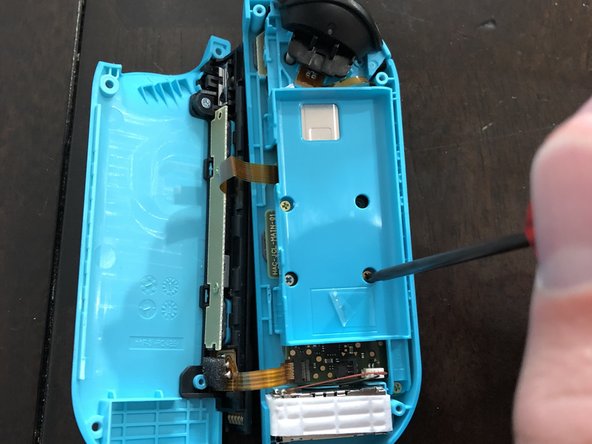
Usa un destornillador Phillips n.° 2 para quitar los tres tornillos que bloquean la carcasa interna en su lugar.
There is also a phillips screw in the bottom right of the picture that needs to be removed before removing the battery holder.
-
-
-
-
Abre la carcasa interior en la dirección opuesta a la que abriste la carcasa exterior.
-
-
-
Usando pinzas, levanta suavemente los broches negros o grises que sujetan cada uno de los 5 cables planos conectados a la placa base.
-
Con las pinzas, extrae con cuidado cada uno de los cables planos de sus conexiones.
I use these tutorials to also learn what each part is so I wish these were labeled with their proper names
-
-
-
Con un destornillador Phillips n.º 2, desatornilla ambos tornillos que conectan el dispositivo analógico a la placa base.
This step and the next are not really necessary unless you are replacing the analog stick.
-


Para volver a armar tu dispositivo, sigue estas instrucciones en orden inverso. Cuando vuelvas a atornillar la placa base en su lugar, asegúrate de no apretarla demasiado. Si la placa base está demasiado ajustada a los botones, podrías impedir que los botones se presionen correctamente.
Para volver a armar tu dispositivo, sigue estas instrucciones en orden inverso. Cuando vuelvas a atornillar la placa base en su lugar, asegúrate de no apretarla demasiado. Si la placa base está demasiado ajustada a los botones, podrías impedir que los botones se presionen correctamente.
Cancelar: No complete esta guía.
30 personas más completaron esta guía.
Un agradecimiento especial a estos traductores:
94%

¡ Francisco Javier Saiz Esteban nos está ayudando a reparar el mundo! ¿Quieres contribuir?
Empezar a traducir ›
Equipo

Eastern Washington University, Team S3-G2, Crane Fall 2018 Miembro de Eastern Washington University, Team S3-G2, Crane Fall 2018
EWU-CRANE-F18S3G2
3 Miembros
9 Guías creadas
8 comentarios
My left directional button is nonresponsive. Can I fix this by dropping in a replacement left directional button? Would the rubber cover need to be replaced as well?
just incase you havent done so already, it might not be the button. it might be the motherboard, connectors, and a whole slew of other problems.
What type of switch is the minus button? It’s on the same ribbon as the L micro switch. My L switch is bad and I’m replacing it I just would like to know the name of the type of switch used on the minus button.
Thank you for the helpful guide! Is there a guide for the right Joy Con available anywhere?
Eric, no one has made a guide for the right Joy-Con yet! I’ve taken them both apart and the buttons are pretty similar. I think you can use Joshua’s button guide here and this joystick guide to guide you to the buttons in the other Joy-Con! If you do end up attempting it, consider taking some photos and making a guide for future right Joy-Con fixers. :)
Thanks for sharing this awesome guide! The first Joy-Con repair went great but i just tried repairing a second Joy-Con and after calibrating it’s drifting really bad. The replacement joystick I used was from Amazon and only $6 so I’m assuming that’s why it didn’t work. I just ordered a new replacement joystick from iFixit so hopefully that one is better quality and works. Thanks again!
Mon bouton left ne fonctionné plus , problème résolu grâce à ce tuto ,trop simple en faite .