Saltar al contenido principal

LG G8 ThinQ Motherboard Replacement

Qué necesitas

  1. LG G8 ThinQ Motherboard Replacement, SIM Card Tray: paso 1, imagen 1 de 3 LG G8 ThinQ Motherboard Replacement, SIM Card Tray: paso 1, imagen 2 de 3 LG G8 ThinQ Motherboard Replacement, SIM Card Tray: paso 1, imagen 3 de 3
    • Unplug and power off your phone before you begin.

    • Insert the SIM card eject tool into the pinhole in the lower right side of the phone.

    • Remove the SIM card and tray.

  2. LG G8 ThinQ Motherboard Replacement, Back Panel: paso 2, imagen 1 de 3 LG G8 ThinQ Motherboard Replacement, Back Panel: paso 2, imagen 2 de 3 LG G8 ThinQ Motherboard Replacement, Back Panel: paso 2, imagen 3 de 3
    • Place the phone so that the screen is facing down.

    • Insert opening cards between the back panel and frame of the phone to loosen the clips and adhesive.

    • Using equal pressure, carefully pry the back panel away from the phone.

    • Once enough space has been created, use an opening tool to completely separate the back panel from the phone.

  3. LG G8 ThinQ Motherboard Replacement, Midframe: paso 3, imagen 1 de 3 LG G8 ThinQ Motherboard Replacement, Midframe: paso 3, imagen 2 de 3 LG G8 ThinQ Motherboard Replacement, Midframe: paso 3, imagen 3 de 3
    • Remove all 14 screws from the midframe using a Phillips #000 screwdriver.

    • Work an opening tool around the perimeter of the midframe to pry and remove it from the phone.

  4. LG G8 ThinQ Motherboard Replacement, Speaker System: paso 4, imagen 1 de 3 LG G8 ThinQ Motherboard Replacement, Speaker System: paso 4, imagen 2 de 3 LG G8 ThinQ Motherboard Replacement, Speaker System: paso 4, imagen 3 de 3
    • Using an opening tool, carefully pry out remove the speaker system from the phone.

  5. LG G8 ThinQ Motherboard Replacement, Headphone Jack: paso 5, imagen 1 de 3 LG G8 ThinQ Motherboard Replacement, Headphone Jack: paso 5, imagen 2 de 3 LG G8 ThinQ Motherboard Replacement, Headphone Jack: paso 5, imagen 3 de 3
    • Using an opening tool, carefully disconnect the ribbon cable connecting the 3.5mm audio jack to the motherboard.

    • Remove the screw holding the 3.5 mm audio jack in place using a Phillips #000 screwdriver.

    • Remove the audio jack from the phone.

  6. LG G8 ThinQ Motherboard Replacement, Battery: paso 6, imagen 1 de 1
    • Flip phone so that screen is facing up.

    • Using a heating pad, hairdryer, or heat gun, apply heat to loosen the adhesive beneath the battery.

    • Be careful to not overheat the phone; the screen and battery are susceptible to damage.

    • The adhesive can be difficult to soften; it may take many attempts.

  7. LG G8 ThinQ Motherboard Replacement: paso 7, imagen 1 de 2 LG G8 ThinQ Motherboard Replacement: paso 7, imagen 2 de 2
    • Using an opening tool, carefully pry up the ribbon cable to disconnect the battery.

  8. LG G8 ThinQ Motherboard Replacement: paso 8, imagen 1 de 3 LG G8 ThinQ Motherboard Replacement: paso 8, imagen 2 de 3 LG G8 ThinQ Motherboard Replacement: paso 8, imagen 3 de 3
    • Using opening cards or an opening tool, carefully pry around the edges of the battery.

    • If you have trouble prying up the battery, the adhesive may not be loose enough. Re-apply heat, or use some isopropyl alcohol under the battery, allowing it to penetrate for several minutes to weaken the adhesive.

    • Remove the battery from the phone.

  9. LG G8 ThinQ Motherboard Replacement, Motherboard: paso 9, imagen 1 de 2 LG G8 ThinQ Motherboard Replacement, Motherboard: paso 9, imagen 2 de 2
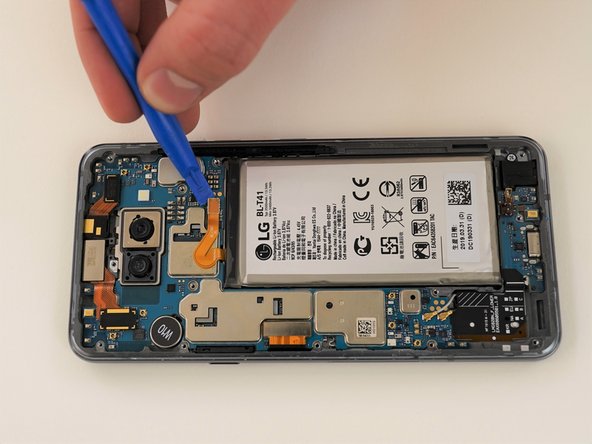
    • Use an opening tool to disconnect the two coaxial cables from the motherboard.

  10. LG G8 ThinQ Motherboard Replacement: paso 10, imagen 1 de 3 LG G8 ThinQ Motherboard Replacement: paso 10, imagen 2 de 3 LG G8 ThinQ Motherboard Replacement: paso 10, imagen 3 de 3
    • Using an opening tool, carefully disconnect the screen ribbon cable from the motherboard.

    • Using an opening tool, carefully pry up the motherboard from the frame and remove it from the phone.

Conclusión

To reassemble your device, follow these instructions in reverse order.

2 personas más completaron esta guía.

Kristen Gismondi

Miembro Desde 11/12/14

82,236 Reputación

200 Guías creadas

Equipo

iFixit Miembro de iFixit

Staff

135 Miembros

17,259 Guías creadas

0 comentarios

Agregar Comentario

Ver Estadísticas:

Ultimas 24 horas: 0

Ultimos 7 días: 9

Ultimos 30 días: 40

Todo El Tiempo: 1,387