Esta versión puede contener ediciones incorrectas. Cambiar a la última instantánea verificada.
Qué necesitas
-
-
Con el estuche cerrado, coloca el Unibody boca arriba sobre una superficie plana.
-
Presiona el lado ranurado del pestillo de liberación de la puerta de acceso lo suficiente para agarrar el extremo libre. Levanta el pestillo de liberación hasta que quede vertical.
-
-
-
Agarra la lengüeta de plástico translúcido y extrae la batería de la Unibody.
-
Si se presiona el pestillo, se bloqueará la batería en su lugar.
-
-
-
Retira los siguientes ocho tornillos que sujetan la carcasa inferior al chasis:
-
Un tornillo Phillips de 5.4 mm.
-
Tres tornillos Phillips de 14 mm.
-
Cuatro tornillos Phillips de 3.5 mm.
-
-
Este paso está sin traducir. Ayuda a traducirlo
-
Disconnect the camera cable by pulling the male end straight away from its socket.
-
-
Este paso está sin traducir. Ayuda a traducirlo
-
Deroute the camera data cable from the channel in the optical drive.
-
-
-
Este paso está sin traducir. Ayuda a traducirlo
-
Use a spudger to pry the optical drive connector straight up off the logic board.
-
-
Este paso está sin traducir. Ayuda a traducirlo
-
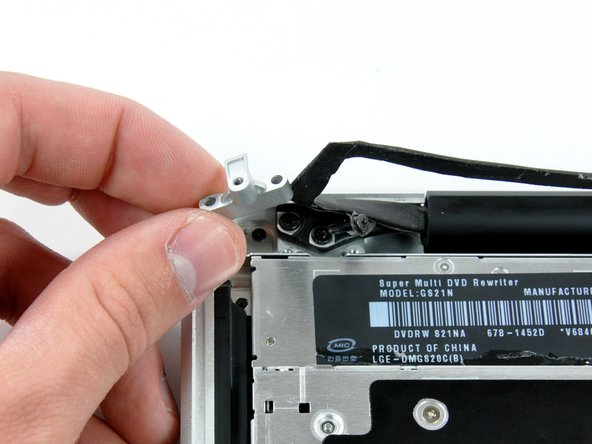
Remove two 8 mm Phillips screws securing the camera cable bracket to the upper case.
-
Lift the camera cable bracket out from the upper case.
-
-
Este paso está sin traducir. Ayuda a traducirlo
-
Remove the following three Phillips screws securing the optical drive to the upper case:
-
One 3.5 mm Phillips screw.
-
Two 2.5 mm Phillips screws.
-
-
Este paso está sin traducir. Ayuda a traducirlo
-
Lift the optical drive from its left edge and pull it out of the computer.
-
-
Este paso está sin traducir. Ayuda a traducirlo
-
Remove the optical drive cable by pulling it straight away from the optical drive.
-
-
Este paso está sin traducir. Ayuda a traducirlo
-
Remove the two black Phillips #0 screws securing the small metal mounting bracket. Transfer this bracket to your new optical drive or hard drive enclosure.
-
-
-
Retira el separador de plástico de la bahía del disco óptico presionando los cierres a cada lado, levántalo y sácalo de la bahía.
-
-
-
Asegúrate de que los conectores del disco duro miran hacia abajo antes de colocarlo en el hueco de la bahía.
-
Coloca con cuidado el disco duro en el hueco insertándolo en la ranura.
-
Mientras sujetas la bahía con una mano, presiona el disco duro con la otra mano para insertarlo en los conectores.
-


Cancelar: No complete esta guía.
87 personas más completaron esta guía.


5 comentarios
Thank you for this very comprehensive guide. I have been able to use it to add a 2nd 1TB Hard Drive to my smaller 13-inch, Aluminum, Late 2008 Macbook in lieu of its original SuperDrive. However, I am unable to see this 2nd drive on my desktop. This is despite the fact that I have checked “Hard disks” under the General tab in Preferences. I only see my 1st 500 Gb SSD boot drive. What can I do to have the 2nd Hard Drive show on my desktop as well?
Ok, I formatted the new HD and it can now be seen on my desktop!
Hi, I’m planning to do the 2nd disk op, however my idea is to add either a 2Tb SSD or 4TB SSD, leaving the OS and the std office tools (write, table, presentation) on original HDD. SSD would contain data and video/photo editing tools.
Does anyone know if the late2008 accepts, runs the above 1Tb drives (SSDs or HDDs)?
I’ve heard so many no/yes/hmmm/ney replies, seems that no one knows. Not even Apple Support team.
I would be grateful if somebody is able to give a solid advice on this matter.
One of the CDRom small screw got damage and it wont be unscrew is there away for me to remove the CD Rom? Help?
Richard Tirtadji: you can try to fix a “good” screw with a strong glue on the top of the defective one. There are how-to’s at youtube.