Esta versión puede contener ediciones incorrectas. Cambie a la última instantánea verificada.
Qué necesitas
-
Este paso está sin traducir. Ayuda a traducirlo
-
Place the tablet on a flat clear surface to keep the screen safe.
-
Slide the larger portion of the back cover off the tablet.
-
This will reveal the battery.
-
-
Este paso está sin traducir. Ayuda a traducirlo
-
Using a plastic opening tool, pry off the top cover casing gently by moving the tool along all three sides.
-
-
-
Este paso está sin traducir. Ayuda a traducirlo
-
With a T5 hexagonal head, remove the nine black 2.5 mm torx screws. Place them carefully aside on the magnetic mat.
-
-
Este paso está sin traducir. Ayuda a traducirlo
-
Using a plastic opening tool, pry off the back casing gently on each side of the tablet.
-
-
Este paso está sin traducir. Ayuda a traducirlo
-
Using a Phillips #00 screwdriver, remove the following screws:
-
Four 5mm wide grey Phillips screws on the logic board.
-
Seven 3mm small grey Phillips screws (four on one side, three on the other) from the black side casing.
-
-
Este paso está sin traducir. Ayuda a traducirlo
-
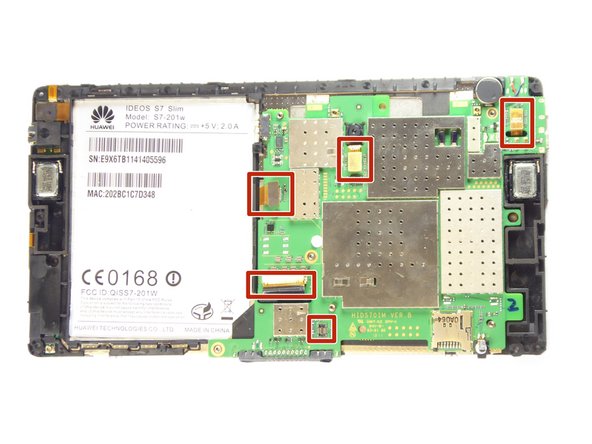
Disconnect the five cables connected to the logic board and then carefully lift the logic board out of the casing.
-


Cancelar: No complete esta guía.
Una persona más ha completado esta guía.
Equipo

UC Davis, Team 1-1, Oliver Fall 2016 Miembro de UC Davis, Team 1-1, Oliver Fall 2016
UCD-OLIVER-F16S1G1
5 Miembros
10 Guías creadas