Saltar al contenido principal

Hover-1 Charger Bluetooth Speaker Replacement

Qué necesitas

  1. Hover-1 Charger Bluetooth Speaker Replacement, Unplugging the Battery: paso 1, imagen 1 de 2 Hover-1 Charger Bluetooth Speaker Replacement, Unplugging the Battery: paso 1, imagen 2 de 2
    • Flip the hoverboard over so that the warning label is facing up.

    • Remove the twelve 12 mm screws with a Phillips #2 screwdriver.

    • Remove the four 10 mm screws with a Phillips #2 screwdriver.

    • The screws nearest to the wheels may be hard to access. Be sure to use a long, thin screwdriver.

  2. Hover-1 Charger Bluetooth Speaker Replacement: paso 2, imagen 1 de 1
    • Pull the right cover away from the hoverboard to expose the battery.

  3. Hover-1 Charger Bluetooth Speaker Replacement: paso 3, imagen 1 de 2 Hover-1 Charger Bluetooth Speaker Replacement: paso 3, imagen 2 de 2
    • Disconnect the two pronged black and yellow cable.

  4. Hover-1 Charger Bluetooth Speaker Replacement: paso 4, imagen 1 de 1
    • Pull the left cover away from the hoverboard.

  5. Hover-1 Charger Bluetooth Speaker Replacement: paso 5, imagen 1 de 2 Hover-1 Charger Bluetooth Speaker Replacement: paso 5, imagen 2 de 2
    • Disconnect the two pronged black and yellow cable. The battery is now fully disconnected.

  6. Hover-1 Charger Bluetooth Speaker Replacement, Bluetooth Speaker: paso 6, imagen 1 de 1
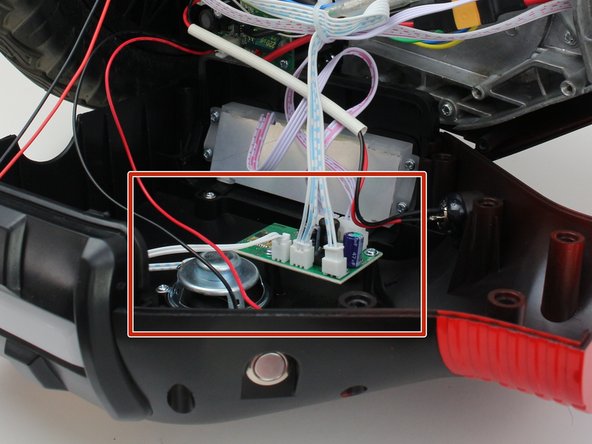
    • Locate the speaker attached to the left cover of the hoverboard.

  7. Hover-1 Charger Bluetooth Speaker Replacement: paso 7, imagen 1 de 2 Hover-1 Charger Bluetooth Speaker Replacement: paso 7, imagen 2 de 2
    • Unplug the red and white four pin connector from the circuit board. Unplugging this connector is photographed as an example.

    • Unplug the red and white four pin connector from the circuit board.

    • Unplug the white and blue three pin connector from the circuit board.

    • Unplug the white and blue two pin connector from the circuit board.

  8. Hover-1 Charger Bluetooth Speaker Replacement: paso 8, imagen 1 de 2 Hover-1 Charger Bluetooth Speaker Replacement: paso 8, imagen 2 de 2
    • Using a Phillips #1 screwdriver, remove the two 7 mm screws from the circuit board.

  9. Hover-1 Charger Bluetooth Speaker Replacement: paso 9, imagen 1 de 2 Hover-1 Charger Bluetooth Speaker Replacement: paso 9, imagen 2 de 2
    • Using a Phillips #1 screwdriver, remove the three screws securing the speaker to the outer shell.

  10. Hover-1 Charger Bluetooth Speaker Replacement: paso 10, imagen 1 de 1
    • Remove the speaker and circuit board from the outer shell.

Conclusión

To reassemble your device, follow these instructions in reverse order.

Una persona más ha completado esta guía.

Equipo

Cal Poly, Team S12-G1, Regan Fall 2019 Miembro de Cal Poly, Team S12-G1, Regan Fall 2019

CPSU-REGAN-F19S12G1

4 Miembros

6 Guías creadas

0 comentarios

Agregar Comentario

Ver Estadísticas:

Ultimas 24 horas: 0

Ultimos 7 días: 3

Ultimos 30 días: 24

Todo El Tiempo: 1,276