Saltar al contenido principal

Honeywell HY-204 Control Panel Replacement

Qué necesitas

  1. Honeywell HY-204 Control Panel Replacement, Case: paso 1, imagen 1 de 2 Honeywell HY-204 Control Panel Replacement, Case: paso 1, imagen 2 de 2
    • Before you begin, be sure to unplug the fan.

    • Remove the four 14 mm screws from the back of the device using the Phillips #0 Screwdriver.

  2. Honeywell HY-204 Control Panel Replacement: paso 2, imagen 1 de 2 Honeywell HY-204 Control Panel Replacement: paso 2, imagen 2 de 2
    • Pull the front and back parts of the case away from each other until the back is free from the front. This may require a large amount of force.

  3. Honeywell HY-204 Control Panel Replacement, Control Panel: paso 3, imagen 1 de 2 Honeywell HY-204 Control Panel Replacement, Control Panel: paso 3, imagen 2 de 2
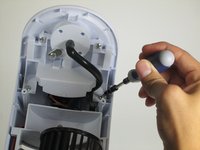
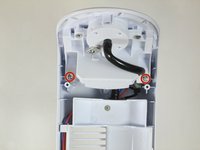
    • Remove the two 3mm screws found just below the top of the device using the Phillips #0 Screwdriver.

  4. Honeywell HY-204 Control Panel Replacement: paso 4, imagen 1 de 1
    • Pry off the control panel by forcefully lifting the tab located inside the front of the fan with the plastic opening tool.

Conclusión

To reassemble your device, follow these instructions in reverse order.

Nolan Ernotte

Miembro Desde 10/14/14

366 Reputación

3 Guías creadas

Equipo

Cal Poly, Team 10-40, Amido Fall 2014 Miembro de Cal Poly, Team 10-40, Amido Fall 2014

CPSU-AMIDO-F14S10G40

3 Miembros

7 Guías creadas

0 comentarios

Agregar Comentario

Ver Estadísticas:

Ultimas 24 horas: 1

Ultimos 7 días: 10

Ultimos 30 días: 10

Todo El Tiempo: 508