Saltar al contenido principal

Honda 3000 Watt Generator EB3000CK2A Air Cleaner and Canister Assembly Replacement

Sólo Prerrequisito
Esta guía solo debería usarse como prerrequisito para otras guías. Por tanto, estará incompleta.

Qué necesitas

  1. Honda 3000 Watt Generator EB3000CK2A Air Cleaner and Canister Assembly Replacement, Disconnect the spark plug: paso 1, imagen 1 de 2 Honda 3000 Watt Generator EB3000CK2A Air Cleaner and Canister Assembly Replacement, Disconnect the spark plug: paso 1, imagen 2 de 2
    • Before you begin, disconnect the spark plug connector from the spark plug.

  2. Honda 3000 Watt Generator EB3000CK2A Air Cleaner and Canister Assembly Replacement, Unfasten the control box: paso 2, imagen 1 de 2 Honda 3000 Watt Generator EB3000CK2A Air Cleaner and Canister Assembly Replacement, Unfasten the control box: paso 2, imagen 2 de 2
    • Use a 10 mm socket to remove the two 20 mm-long bolts securing the sides of the control box case.

  3. Honda 3000 Watt Generator EB3000CK2A Air Cleaner and Canister Assembly Replacement, Remove the control box: paso 3, imagen 1 de 3 Honda 3000 Watt Generator EB3000CK2A Air Cleaner and Canister Assembly Replacement, Remove the control box: paso 3, imagen 2 de 3 Honda 3000 Watt Generator EB3000CK2A Air Cleaner and Canister Assembly Replacement, Remove the control box: paso 3, imagen 3 de 3
    • Remove the control box from the generator frame and tilt it downwards.

    • Do not attempt to completely remove the control box as it is still wired to the generator.

  4. Honda 3000 Watt Generator EB3000CK2A Air Cleaner and Canister Assembly Replacement, Unfasten the fuel tank and muffler protector: paso 4, imagen 1 de 2 Honda 3000 Watt Generator EB3000CK2A Air Cleaner and Canister Assembly Replacement, Unfasten the fuel tank and muffler protector: paso 4, imagen 2 de 2
    • Use a 10 mm socket to remove the five bolts securing the muffler protector and the fuel tank to the frame:

    • Two 25 mm-long bolts

    • Three 15 mm-long bolts

    • Use a pair of pliers to remove the lock pin and clutch joint securing the fuel tank to the frame.

  5. Honda 3000 Watt Generator EB3000CK2A Air Cleaner and Canister Assembly Replacement, Remove the fuel tank bar: paso 5, imagen 1 de 3 Honda 3000 Watt Generator EB3000CK2A Air Cleaner and Canister Assembly Replacement, Remove the fuel tank bar: paso 5, imagen 2 de 3 Honda 3000 Watt Generator EB3000CK2A Air Cleaner and Canister Assembly Replacement, Remove the fuel tank bar: paso 5, imagen 3 de 3
    • Use a 10 mm socket to remove the two 20 mm-long bolts securing the fuel tank bar to the rest of the frame.

    • Remove the fuel tank bar.

  6. Honda 3000 Watt Generator EB3000CK2A Air Cleaner and Canister Assembly Replacement, Disconnect the fuel tank tubes: paso 6, imagen 1 de 1
    • Identify these two tubes and their tube clamps:

    • The tube connected to the bottom of the fuel tank

    • The tube connected to the petcock assembly

  7. Honda 3000 Watt Generator EB3000CK2A Air Cleaner and Canister Assembly Replacement: paso 7, imagen 1 de 2 Honda 3000 Watt Generator EB3000CK2A Air Cleaner and Canister Assembly Replacement: paso 7, imagen 2 de 2
    • Use a pair of pliers to squeeze and shift the first tube clamp down the fuel tank tube.

  8. Honda 3000 Watt Generator EB3000CK2A Air Cleaner and Canister Assembly Replacement: paso 8, imagen 1 de 2 Honda 3000 Watt Generator EB3000CK2A Air Cleaner and Canister Assembly Replacement: paso 8, imagen 2 de 2
    • Disconnect the tube from the fuel tank.

    • Residual fuel may leak when you disconnect this tube. Be ready to catch any spillage.

  9. Honda 3000 Watt Generator EB3000CK2A Air Cleaner and Canister Assembly Replacement: paso 9, imagen 1 de 2 Honda 3000 Watt Generator EB3000CK2A Air Cleaner and Canister Assembly Replacement: paso 9, imagen 2 de 2
    • Use a pair of pliers to squeeze and shift the second tube clamp left and away from the petcock assembly.

  10. Honda 3000 Watt Generator EB3000CK2A Air Cleaner and Canister Assembly Replacement: paso 10, imagen 1 de 2 Honda 3000 Watt Generator EB3000CK2A Air Cleaner and Canister Assembly Replacement: paso 10, imagen 2 de 2
    • Disconnect the tube from the petcock assembly.

  11. Honda 3000 Watt Generator EB3000CK2A Air Cleaner and Canister Assembly Replacement, Remove the fuel tank: paso 11, imagen 1 de 2 Honda 3000 Watt Generator EB3000CK2A Air Cleaner and Canister Assembly Replacement, Remove the fuel tank: paso 11, imagen 2 de 2
    • Gently lift one side of the tank and slip it out of the generator frame.

    • Remove the fuel tank.

  12. Honda 3000 Watt Generator EB3000CK2A Air Cleaner and Canister Assembly Replacement, Remove the muffler cover: paso 12, imagen 1 de 2 Honda 3000 Watt Generator EB3000CK2A Air Cleaner and Canister Assembly Replacement, Remove the muffler cover: paso 12, imagen 2 de 2
    • Remove the muffler protector.

  13. Honda 3000 Watt Generator EB3000CK2A Air Cleaner and Canister Assembly Replacement, Remove the choke rod: paso 13, imagen 1 de 2 Honda 3000 Watt Generator EB3000CK2A Air Cleaner and Canister Assembly Replacement, Remove the choke rod: paso 13, imagen 2 de 2
    • Lift the choke rod off of the air cleaner housing.

  14. Honda 3000 Watt Generator EB3000CK2A Air Cleaner and Canister Assembly Replacement: paso 14, imagen 1 de 3 Honda 3000 Watt Generator EB3000CK2A Air Cleaner and Canister Assembly Replacement: paso 14, imagen 2 de 3 Honda 3000 Watt Generator EB3000CK2A Air Cleaner and Canister Assembly Replacement: paso 14, imagen 3 de 3
    • Continue lifting the choke rod until it's free from the generator.

    • Remove the choke rod.

  15. Honda 3000 Watt Generator EB3000CK2A Air Cleaner and Canister Assembly Replacement, Remove the air cleaner cover: paso 15, imagen 1 de 3 Honda 3000 Watt Generator EB3000CK2A Air Cleaner and Canister Assembly Replacement, Remove the air cleaner cover: paso 15, imagen 2 de 3 Honda 3000 Watt Generator EB3000CK2A Air Cleaner and Canister Assembly Replacement, Remove the air cleaner cover: paso 15, imagen 3 de 3
    • Unclip the two clips on top of the air cleaner housing.

    • Tilt the air cleaner cover down slightly.

  16. Honda 3000 Watt Generator EB3000CK2A Air Cleaner and Canister Assembly Replacement: paso 16, imagen 1 de 2 Honda 3000 Watt Generator EB3000CK2A Air Cleaner and Canister Assembly Replacement: paso 16, imagen 2 de 2
    • Remove the air cleaner cover.

  17. Honda 3000 Watt Generator EB3000CK2A Air Cleaner and Canister Assembly Replacement, Remove the air cleaner element: paso 17, imagen 1 de 2 Honda 3000 Watt Generator EB3000CK2A Air Cleaner and Canister Assembly Replacement, Remove the air cleaner element: paso 17, imagen 2 de 2
    • Use a flathead screwdriver or a pick to remove the air cleaner element from the air cleaner housing.

  18. Honda 3000 Watt Generator EB3000CK2A Air Cleaner and Canister Assembly Replacement, Unfasten the air cleaner housing: paso 18, imagen 1 de 2 Honda 3000 Watt Generator EB3000CK2A Air Cleaner and Canister Assembly Replacement, Unfasten the air cleaner housing: paso 18, imagen 2 de 2
    • Use a 10 mm socket to remove the two nuts from the inside of the air cleaner housing.

    • Use a 10 mm socket to remove the 20 mm-long bolt from the inside of the air cleaner housing.

    • During reassembly, tighten these fasteners to 7 lb-ft (10 N-m) of torque.

  19. Honda 3000 Watt Generator EB3000CK2A Air Cleaner and Canister Assembly Replacement, Disconnect the breather tube: paso 19, imagen 1 de 2 Honda 3000 Watt Generator EB3000CK2A Air Cleaner and Canister Assembly Replacement, Disconnect the breather tube: paso 19, imagen 2 de 2
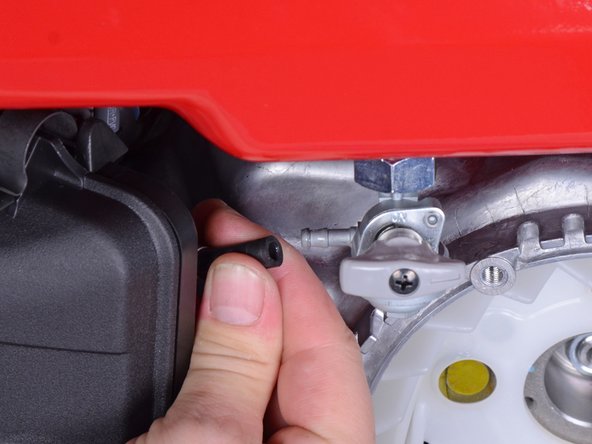
    • Pull up and disconnect the breather tube from the top of the air cleaner housing.

  20. Honda 3000 Watt Generator EB3000CK2A Air Cleaner and Canister Assembly Replacement, Unfasten the canister assembly: paso 20, imagen 1 de 3 Honda 3000 Watt Generator EB3000CK2A Air Cleaner and Canister Assembly Replacement, Unfasten the canister assembly: paso 20, imagen 2 de 3 Honda 3000 Watt Generator EB3000CK2A Air Cleaner and Canister Assembly Replacement, Unfasten the canister assembly: paso 20, imagen 3 de 3
    • Lift up the canister assembly from its mounting rails to release it from the generator frame.

  21. Honda 3000 Watt Generator EB3000CK2A Air Cleaner and Canister Assembly Replacement, Remove the canister and air cleaner assembly: paso 21, imagen 1 de 2 Honda 3000 Watt Generator EB3000CK2A Air Cleaner and Canister Assembly Replacement, Remove the canister and air cleaner assembly: paso 21, imagen 2 de 2
    • Remove the air cleaner and canister assembly.

Conclusión

To reassemble your device, follow these instructions in reverse order.

Tarun Thiruma

Miembro Desde 11/20/19

35,352 Reputación

134 Guías creadas

0 comentarios

Agregar Comentario

Ver Estadísticas:

Ultimas 24 horas: 0

Ultimos 7 días: 0

Ultimos 30 días: 0

Todo El Tiempo: 55