Esta versión puede contener ediciones incorrectas. Cambie a la última instantánea verificada.
Qué necesitas
-
-
Voltea el controlador Vive para que el plato inferior quede hacia arriba.
-
Usa el destornillador Torx T5 para quitar los tres tornillos negros de 21 mm del plato inferior.
-
-
-
Utiliza el destornillador Torx T5 para quitar los dos tornillos negros de 5,2 mm del panel gris posterior.
-
-
-
-
Usa el destornillador Phillips 00 para quitar los dos tornillos negros de 2,8 mm de la placa plateada.
-
Usa el destornillador Phillips 00 para quitar el tornillo negro de 5,8 mm de la esquina inferior derecha de la placa plateada.
-
-
Este paso está sin traducir. Ayuda a traducirlo
-
Use the Phillips 00 screwdriver to remove the two black 5.8mm screws from the top of the motherboard.
-
-
Este paso está sin traducir. Ayuda a traducirlo
-
Use the T5 Torx screwdriver to remove the two silver 4.2mm screws from the bottom of the motherboard.
-
-
Este paso está sin traducir. Ayuda a traducirlo
-
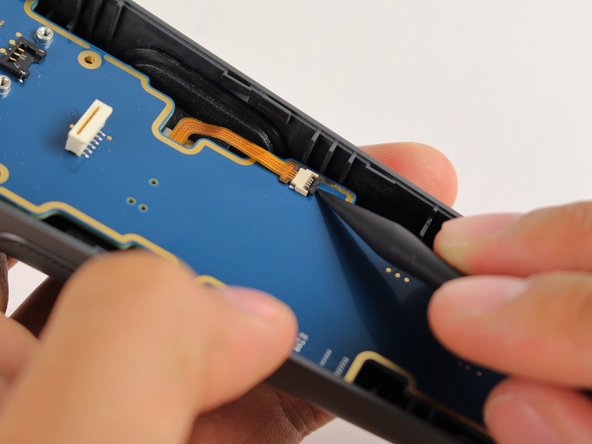
Use the nylon spudger to rotate the black tab up by 90 degrees.
-
Disconnect the ribbon cable carefully with your finger.
-
-
Este paso está sin traducir. Ayuda a traducirlo
-
Lift the motherboard up and out of the Vive controller using your hands.
-


Cancelar: No complete esta guía.
9 personas más completaron esta guía.
Equipo

Cal Poly, Team S15-G5, Livingston Fall 2017 Miembro de Cal Poly, Team S15-G5, Livingston Fall 2017
CPSU-LIVINGSTON-F17S15G5
4 Miembros
51 Guías creadas
13 comentarios
Hi, do you know where I can get a new motherboard? I bought my controller second hand and after several months it stoppedworking…. when I took it apart the connection at the bottom has been removed and two wires soldered in place but it’s so small I can’t do it again so I need a new motherboard
thanks
I am looking for the connetor at step 10. The top of the connector is broken (fail quality assurence). I am not interrested to purchase a new controler at 200$ because of a 2 cents connector.
Thank you
I had the same connector problem in step 10, where can I just buy the mother board
did either of you find the connector for the power button to mother board in step 10