Saltar al contenido principal

HP Slate 7 Plus 4200US LCD Screen Replacement

Qué necesitas

  1. HP Slate 7 Plus 4200US LCD Screen Replacement, Tablet Cover: paso 1, imagen 1 de 1
    • Turn off the tablet and disconnect the power and all external devices from the tablet.

    • Position the tablet with the display panel down and the right side toward you.

    • Carefully insert a plastic opening tool between the tablet cover and display panel assembly, separating the two components. The first insertion point should be between the power button and the volume buttons.

  2. HP Slate 7 Plus 4200US LCD Screen Replacement: paso 2, imagen 1 de 2 HP Slate 7 Plus 4200US LCD Screen Replacement: paso 2, imagen 2 de 2
    • Slide the tool around the perimeter of the tablet until the edge of the cover is completely separated from the display panel assembly.

  3. HP Slate 7 Plus 4200US LCD Screen Replacement: paso 3, imagen 1 de 3 HP Slate 7 Plus 4200US LCD Screen Replacement: paso 3, imagen 2 de 3 HP Slate 7 Plus 4200US LCD Screen Replacement: paso 3, imagen 3 de 3
    • Pry open the back cover to take it off.

  4. HP Slate 7 Plus 4200US LCD Screen Replacement, Battery: paso 4, imagen 1 de 3 HP Slate 7 Plus 4200US LCD Screen Replacement, Battery: paso 4, imagen 2 de 3 HP Slate 7 Plus 4200US LCD Screen Replacement, Battery: paso 4, imagen 3 de 3
    • Disconnect the battery cables from the system board by desoldering them. See iFixit guide on how to solder.

    • The battery cables are soldered to the system in the following sequence, top to bottom: red, blue, green, yellow, black.

  5. HP Slate 7 Plus 4200US LCD Screen Replacement: paso 5, imagen 1 de 3 HP Slate 7 Plus 4200US LCD Screen Replacement: paso 5, imagen 2 de 3 HP Slate 7 Plus 4200US LCD Screen Replacement: paso 5, imagen 3 de 3
    • Insert a nylon spudger between the battery and the display panel assembly. Carefully pry the battery up and remove it from its place.

    • The battery is attached to the display panel assembly with double-sided adhesive. Make sure to firmly pull the battery.

    • The regular black nylon spudger should be used whenever possible, especially around batteries.

  6. HP Slate 7 Plus 4200US LCD Screen Replacement, Front Facing Webcamera: paso 6, imagen 1 de 2 HP Slate 7 Plus 4200US LCD Screen Replacement, Front Facing Webcamera: paso 6, imagen 2 de 2
    Herramienta utilizada en este paso:
    Tweezers
    $4.99
    Comprar
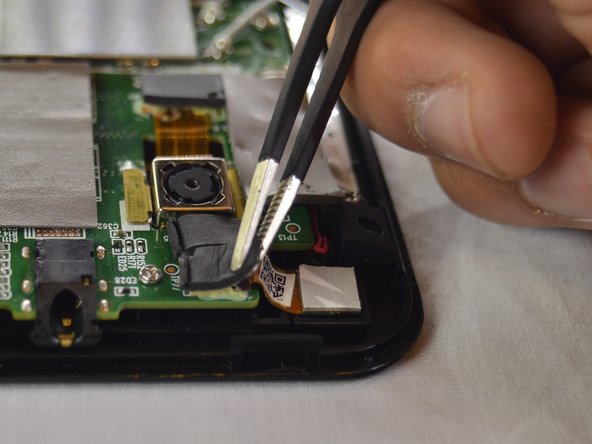
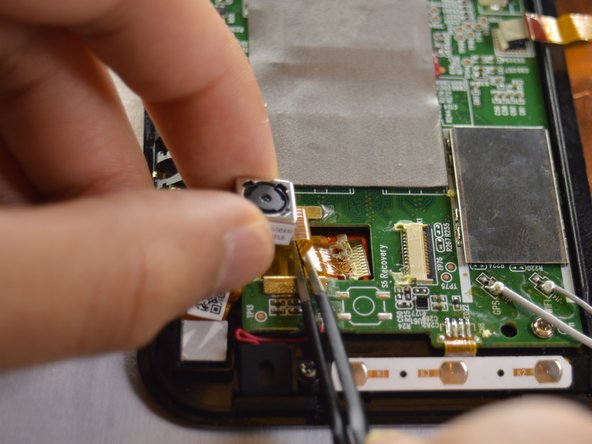
    • Use tweezers to remove the black foam stickers from the front facing camera to expose the wiring.

  7. HP Slate 7 Plus 4200US LCD Screen Replacement: paso 7, imagen 1 de 2 HP Slate 7 Plus 4200US LCD Screen Replacement: paso 7, imagen 2 de 2
    • Lift the camera out from system board and firmly pull the wire out from the connector.

  8. HP Slate 7 Plus 4200US LCD Screen Replacement, Rear Facing Webcamera: paso 8, imagen 1 de 2 HP Slate 7 Plus 4200US LCD Screen Replacement, Rear Facing Webcamera: paso 8, imagen 2 de 2
    Herramienta utilizada en este paso:
    Tweezers
    $4.99
    Comprar
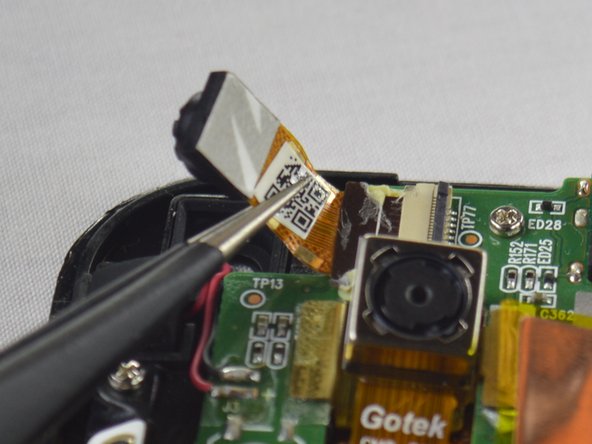
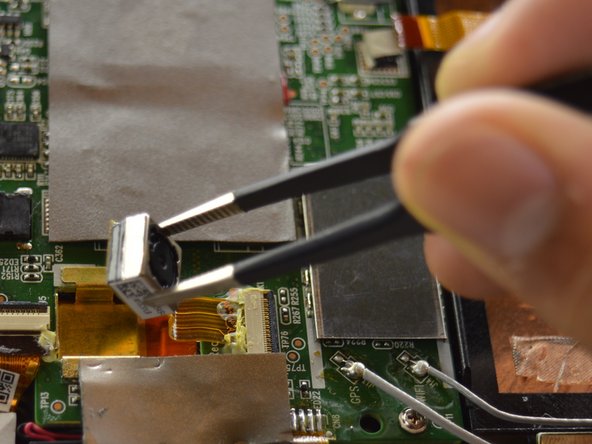
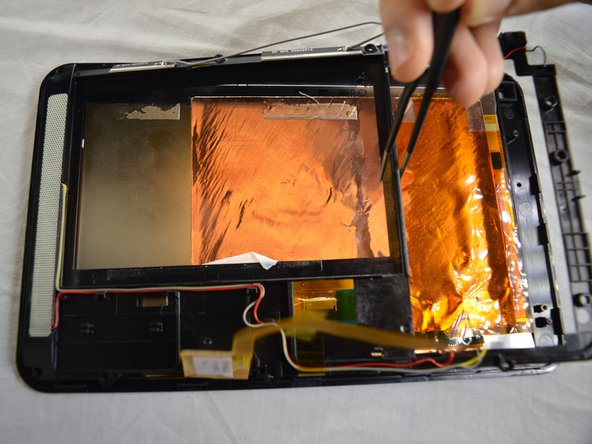
    • Use the tweezers to remove the black foam stickers from the rear facing camera to expose the wiring.

  9. HP Slate 7 Plus 4200US LCD Screen Replacement: paso 9, imagen 1 de 2 HP Slate 7 Plus 4200US LCD Screen Replacement: paso 9, imagen 2 de 2
    • Using tweezers, lift the camera out from system board.

  10. HP Slate 7 Plus 4200US LCD Screen Replacement: paso 10, imagen 1 de 2 HP Slate 7 Plus 4200US LCD Screen Replacement: paso 10, imagen 2 de 2
    • Use tweezers to pull the wire out from the connector. Pull away from the connector, parallel to the tablet.

  11. HP Slate 7 Plus 4200US LCD Screen Replacement, System Board: paso 11, imagen 1 de 1
    • Remove the four screws from the motherboard using a Phillips 00 screwdriver.

  12. HP Slate 7 Plus 4200US LCD Screen Replacement: paso 12, imagen 1 de 1
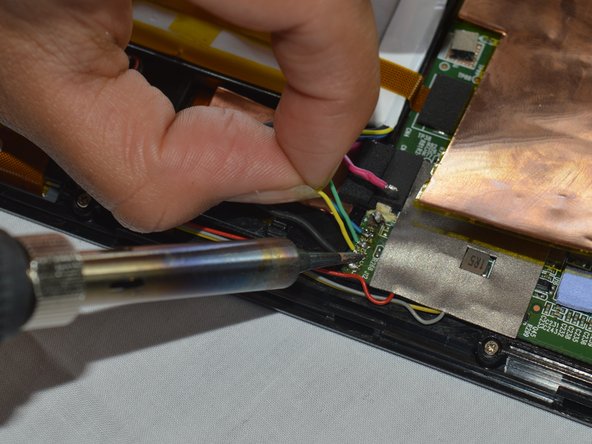
    • Remove the two grey wires on the left and the four multicolored wires on the right by desoldering them. See iFixit guide on how to solder.

    • The multicolored wires are in soldered in order from top to bottom in the following order: yellow, grey, black, and red.

  13. HP Slate 7 Plus 4200US LCD Screen Replacement: paso 13, imagen 1 de 1
    • Disconnect the LCD wire from the connector by pulling away from the connector, parallel to the tablet.

  14. HP Slate 7 Plus 4200US LCD Screen Replacement: paso 14, imagen 1 de 2 HP Slate 7 Plus 4200US LCD Screen Replacement: paso 14, imagen 2 de 2
    Herramienta utilizada en este paso:
    Tweezers
    $4.99
    Comprar
    • Using tweezers, lift the system board and remove it.

  15. HP Slate 7 Plus 4200US LCD Screen Replacement, Speaker: paso 15, imagen 1 de 1
    • Unscrew 8 screw using a Phillips 00 screwdriver.

  16. HP Slate 7 Plus 4200US LCD Screen Replacement: paso 16, imagen 1 de 2 HP Slate 7 Plus 4200US LCD Screen Replacement: paso 16, imagen 2 de 2
    • Grab the center of the plastic frame, which has the speaker, and lift to remove it.

  17. HP Slate 7 Plus 4200US LCD Screen Replacement, LCD Screen: paso 17, imagen 1 de 3 HP Slate 7 Plus 4200US LCD Screen Replacement, LCD Screen: paso 17, imagen 2 de 3 HP Slate 7 Plus 4200US LCD Screen Replacement, LCD Screen: paso 17, imagen 3 de 3
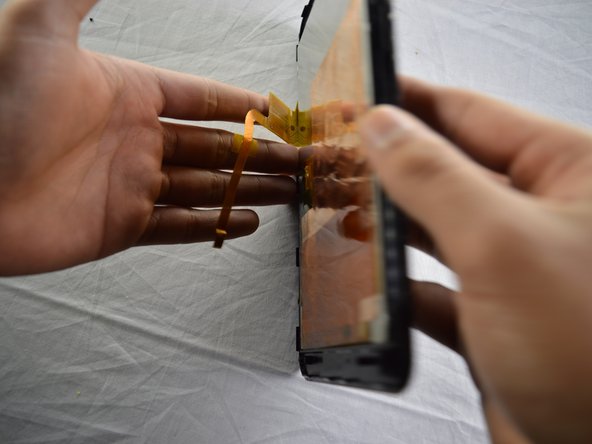
    • Remove the screen by holding the tablet in one hand with the back of the LCD screen facing up. Slowly rotate the tablet so the screen falls into your other hand.

Conclusión

To reassemble your device, follow these instructions in reverse order.

3 personas más completaron esta guía.

Jessica Andrade

Miembro Desde 10/04/16

860 Reputación

7 Guías creadas

Equipo

USF Tampa, Team 3-1, Sullivan Fall 2016 Miembro de USF Tampa, Team 3-1, Sullivan Fall 2016

USFT-SULLIVAN-F16S3G1

3 Miembros

14 Guías creadas

0 comentarios

Agregar Comentario

Ver Estadísticas:

Ultimas 24 horas: 0

Ultimos 7 días: 7

Ultimos 30 días: 11

Todo El Tiempo: 1,239