Saltar al contenido principal

HP Pavilion G60-120US Motherboard Replacement

Qué necesitas

  1. HP Pavilion G60-120US Motherboard Replacement, Battery: paso 1, imagen 1 de 1
    • Make sure the laptop is turned off.

    • Turn the laptop over to reveal the battery.

  2. HP Pavilion G60-120US Motherboard Replacement: paso 2, imagen 1 de 2 HP Pavilion G60-120US Motherboard Replacement: paso 2, imagen 2 de 2
    • Slide and hold the battery release switch to the left to release the battery from the device.

  3. HP Pavilion G60-120US Motherboard Replacement: paso 3, imagen 1 de 2 HP Pavilion G60-120US Motherboard Replacement: paso 3, imagen 2 de 2
    • While holding the battery release switch, grab the battery and pull it upward gently.

  4. HP Pavilion G60-120US Motherboard Replacement, Keyboard: paso 4, imagen 1 de 1
    • Using the Phillips #0 screwdriver, remove the seven 4.0mm screws on the battery compartment of the laptop.

  5. HP Pavilion G60-120US Motherboard Replacement: paso 5, imagen 1 de 2 HP Pavilion G60-120US Motherboard Replacement: paso 5, imagen 2 de 2
    • Using the Phillips #0 screwdriver, remove two 4.0mm screws from the hard disk cover.

    • Remove the hard disk cover.

  6. HP Pavilion G60-120US Motherboard Replacement: paso 6, imagen 1 de 2 HP Pavilion G60-120US Motherboard Replacement: paso 6, imagen 2 de 2
    • Remove the hard drive by pulling gently and disconnecting the hard drive from the laptop.

    • Gently pull on the black and red wiring on the bottom left to separate the wire from the component.

  7. HP Pavilion G60-120US Motherboard Replacement: paso 7, imagen 1 de 1
    • Remove the two 4.0 mm Phillips #0 screws from the hard disk compartment.

  8. HP Pavilion G60-120US Motherboard Replacement: paso 8, imagen 1 de 3 HP Pavilion G60-120US Motherboard Replacement: paso 8, imagen 2 de 3 HP Pavilion G60-120US Motherboard Replacement: paso 8, imagen 3 de 3
    • Using the Phillips #0 screwdriver, remove the two 4.0 mm screws from the memory card cover.

    • Remove the memory disk cover.

  9. HP Pavilion G60-120US Motherboard Replacement: paso 9, imagen 1 de 3 HP Pavilion G60-120US Motherboard Replacement: paso 9, imagen 2 de 3 HP Pavilion G60-120US Motherboard Replacement: paso 9, imagen 3 de 3
    • Using the Phillips #0 screwdriver, remove the 4.0 mm screw from the Wi-Fi chip cover.

    • Remove the Wi-Fi chip cover.

  10. HP Pavilion G60-120US Motherboard Replacement: paso 10, imagen 1 de 2 HP Pavilion G60-120US Motherboard Replacement: paso 10, imagen 2 de 2
    • Using the Phillips #0 screwdriver, remove the two 3.0 mm screws securing the Wi-Fi chip in place.

    • Grab the Wi-Fi chip and pull up gently to the left to disconnect it from the laptop.

  11. HP Pavilion G60-120US Motherboard Replacement: paso 11, imagen 1 de 2 HP Pavilion G60-120US Motherboard Replacement: paso 11, imagen 2 de 2
    • Disconnect the two wires connecting the chip's base.

    • Remove the Wi-Fi chip.

  12. HP Pavilion G60-120US Motherboard Replacement: paso 12, imagen 1 de 1
    • Using the Phillips #0 screwdriver, remove the seven 4.0 mm screws on the bottom of the laptop.

  13. HP Pavilion G60-120US Motherboard Replacement: paso 13, imagen 1 de 3 HP Pavilion G60-120US Motherboard Replacement: paso 13, imagen 2 de 3 HP Pavilion G60-120US Motherboard Replacement: paso 13, imagen 3 de 3
    • Turn the laptop back to its upright state.

    • Insert an opening tool into the upper right corner of the keyboard and gently lift it to separate it from the laptop.

    • Be sure not to apply excessive pressure to prevent the bending and breaking of the keyboard.

    • Do not pull the keyboard all the way out because there is a wiring connection under the keyboard.

  14. HP Pavilion G60-120US Motherboard Replacement: paso 14, imagen 1 de 3 HP Pavilion G60-120US Motherboard Replacement: paso 14, imagen 2 de 3 HP Pavilion G60-120US Motherboard Replacement: paso 14, imagen 3 de 3
    • Grab the wiring and gently pull it out to disconnect it from the laptop.

    • Don't use excessive force.

    • Remove the keyboard.

  15. HP Pavilion G60-120US Motherboard Replacement, Display Assembly: paso 15, imagen 1 de 2 HP Pavilion G60-120US Motherboard Replacement, Display Assembly: paso 15, imagen 2 de 2
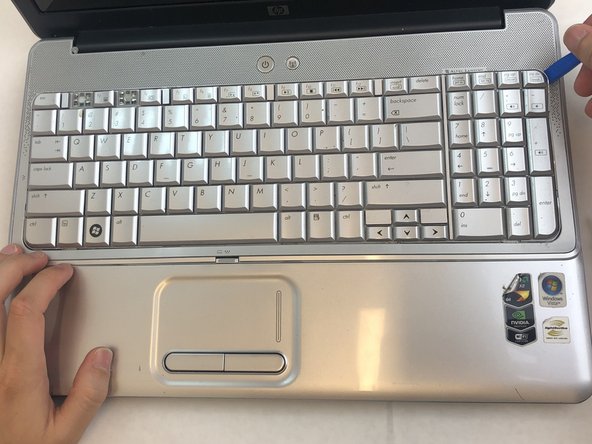
    • Insert an opening tool into the top right side of the corner, and gently lift the rest of the cover to separate if from the laptop.

    • Avoid using excessive force which may break the cover.

    • Do not completely pull out the cover; there is a wire still attached to the laptop.

  16. HP Pavilion G60-120US Motherboard Replacement: paso 16, imagen 1 de 2 HP Pavilion G60-120US Motherboard Replacement: paso 16, imagen 2 de 2
    • Using your fingertips, detach the ribbon cable by gently lifting up the black tab located on the bottom end of the cable.

    • Separate the cable and remove the cover.

  17. HP Pavilion G60-120US Motherboard Replacement: paso 17, imagen 1 de 3 HP Pavilion G60-120US Motherboard Replacement: paso 17, imagen 2 de 3 HP Pavilion G60-120US Motherboard Replacement: paso 17, imagen 3 de 3
    • Remove the mouse and touchpad cable by lifting the black tab and gently pulling the cable out.

  18. HP Pavilion G60-120US Motherboard Replacement: paso 18, imagen 1 de 3 HP Pavilion G60-120US Motherboard Replacement: paso 18, imagen 2 de 3 HP Pavilion G60-120US Motherboard Replacement: paso 18, imagen 3 de 3
    • Detach the white screen wiring on the bottom left side by gently pulling out.

    • Detach two black screen cables on the middle left side by gently pulling out the cables.

    • Pull out the black cable on the upper right side of the laptop.

    • Use gentle pressure while removing the wires.

  19. HP Pavilion G60-120US Motherboard Replacement: paso 19, imagen 1 de 3 HP Pavilion G60-120US Motherboard Replacement: paso 19, imagen 2 de 3 HP Pavilion G60-120US Motherboard Replacement: paso 19, imagen 3 de 3
    • Using the Phillips #0 screwdriver, remove the four 4.0 mm screws on both hinges of the laptop's screen.

  20. HP Pavilion G60-120US Motherboard Replacement: paso 20, imagen 1 de 2 HP Pavilion G60-120US Motherboard Replacement: paso 20, imagen 2 de 2
    • Gently lift and detach the display assembly from the laptop’s base.

  21. HP Pavilion G60-120US Motherboard Replacement, Midframe: paso 21, imagen 1 de 1
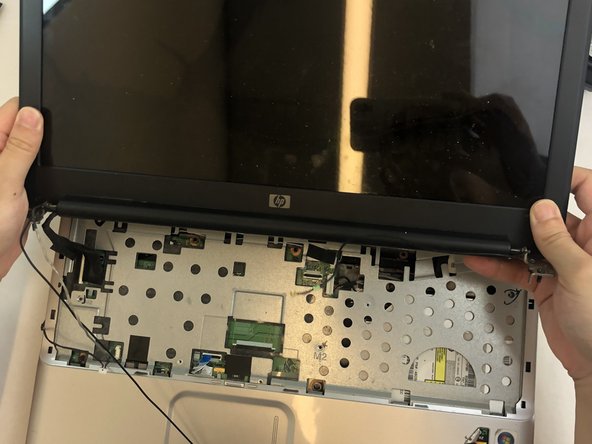
    • Using the Phillips #0 screwdriver, remove the four 4mm screws from the midframe.

  22. HP Pavilion G60-120US Motherboard Replacement: paso 22, imagen 1 de 3 HP Pavilion G60-120US Motherboard Replacement: paso 22, imagen 2 de 3 HP Pavilion G60-120US Motherboard Replacement: paso 22, imagen 3 de 3
    • Using an opening tool, gently lift each corner of the midframe.

    • Use caution when applying pressure with the opening tool as it may break while attempting to lift the midframe.

    • Detach and remove the midframe from the main body of the laptop.

  23. HP Pavilion G60-120US Motherboard Replacement, Motherboard: paso 23, imagen 1 de 3 HP Pavilion G60-120US Motherboard Replacement, Motherboard: paso 23, imagen 2 de 3 HP Pavilion G60-120US Motherboard Replacement, Motherboard: paso 23, imagen 3 de 3
    • Gently detach the five wires that are connected to the motherboard.

    • Do not use excessive force when pulling on the wires.

  24. HP Pavilion G60-120US Motherboard Replacement: paso 24, imagen 1 de 3 HP Pavilion G60-120US Motherboard Replacement: paso 24, imagen 2 de 3 HP Pavilion G60-120US Motherboard Replacement: paso 24, imagen 3 de 3
    • Remove seven 4mm Phillips #0 screws from the motherboard.

    • Remove the speaker from above the fan.

  25. HP Pavilion G60-120US Motherboard Replacement: paso 25, imagen 1 de 2 HP Pavilion G60-120US Motherboard Replacement: paso 25, imagen 2 de 2
    • Gently lift the motherboard out of the laptop.

Conclusión

To reassemble your device, follow these instructions in reverse order.

Kristen Gismondi

Miembro Desde 11/12/14

82,698 Reputación

202 Guías creadas

Equipo

iFixit Miembro de iFixit

Staff

136 Miembros

17,430 Guías creadas

0 comentarios

Agregar Comentario

Ver Estadísticas:

Ultimas 24 horas: 0

Ultimos 7 días: 2

Ultimos 30 días: 6

Todo El Tiempo: 439