Introducción
Si la pantalla LCD de tu Game Boy Pocket está dañada o simplemente no funciona y necesitas cambiarla, esta guía te ayudará a cambiarla y repararla. No se requieren habilidades especiales para este cambio. Lo único que necesitas es un destornillador Phillips pequeño y una herramienta de apertura de plástico. Es una reparación muy común y sencilla.
Qué necesitas
-
-
Coloca la Game Boy Pocket boca abajo sobre una superficie limpia y plana.
-
Retira las baterías del compartimiento de baterías.
-
Utiliza un destornillador triangular Y1 y gíralo en sentido contrario a las agujas del reloj, para quitar los cuatro tornillos externos.
-
Con el mismo destornillador, y usándolo en el mismo sentido, quita los dos tornillos que hay dentro del compartimento de la batería.
-
-
-
Coloca las manos en las carcasas delantera y trasera de la Game Boy Pocket y sepáralas con cuidado.
-
-
-
Usa un destornillador Phillips n.°1 y gíralo en sentido contrario a las agujas del reloj, para quitar los tres tornillos de la placa base.
-
-
-
-
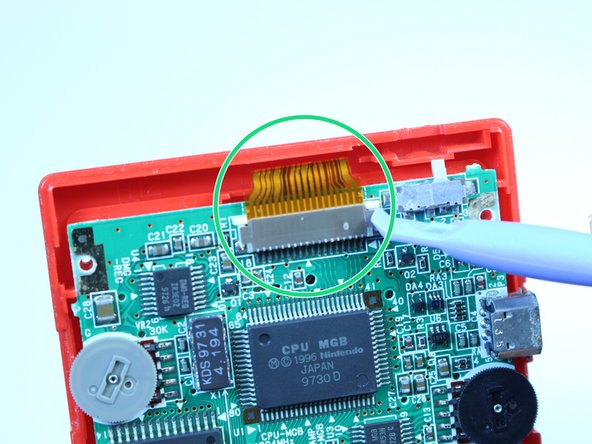
Usa una herramienta plástica de apertura, para desencajar y quitar el clip que sujeta el cable plano.
-
-
-
Usa una herramienta plástica de apertura, para desencajar el cable plano.
-
-
-
Sujeta la pieza negra que sobresale de la placa base y levántala, para retirar la placa base.
-
-
-
Usa una herramienta plástica de apertura, para levantar la pantalla LCD y separarla de la carcasa frontal.
-
Quita la pantalla LCD con los dedos.
-


Para volver a montar tu dispositivo, sigue estas instrucciones en orden inverso.
Para volver a montar tu dispositivo, sigue estas instrucciones en orden inverso.
Cancelar: No complete esta guía.
16 personas más completaron esta guía.
Un agradecimiento especial a estos traductores:
100%

¡ Penny nos está ayudando a reparar el mundo! ¿Quieres contribuir?
Empezar a traducir ›
Equipo

USF Tampa, Team 1-1, Leahy Fall 2014 Miembro de USF Tampa, Team 1-1, Leahy Fall 2014
USFT-LEAHY-F14S1G1
4 Miembros
18 Guías creadas
3 comentarios
please can anyone give me a website that sells replacemtn screens for the Gameboy pocket?
There's no website that sells replacement screens the only way to get one is to order another Gameboy off of eBay and take out the screen
I get mine from Handheld Legend. They have all the Gameboy parts you could ever want.