Introducción
The front bumper of the Ecovacs Deebot 900 is used to sense obstacles in its path. A malfunctioning front bumper can cause the Deebot to move in a circular fashion. Use this guide to remove or replace the front bumper on your Ecovacs 900 Deebot.
Qué necesitas
-
-
-
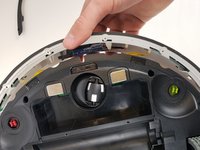
Carefully disconnect the battery cable by pulling near the connector at the bottom of the battery compartment.
I have two issues with these instructions.
Title is Ecovacs Deebot 900 Battery Replacement. The battery was never replaced the device was reassembled.
For battery replacement you need a battery it would be nice to have the replacement battery part number as well.
I’d like some more info on part numbers, too. I have a Deebot 901 with a battery that, already after 2 years, has deteriorated significantly. Deebot 901 is also called “DE5G.10” in Europe, and it’s existing Battery back has model number ZJ1517-HFR, on which I can find almost no info, let a lone a compatible part somewhere in The Netherlands.
eymert -
-
-
-
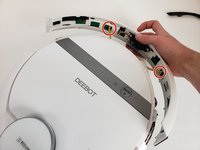
Using a Phillips #00 screwdriver, remove the eight screws on the bottom edge of the bumper.
-


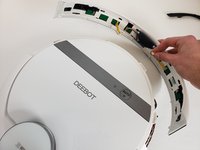
To reassemble your device, follow these instructions in reverse order.
To reassemble your device, follow these instructions in reverse order.
Cancelar: No complete esta guía.
Una persona más ha completado esta guía.

Equipo

Embry-Riddle Aeronautical University, Team S6-G1, Rauch Spring 2020 Miembro de Embry-Riddle Aeronautical University, Team S6-G1, Rauch Spring 2020
ERAU-RAUCH-S20S6G1
Miembros de 3
17 Guías creadas
Un comentario
Where may I buy the front bumper assembly? I'm trying to replace one for a deebot 901 but the mfg tells me they don't see the part directly.