Saltar al contenido principal

Echo Chain Saw CS-590 (2019) Ignition Coil Replacement

Qué necesitas

  1. Echo Chain Saw CS-590 (2019) Ignition Coil Replacement, Turn off the chainsaw: paso 1, imagen 1 de 2 Echo Chain Saw CS-590 (2019) Ignition Coil Replacement, Turn off the chainsaw: paso 1, imagen 2 de 2
    • Make sure you have the ignition switch turned off before starting your repair.

    • The chainsaw should be cool to the touch before continuing.

  2. Echo Chain Saw CS-590 (2019) Ignition Coil Replacement, Loosen the air filter cover: paso 2, imagen 1 de 2 Echo Chain Saw CS-590 (2019) Ignition Coil Replacement, Loosen the air filter cover: paso 2, imagen 2 de 2
    • Use your fingers to loosen the air filter cover knob.

  3. Echo Chain Saw CS-590 (2019) Ignition Coil Replacement: paso 3, imagen 1 de 3 Echo Chain Saw CS-590 (2019) Ignition Coil Replacement: paso 3, imagen 2 de 3 Echo Chain Saw CS-590 (2019) Ignition Coil Replacement: paso 3, imagen 3 de 3
    • Remove the air filter cover.

  4. Echo Chain Saw CS-590 (2019) Ignition Coil Replacement, Disconnect the spark plug: paso 4, imagen 1 de 3 Echo Chain Saw CS-590 (2019) Ignition Coil Replacement, Disconnect the spark plug: paso 4, imagen 2 de 3 Echo Chain Saw CS-590 (2019) Ignition Coil Replacement, Disconnect the spark plug: paso 4, imagen 3 de 3
    • Use your fingers to pull up and disconnect the spark plug boot.

  5. Echo Chain Saw CS-590 (2019) Ignition Coil Replacement, Remove the air filter: paso 5, imagen 1 de 3 Echo Chain Saw CS-590 (2019) Ignition Coil Replacement, Remove the air filter: paso 5, imagen 2 de 3 Echo Chain Saw CS-590 (2019) Ignition Coil Replacement, Remove the air filter: paso 5, imagen 3 de 3
    • To minimize debris entering the intake, pull the choke shut before continuing.

    • Remove the air filter

    • During reassembly, clean the air filter with compressed air or with light brushing before reinstalling it.

  6. Echo Chain Saw CS-590 (2019) Ignition Coil Replacement, Unfasten the front handle: paso 6, imagen 1 de 2 Echo Chain Saw CS-590 (2019) Ignition Coil Replacement, Unfasten the front handle: paso 6, imagen 2 de 2
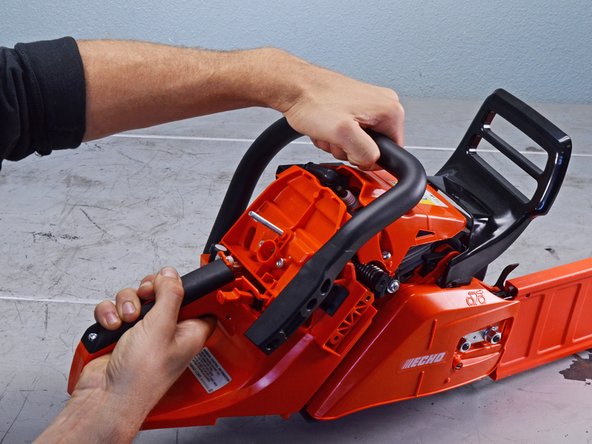
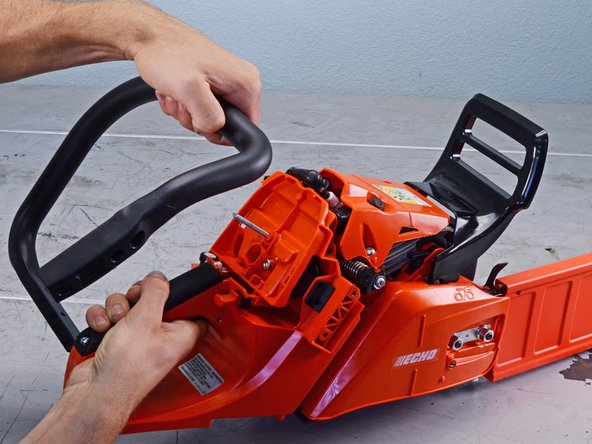
    • Use a T25 Torx screwdriver to remove the five screws securing the front handle to the bottom and right side of the device:

    • Four 24 mm-long screws

    • One 25 mm-long screw

  7. Echo Chain Saw CS-590 (2019) Ignition Coil Replacement, Remove the front handle: paso 7, imagen 1 de 3 Echo Chain Saw CS-590 (2019) Ignition Coil Replacement, Remove the front handle: paso 7, imagen 2 de 3 Echo Chain Saw CS-590 (2019) Ignition Coil Replacement, Remove the front handle: paso 7, imagen 3 de 3
    • Pull the handle toward the rear of the device to remove it.

  8. Echo Chain Saw CS-590 (2019) Ignition Coil Replacement, Remove the sprocket guard: paso 8, imagen 1 de 2 Echo Chain Saw CS-590 (2019) Ignition Coil Replacement, Remove the sprocket guard: paso 8, imagen 2 de 2
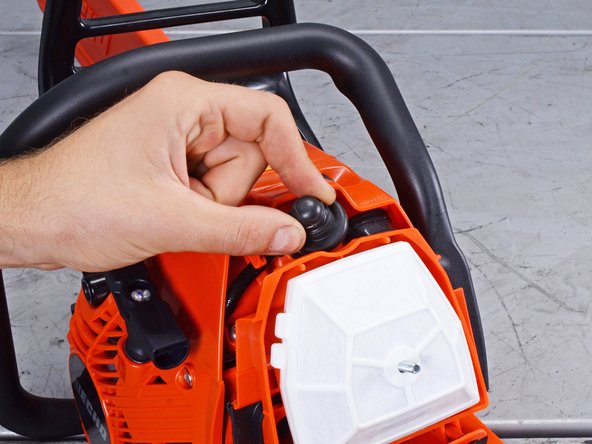
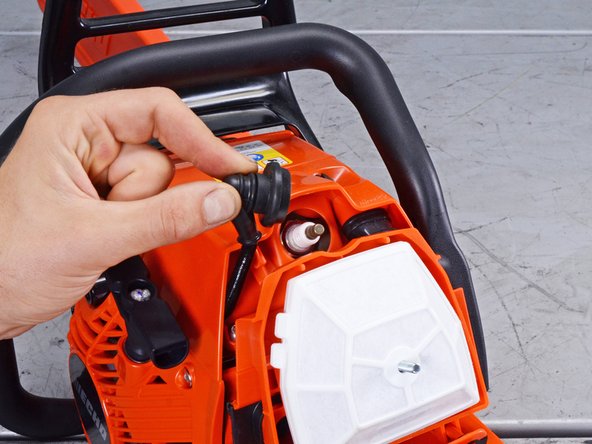
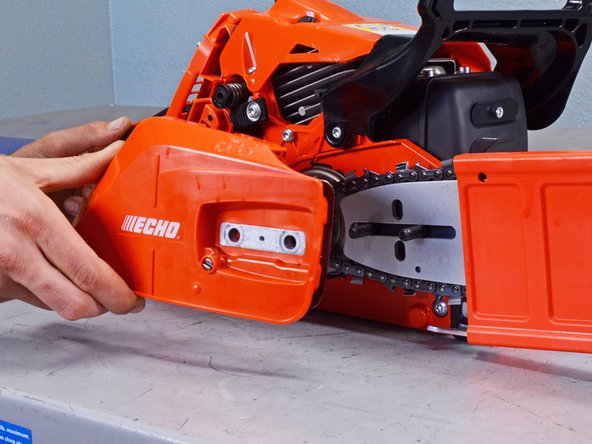
    • Use a 13 mm wrench to remove the two nuts securing the sprocket guard.

  9. Echo Chain Saw CS-590 (2019) Ignition Coil Replacement: paso 9, imagen 1 de 3 Echo Chain Saw CS-590 (2019) Ignition Coil Replacement: paso 9, imagen 2 de 3 Echo Chain Saw CS-590 (2019) Ignition Coil Replacement: paso 9, imagen 3 de 3
    • Remove the sprocket guard.

  10. Echo Chain Saw CS-590 (2019) Ignition Coil Replacement, Remove the guide bar: paso 10, imagen 1 de 3 Echo Chain Saw CS-590 (2019) Ignition Coil Replacement, Remove the guide bar: paso 10, imagen 2 de 3 Echo Chain Saw CS-590 (2019) Ignition Coil Replacement, Remove the guide bar: paso 10, imagen 3 de 3
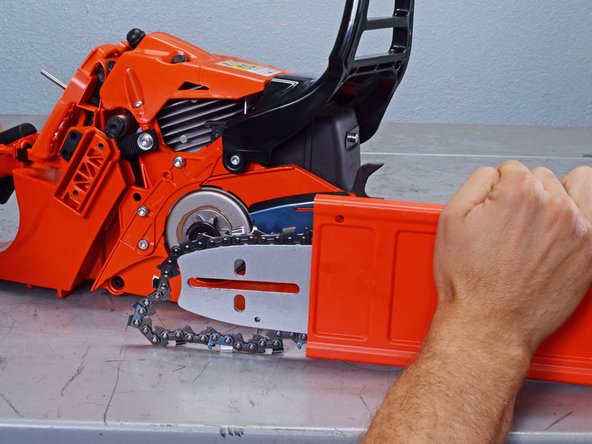
    • Push the guide bar towards the back of the device to create slack in the saw chain.

    • Pull the guide bar away from the device to separate the saw chain from the clutch drum.

    • Remove the guide bar.

  11. Echo Chain Saw CS-590 (2019) Ignition Coil Replacement, Unfasten the front hand guard: paso 11, imagen 1 de 2 Echo Chain Saw CS-590 (2019) Ignition Coil Replacement, Unfasten the front hand guard: paso 11, imagen 2 de 2
    • Make sure the front hand guard is in the unlocked position before continuing.

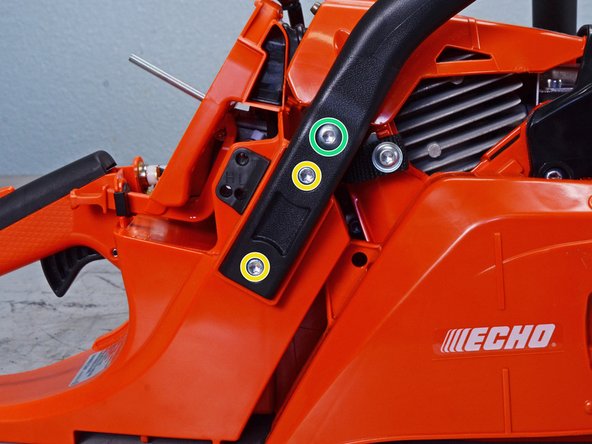
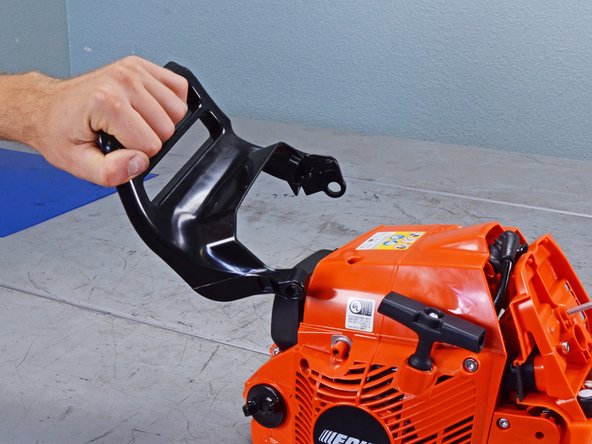
    • Use a T25 Torx screwdriver to remove the two 20 mm screws securing the front hand guard.

  12. Echo Chain Saw CS-590 (2019) Ignition Coil Replacement, Remove the front hand guard: paso 12, imagen 1 de 2 Echo Chain Saw CS-590 (2019) Ignition Coil Replacement, Remove the front hand guard: paso 12, imagen 2 de 2
    • Pull the front hand guard toward the rear of the device to remove it.

  13. Echo Chain Saw CS-590 (2019) Ignition Coil Replacement, Unfasten the engine cover: paso 13, imagen 1 de 2 Echo Chain Saw CS-590 (2019) Ignition Coil Replacement, Unfasten the engine cover: paso 13, imagen 2 de 2
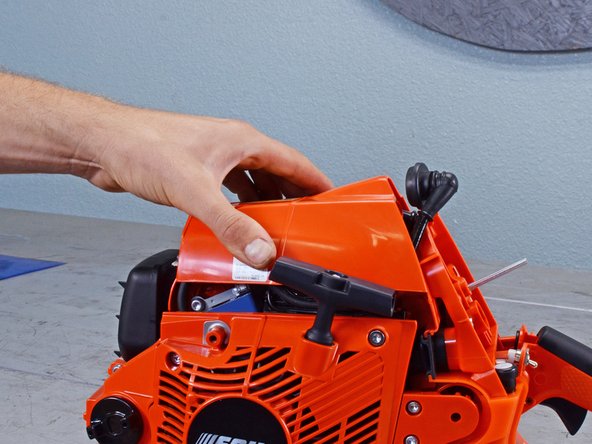
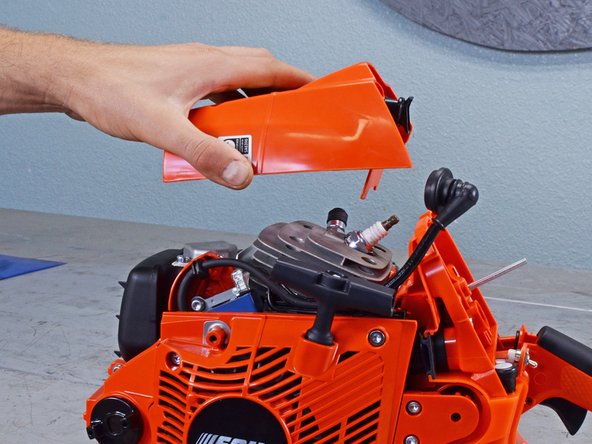
    • Use a T25 Torx screwdriver to remove the three 20 mm screws securing the engine cover.

  14. Echo Chain Saw CS-590 (2019) Ignition Coil Replacement, Remove the engine cover: paso 14, imagen 1 de 3 Echo Chain Saw CS-590 (2019) Ignition Coil Replacement, Remove the engine cover: paso 14, imagen 2 de 3 Echo Chain Saw CS-590 (2019) Ignition Coil Replacement, Remove the engine cover: paso 14, imagen 3 de 3
    • Pull the engine cover straight off the device to remove it.

  15. Echo Chain Saw CS-590 (2019) Ignition Coil Replacement, Unfasten the starter case: paso 15, imagen 1 de 2 Echo Chain Saw CS-590 (2019) Ignition Coil Replacement, Unfasten the starter case: paso 15, imagen 2 de 2
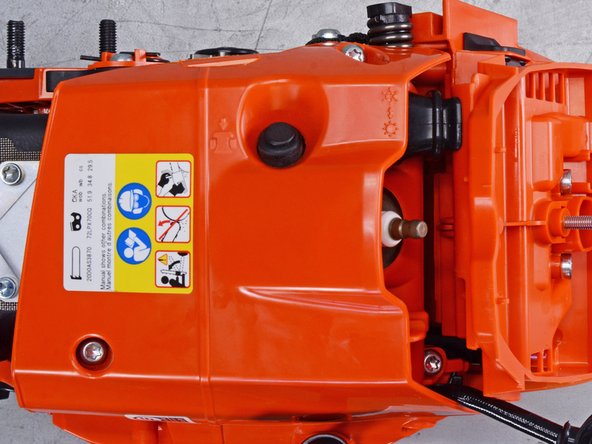
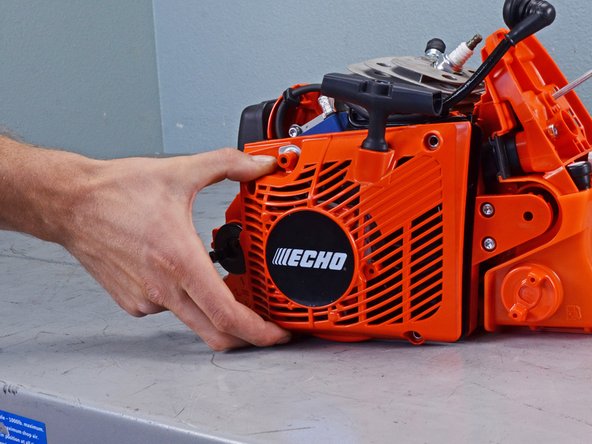
    • Use a T25 Torx screwdriver to remove the four 24 mm screws securing the starter case.

  16. Echo Chain Saw CS-590 (2019) Ignition Coil Replacement: paso 16, imagen 1 de 3 Echo Chain Saw CS-590 (2019) Ignition Coil Replacement: paso 16, imagen 2 de 3 Echo Chain Saw CS-590 (2019) Ignition Coil Replacement: paso 16, imagen 3 de 3
    • Remove the starter case.

  17. Echo Chain Saw CS-590 (2019) Ignition Coil Replacement, Reposition the spark plug cable: paso 17, imagen 1 de 3 Echo Chain Saw CS-590 (2019) Ignition Coil Replacement, Reposition the spark plug cable: paso 17, imagen 2 de 3 Echo Chain Saw CS-590 (2019) Ignition Coil Replacement, Reposition the spark plug cable: paso 17, imagen 3 de 3
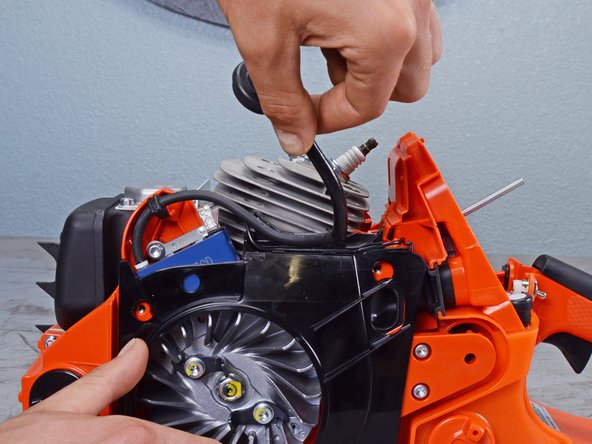
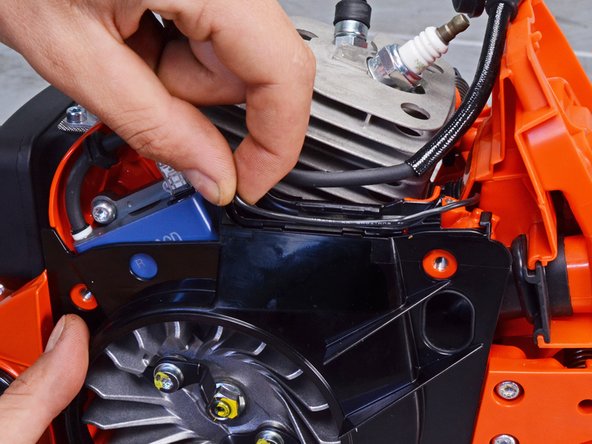
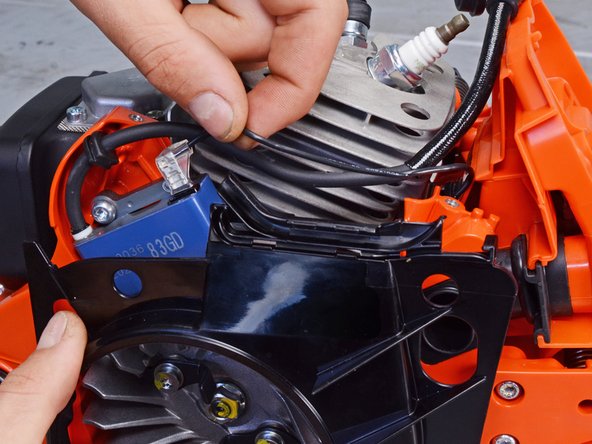
    • Use your fingers to reroute the spark plug cable from its slot in the fan cover.

  18. Echo Chain Saw CS-590 (2019) Ignition Coil Replacement, Reposition the ignition coil cable: paso 18, imagen 1 de 3 Echo Chain Saw CS-590 (2019) Ignition Coil Replacement, Reposition the ignition coil cable: paso 18, imagen 2 de 3 Echo Chain Saw CS-590 (2019) Ignition Coil Replacement, Reposition the ignition coil cable: paso 18, imagen 3 de 3
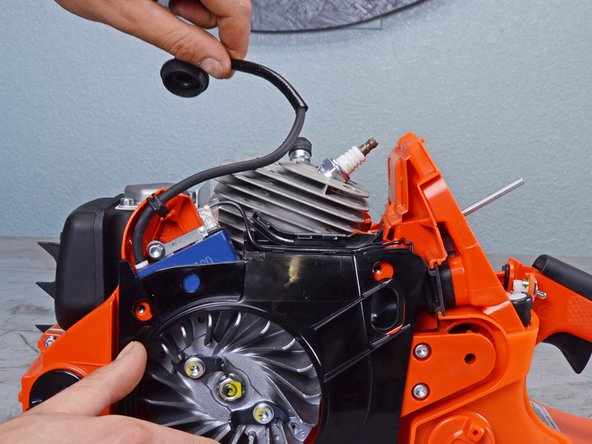
    • Use your fingers to reroute the ignition coil cable from its slot in the fan cover.

  19. Echo Chain Saw CS-590 (2019) Ignition Coil Replacement, Disconnect the ignition coil: paso 19, imagen 1 de 2 Echo Chain Saw CS-590 (2019) Ignition Coil Replacement, Disconnect the ignition coil: paso 19, imagen 2 de 2
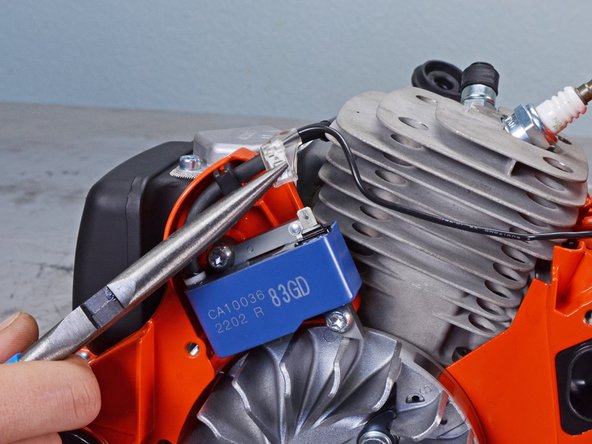
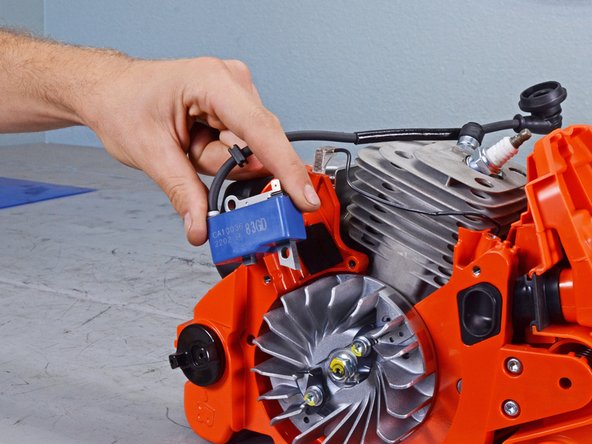
    • Use pliers, or your fingers, to disconnect the ignition coil cable's spade connector.

    • Grip the connector by the base of the clear head and not the wire itself.

  20. Echo Chain Saw CS-590 (2019) Ignition Coil Replacement, Unfasten the ignition coil: paso 20, imagen 1 de 2 Echo Chain Saw CS-590 (2019) Ignition Coil Replacement, Unfasten the ignition coil: paso 20, imagen 2 de 2
    • Use a T25 Torx screwdriver to remove the two 20 mm screws securing the ignition coil.

    • During reassembly, insert the ignition air gap gauge to ensure a 0.35 mm space between the coil and the magnet.

  21. Echo Chain Saw CS-590 (2019) Ignition Coil Replacement, Remove the ignition coil: paso 21, imagen 1 de 2 Echo Chain Saw CS-590 (2019) Ignition Coil Replacement, Remove the ignition coil: paso 21, imagen 2 de 2
    • Remove the ignition coil.

Conclusión

To reassemble your device, follow these instructions in reverse order.

5 personas más completaron esta guía.

Alex Diaz-Kokaisl

Miembro Desde 01/16/22

127,879 Reputación

592 Guías creadas

Equipo

iFixit Miembro de iFixit

Staff

141 Miembros

17,908 Guías creadas

2 comentarios

Useless. This shows nothing about having to put the sparkplug connection onto the coil which was sent WITHOUT

that connector.

KEVIN - Contestar

Most of them have a self-tapping screw in the rubber cap and you just screw it onto the wire.

Truman Fancher -

Agregar Comentario

Ver Estadísticas:

Ultimas 24 horas: 7

Ultimos 7 días: 42

Ultimos 30 días: 125

Todo El Tiempo: 1,350