Esta traducción podría no reflejar los cambios más recientes añadidos a la guía de referencia. Ayúdanos a actualizar la traducción o revisa la guía original.
Qué necesitas
-
Este paso está sin traducir. Ayuda a traducirlo
-
Remove the other 6 screws.
-
Remove the hard disk and the RAM slots.
-
-
Este paso está sin traducir. Ayuda a traducirlo
-
Ensure that the hard disk has been removed. Carefully detach the bottom cover.
-
-
Este paso está sin traducir. Ayuda a traducirlo
-
Once the bottom cover is removed, your device should look like this.
-
-
Este paso está sin traducir. Ayuda a traducirlo
-
Remove the 4 screws to detach the battery.
-
Remove all of the sticky tape.
-
Carefully disconnect the small power connector by using a tool to push the connector out through the small gap in the middle of the connector.
-
-
-
Este paso está sin traducir. Ayuda a traducirlo
-
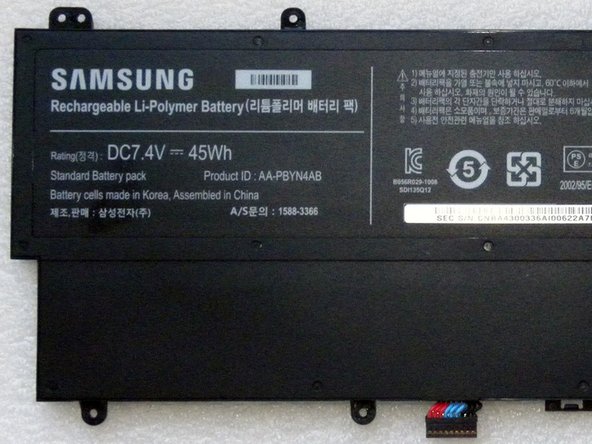
This is the Samsung 7.4V 45Wh battery.
-
Ensure that the battery is removed before continuing.
-
-
Este paso está sin traducir. Ayuda a traducirlo
-
When the battery is removed, this is how it will look.
-
-
Este paso está sin traducir. Ayuda a traducirlo
-
Remove the processor fan.
-
There are 2 screws holding it in place. Loosen and remove them.
-
-
Este paso está sin traducir. Ayuda a traducirlo
-
Remove the processor heat sink.
-
3 screws hold this part in place. Loosen and remove them.
-
-
Este paso está sin traducir. Ayuda a traducirlo
-
Disconnect the antenna cables from the WiFi card.
-
Remove the screw.
-
-
Este paso está sin traducir. Ayuda a traducirlo
-
Remove the screw.
-
Lift the latch upwards to loosen the cable.
-
-
Este paso está sin traducir. Ayuda a traducirlo
-
This is the Motherboard - there is a front and rear view.
-


Cancelar: No complete esta guía.
34 personas más completaron esta guía.
Un agradecimiento especial a estos traductores:
5%
¡ Jose nos está ayudando a reparar el mundo! ¿Quieres contribuir?
Empezar a traducir ›

30 comentarios
Hello,
Do you know where can i reset the Bios CMOS in that motherboard?
I think there are people who wants to know becose system upgrade is leading to bios ACPI Error.
Thanks for your help
No, I do not know where is a reset pin of BIOS.
Try to disconnect NVRAM battery.
Wait 15 minutes and reconnect again.