Esta versión puede contener ediciones incorrectas. Cambie a la última instantánea verificada.
Qué necesitas
-
Este paso está sin traducir. Ayuda a traducirlo
-
Begin by un-clipping the motor housing cover.
-
There are a total of fourteen clips. Five on each of the long side, and two on top and bottom of the housing.
-
The plastic of the housing and lid is very durable, however the thin plastic where the clips enter is an exception. The odds are that you will crack some of these areas as you remove the lid. Do not fret, as the lid will stay closed even with just a few of the clips. The fact that there are fourteen speaks to the over-engineering at Mercedes Benz.
-
-
Este paso está sin traducir. Ayuda a traducirlo
-
As the clips come lose use a metal spudger to separate the cover from the body of the housing.
-
It will eventually lift off and can be set aside.
-
-
Este paso está sin traducir. Ayuda a traducirlo
-
Make note of the rubber seal that goes around the body of the motor in a channel, sealing the cover to the body. If this seal is old a dry rotted it will need to be replaced, or a proper liquid sealant will need to be used in its place, if the motor is being re-used.
-
-
Este paso está sin traducir. Ayuda a traducirlo
-
The basic internal components of the motor are as follows:
-
Control board
-
Electric motor
-
Plastic drive gears
-
Antenna shaft
-
To operate the antenna up and down, the electric motor turns in the appropriate direction which turns the worm gear. The worm gear tuns the upper plastic drive gear. That spins the lower plastic gear which then moves the ribbed plastic cable inside the cable housing below the gears, all of which you will see later.
-
-
Este paso está sin traducir. Ayuda a traducirlo
-
You can see the accumulation of dirt and debris on these gears. If the antenna shaft had not seized it would only have been a matter of time before the gears wore or broke.
-
-
Este paso está sin traducir. Ayuda a traducirlo
-
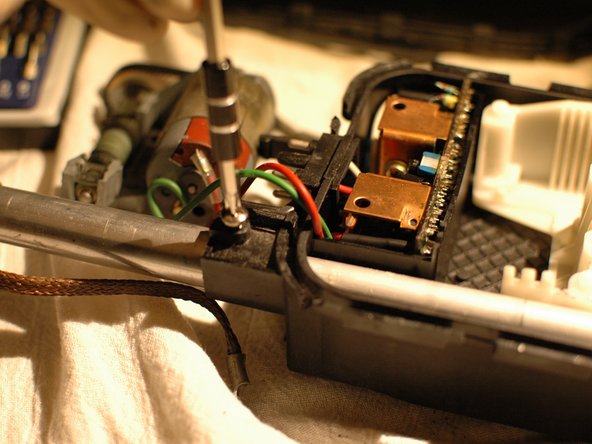
Continue disassembly by unscrewing the two Phillips screws holding the electric motor in place.
-
-
Este paso está sin traducir. Ayuda a traducirlo
-
Remove the two rubber buffers that keep the case cover separated properly from the motors and gears.
-
-
-
Este paso está sin traducir. Ayuda a traducirlo
-
Use a metal spudger or flat blade screwdriver to remove the c-clip holding the gears to the bushing and shaft.
-
-
Este paso está sin traducir. Ayuda a traducirlo
-
Use a metal spudger to gently begin lifting the gears from the shaft.
-
-
Este paso está sin traducir. Ayuda a traducirlo
-
As the gears begin to lift, the electric motor will likely pop loose. It can be rested off to the side; it is wired to the control board so it cannot be removed fully at this time.
-
-
Este paso está sin traducir. Ayuda a traducirlo
-
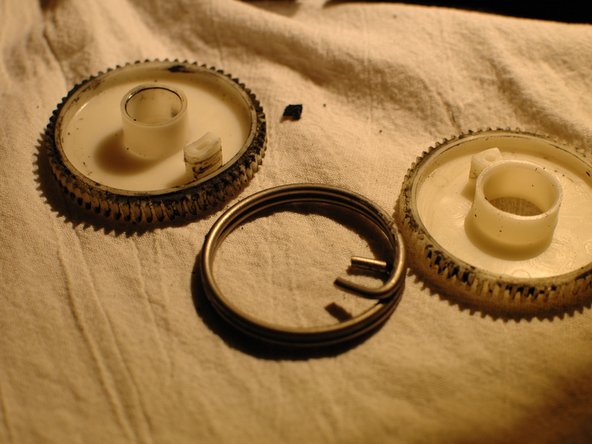
Continue lifting the gears out of their housing until they are free.
-
As you can see, there are actually two gears in the housing.
-
-
Este paso está sin traducir. Ayuda a traducirlo
-
The gears can be separated by simply pulling them apart with your hands.
-
Make note of which gear is the upper gear, and of the alignment of the gears and the spring together.
-
-
Este paso está sin traducir. Ayuda a traducirlo
-
Lift the metal gear bushing up and off of the housing and set it aside.
-
-
Este paso está sin traducir. Ayuda a traducirlo
-
Unscrew the Phillips head screw that helps hold the antenna shaft to the body.
-
-
Este paso está sin traducir. Ayuda a traducirlo
-
Remove the outer sleeve on the shaft from the body by rotating it counter-clockwise.
-
Once loose from the body it can be pulled up the antenna shaft and out of the way.
-
-
Este paso está sin traducir. Ayuda a traducirlo
-
Pull the ribbed plastic cable connected to the antenna shaft out of the body of the motor.
-
-
Este paso está sin traducir. Ayuda a traducirlo
-
Now you can remove the gear and cable housing. It seems to work best to rotate the housing up and in the direction of the antenna shaft opening before angling it up and pulling it out of the motor body.
-
-
Este paso está sin traducir. Ayuda a traducirlo
-
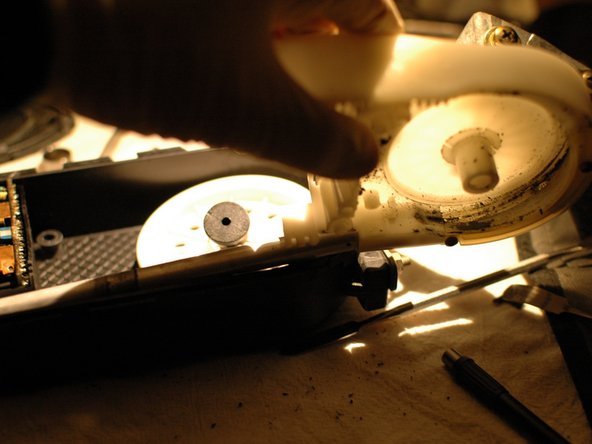
This leaves the lower cable retainer in place.
-
Lift it up and out.
-
Note the thin metal washer at the center of this.
-
-
Este paso está sin traducir. Ayuda a traducirlo
-
Remove the three rubber buffers.
-
Remove the gear shaft.
-
-
Este paso está sin traducir. Ayuda a traducirlo
-
You now have an empty motor housing, besides the control board.
-
This disassembly does not cover the electric motor as everything is in plain sight.
-
Worm gear
-
Motor
-
Small belt driven pulleys for worm gear
-


Cancelar: No complete esta guía.
11 personas más completaron esta guía.

Equipo

8 comentarios
Great guide, I would that this antenna fix also applies to the W201 (1984 190e) model as well. Also, if the small gear is worn (like mine was) it can be fixed by removing the old gear with a Dremel tool and using a #14 gear which can be found at Hobby Shop specializing in Radio controlled cars and planes.
Great disassembly guide but when I get the cover off I find the rubber drive belt is missing. Where can I get this part to replace? The Badger
great disassembly guide for the mechanism but when the cover is off I find the rubber drive belt missing! Where can I get this part....assuming the motor still works and nothing else is wrong. The badger
The teeth on a small gear are broken off - everything else works fine - Where can I buy replacement gears ?
Charles, there are a number of websites that sell plastic gears in a wide variety of shapes and sizes. You can start by measuring the diameter of the gear, the diameter of the center opening, and counting the number of gear teeth. This will help you find one. If you cannot find a gear available online that matches, there are also some sites that will make you a new gear if you send them the old one as a sample. Google will help you find these options. Good luck.